Once I got started with the paper mache, I couldn’t quite stop myself. I came up with a technique for the big decor balls that worked really great – Mixing the paint right into the glue. It gives a super saturated color and saves another messy step and more drying time. So I had to keep going with this other idea I had.
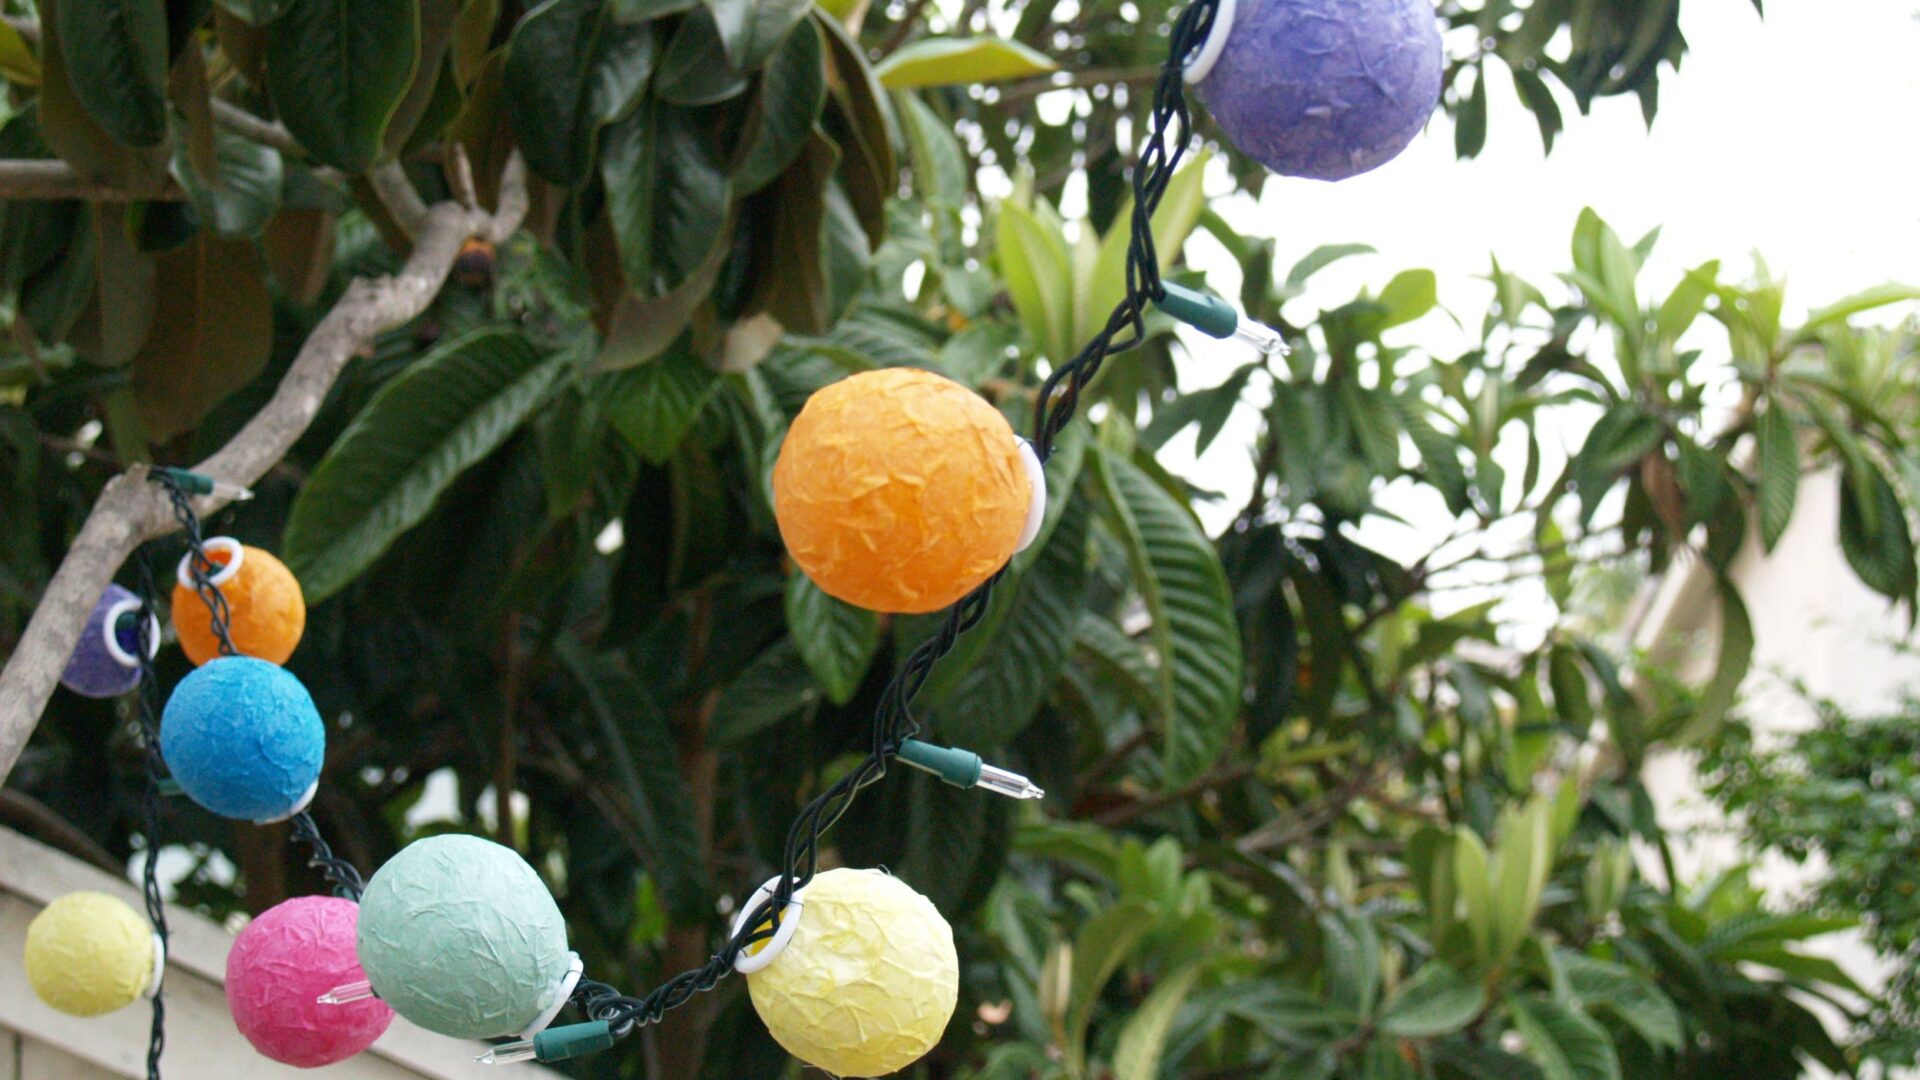
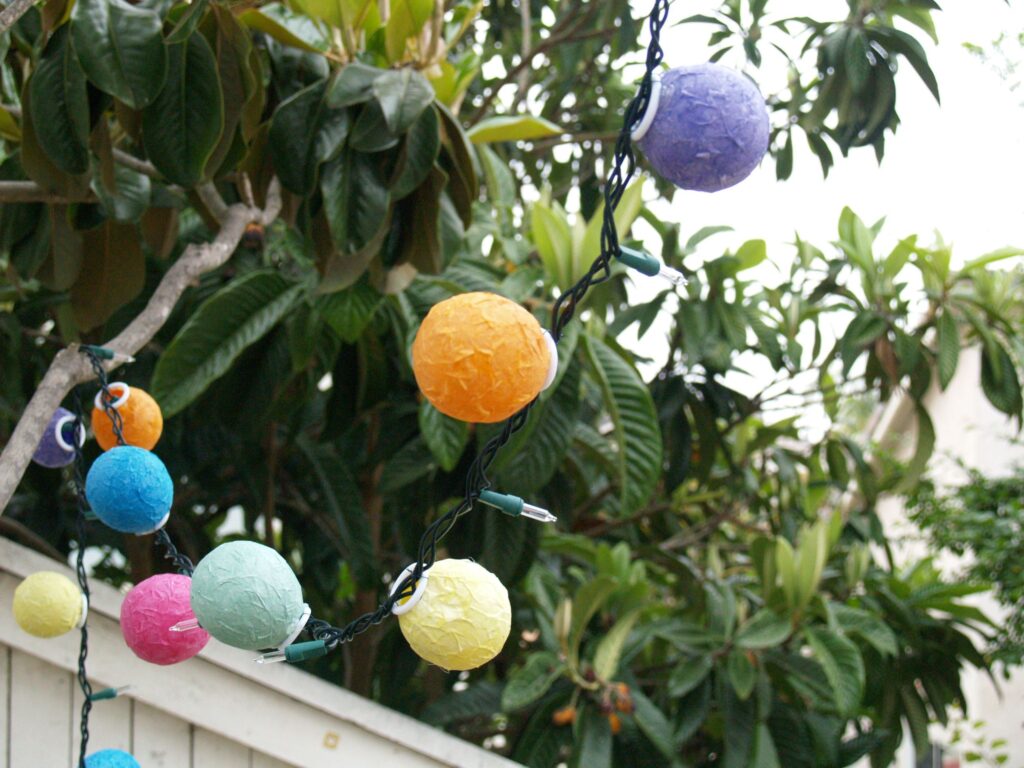
Those party lights you see at the store are so expensive for what you get. 30 little lights for $25 doesn’t go very far before adding up to a whole lot of money for a festive atmosphere. These party lights are removable, so you can use an existing string of Christmas lights and then just take them off when it’s time to use on the tree. If I did the math I’d guess that for a string of 30 lights, I spent about $3.
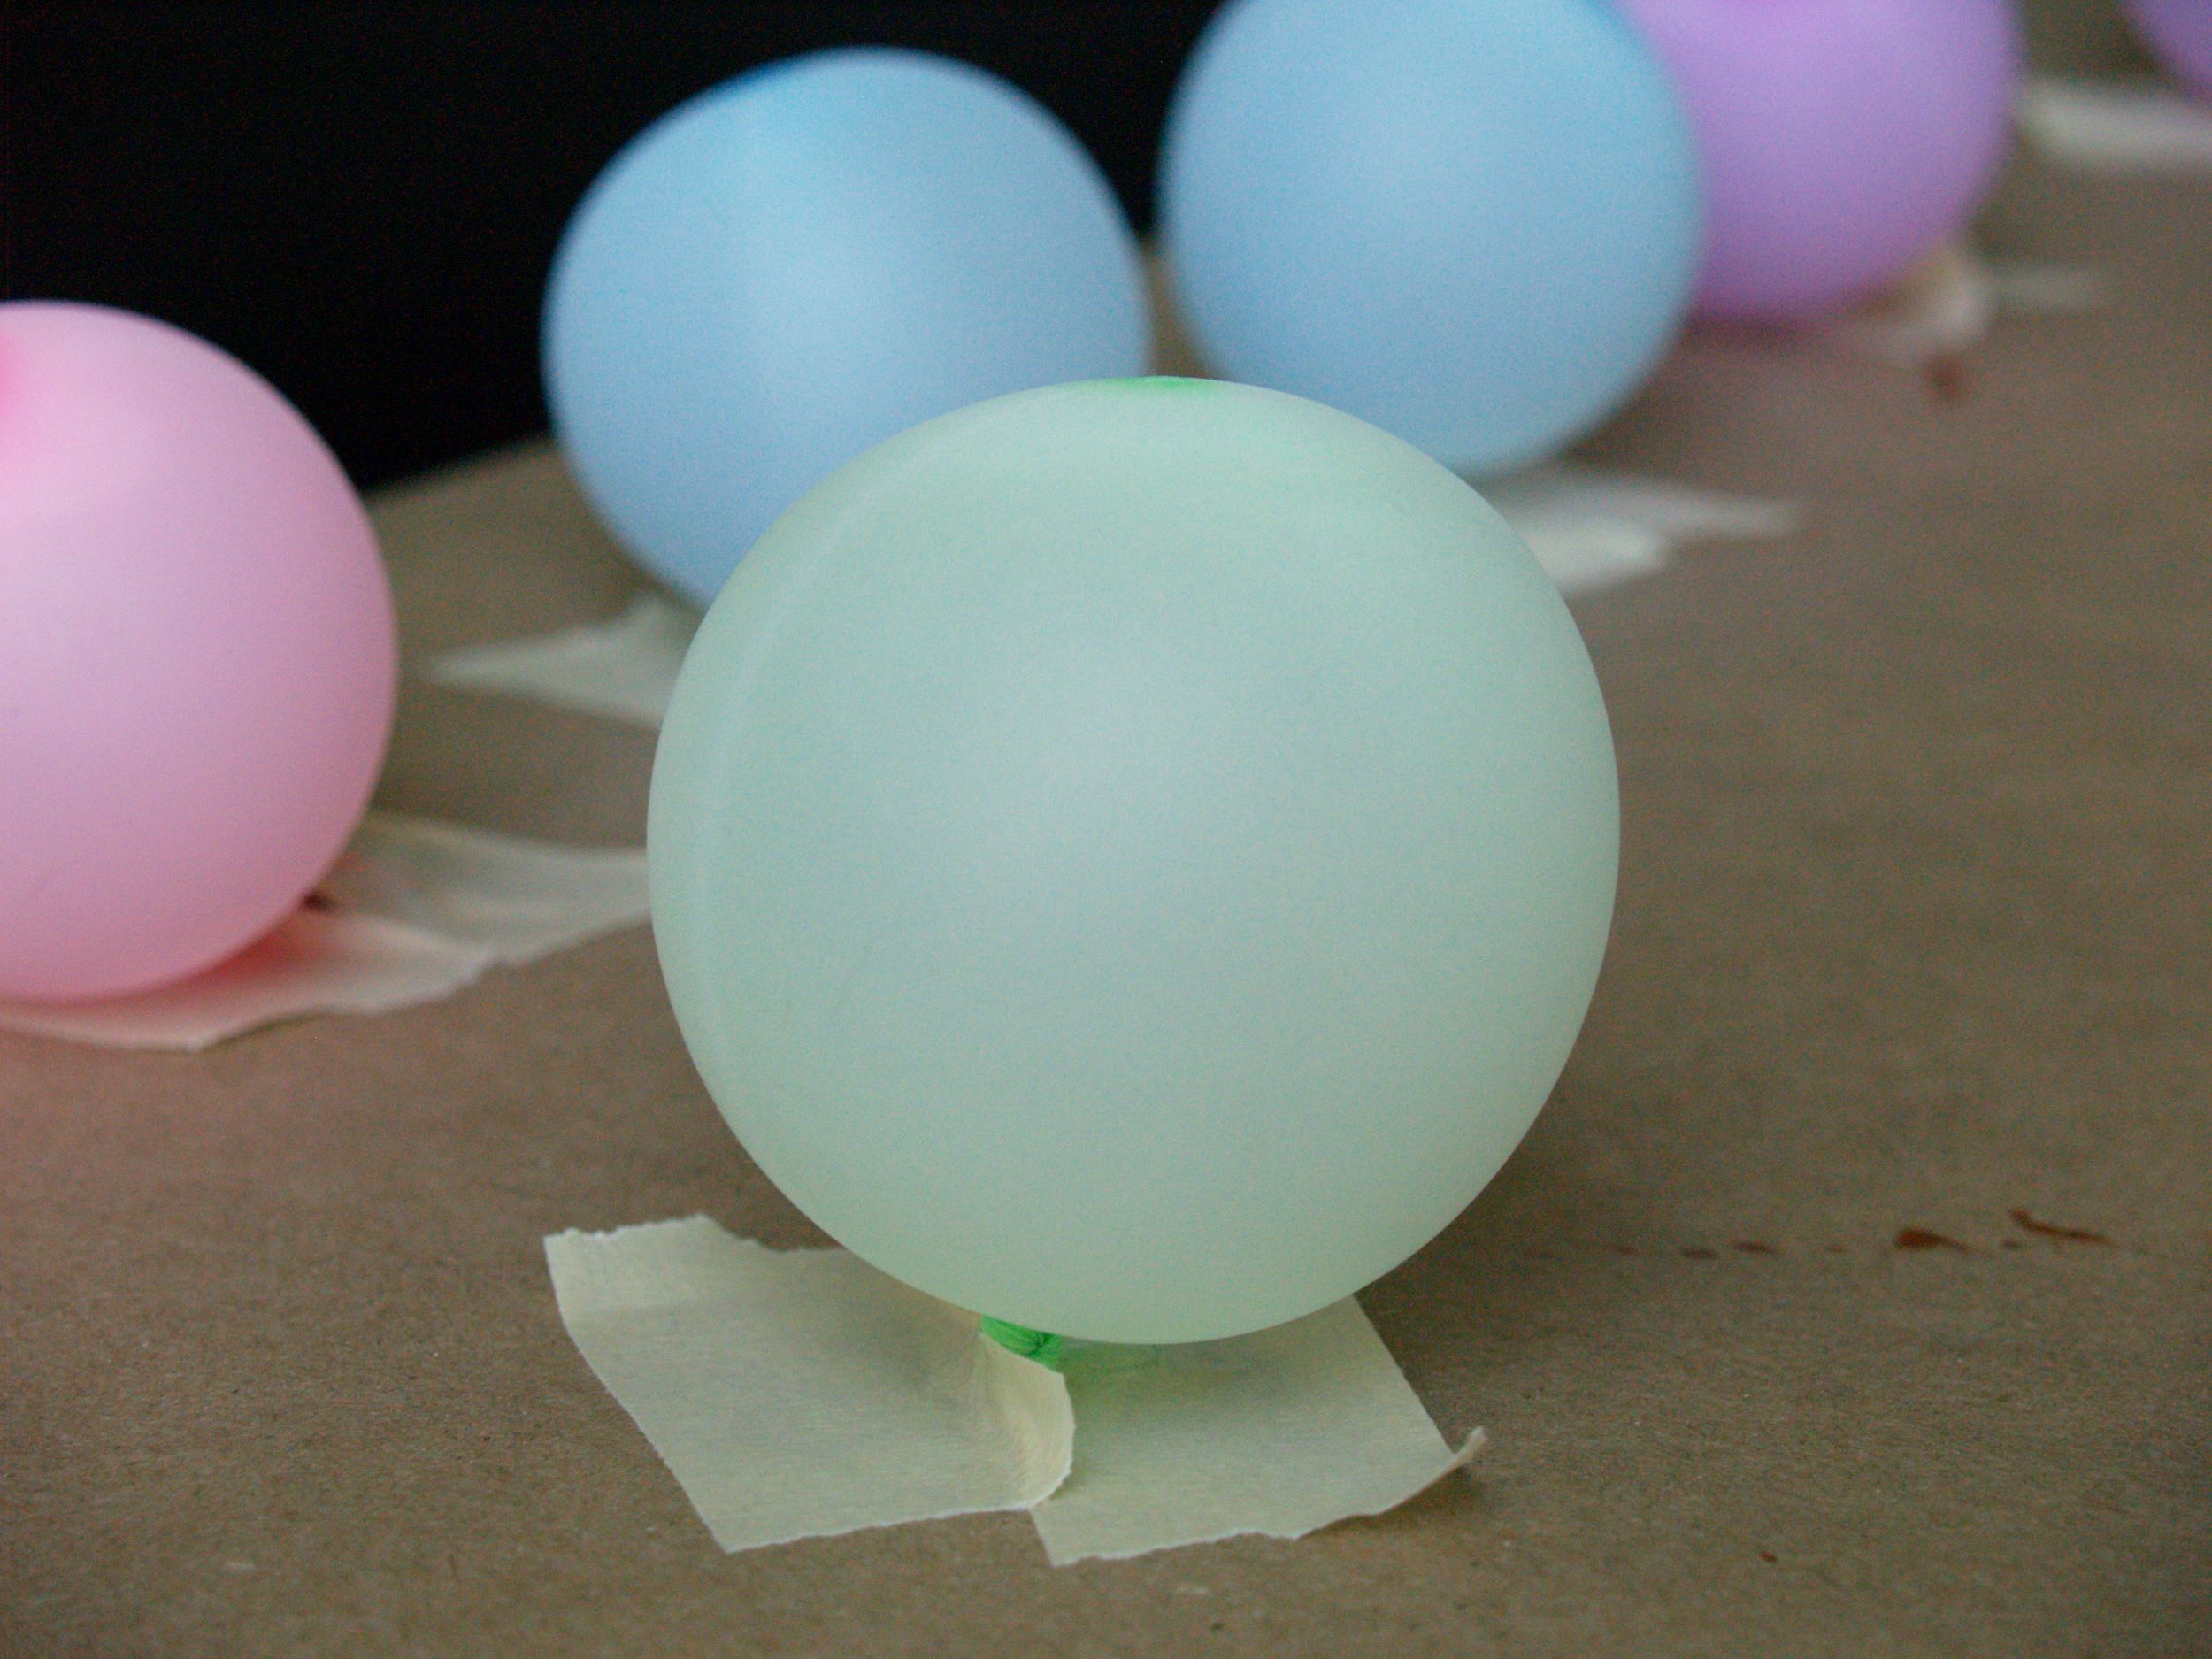
Start with some water balloons, blown up just big enough to be round. I used two pieces of masking tape to prop it up – one secures the tail to the table, the other pushes against that little knot to keep the balloon from touching the table. Make sure you tie your knots are good and tight, these little balloons leak pretty easily and you want to make sure that you get all your layers on and dry before these balloons start shrinking. Working in small batches makes this a lot easier.
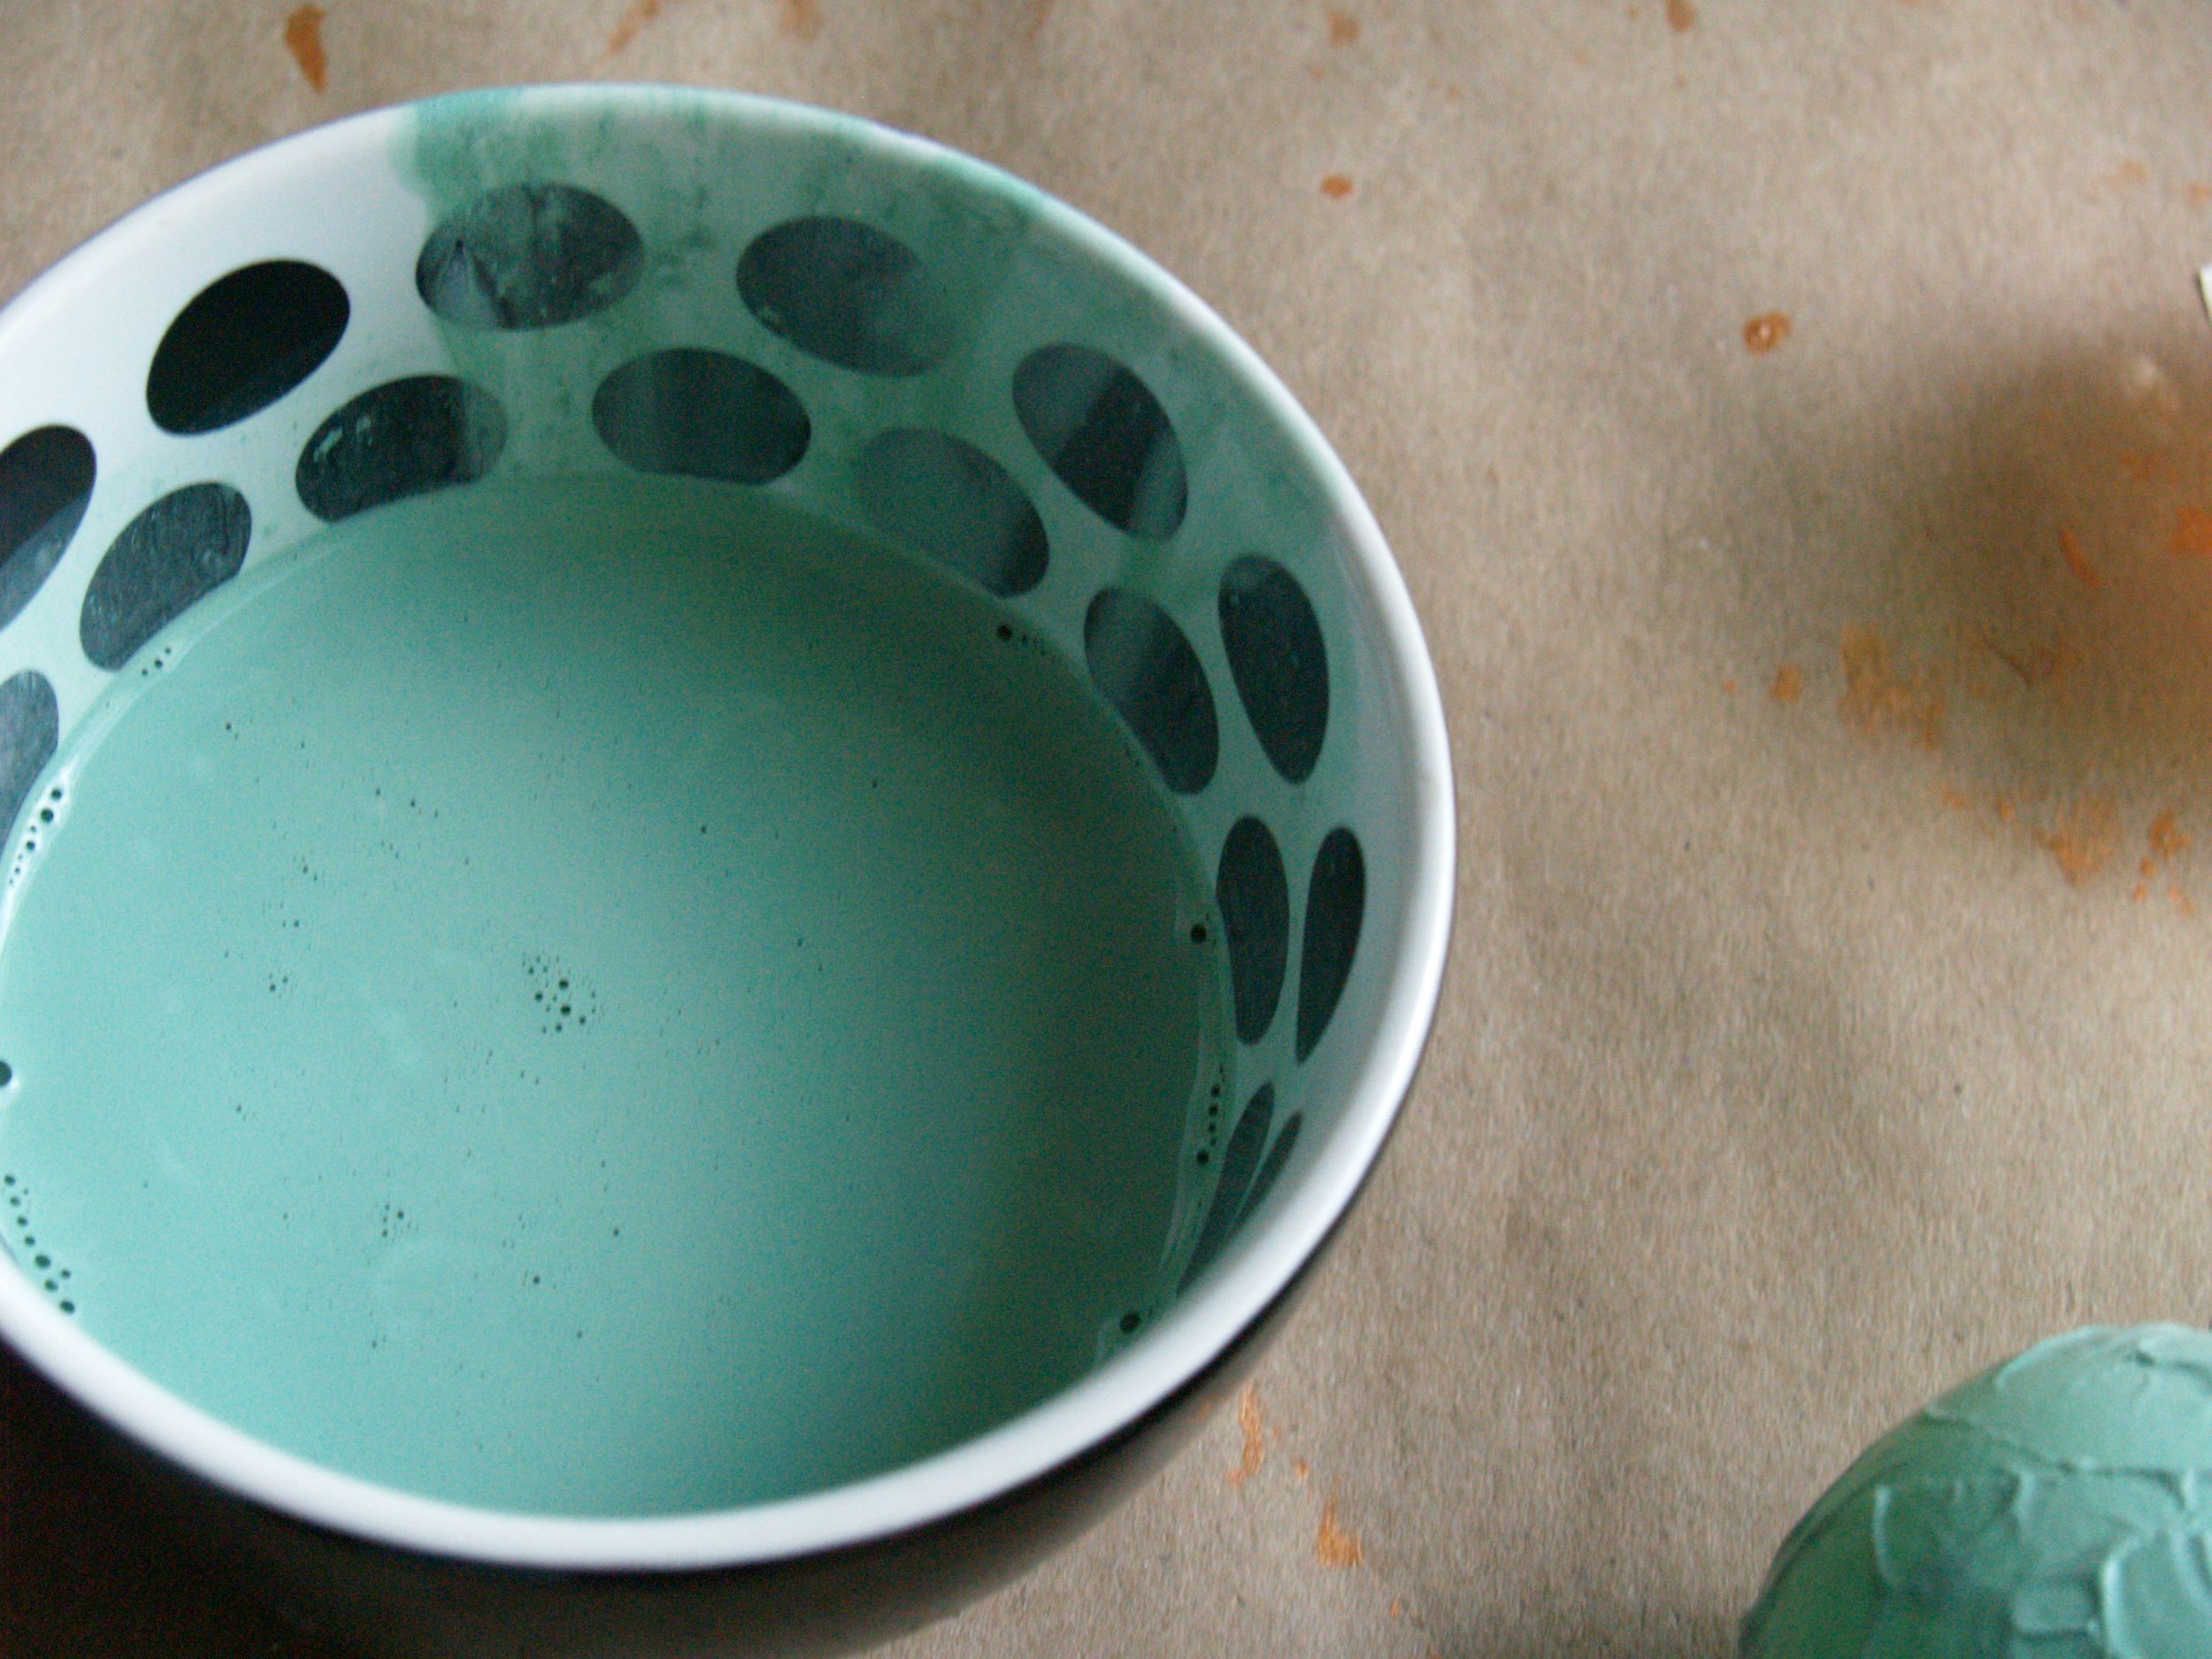
Mix up your glue. It should be about 1 part paint, 2 parts glue, and 3 parts water. But that is no where near scientific. Just water your glue down so that it’s easy to paint with, and then add enough acrylic craft paint to get it the colors you want.
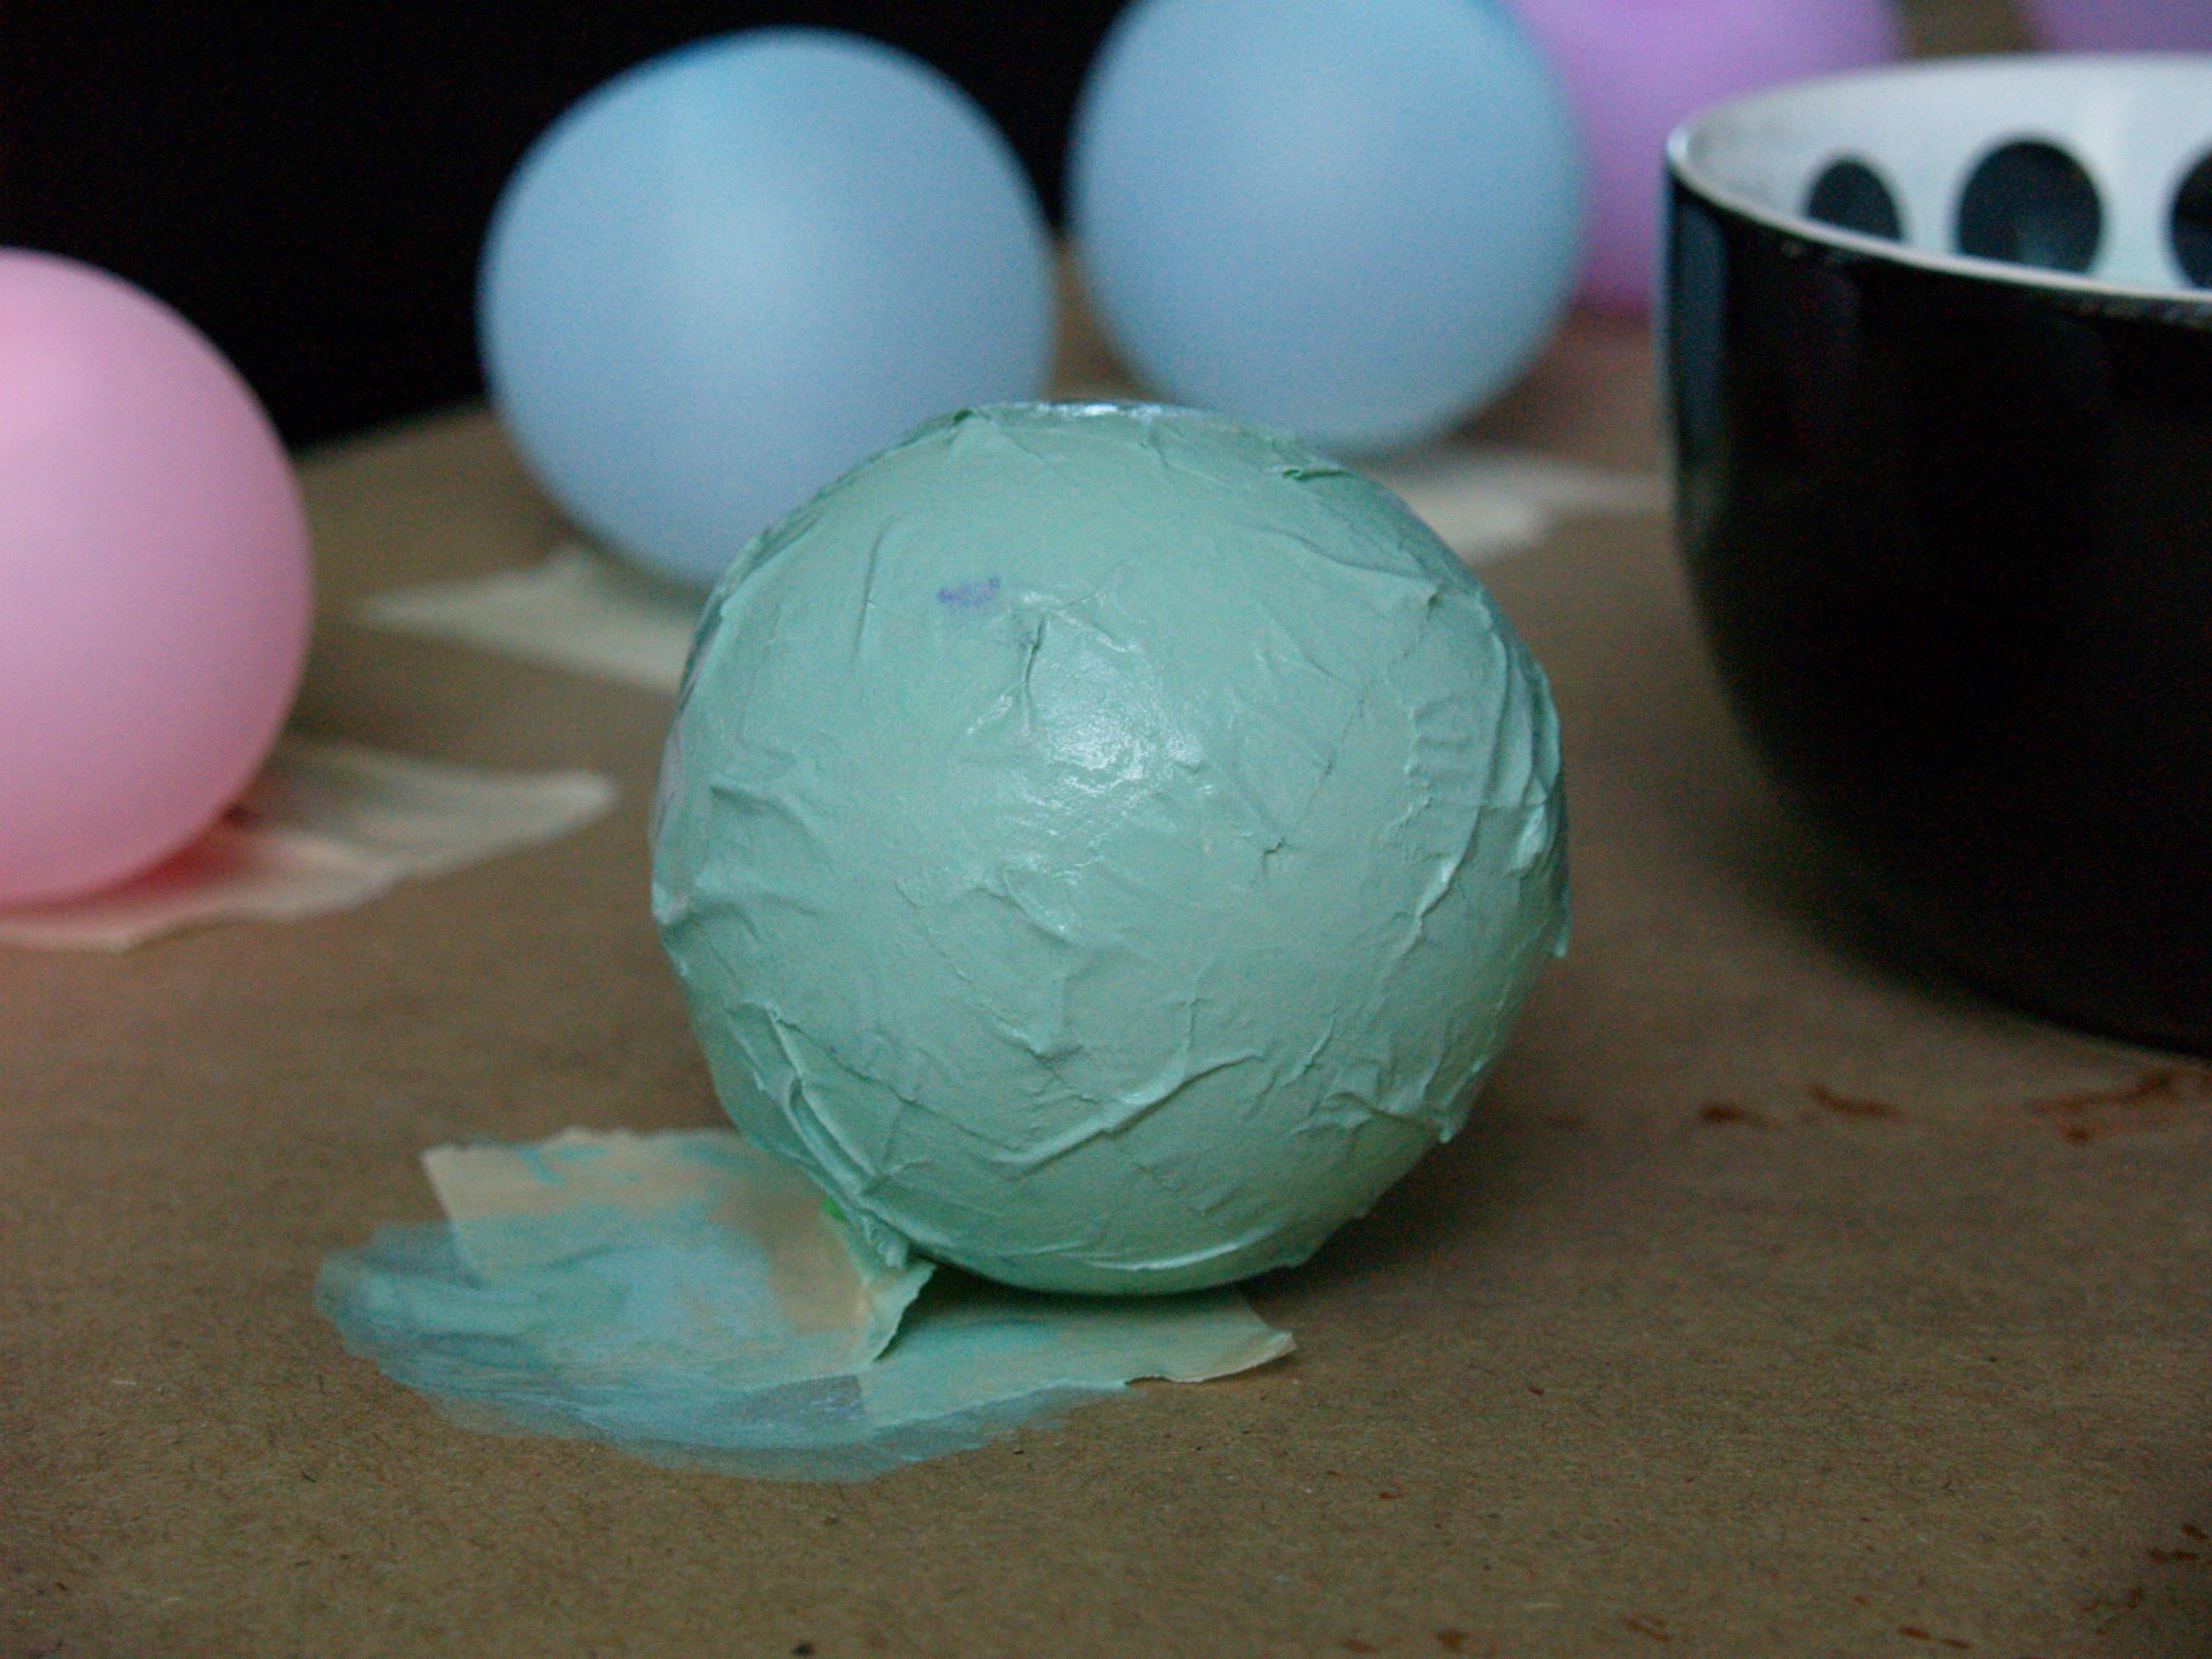
Add the paper mache. You want to use white tissue paper for this so that the light will still shine through after you add all your layers. Tear it into small little bits. The smaller the bits, the fewer wrinkles you’ll get, but it will also be a whole lot harder. So choose your poison.
After a little experimentation, I think that three layers is just right for this project. Let them dry a while between layers, but not overnight until they’re all on. You will be fighting the clock against the strength of your balloons, so you’ll need to get all three layers on in one day. A blow dryer on the cool setting works great in a pinch.

Once all your layers are on, let it dry overnight. In the morning, pop and remove the balloon, then cut a nice smooth hole just under an inch in diameter.
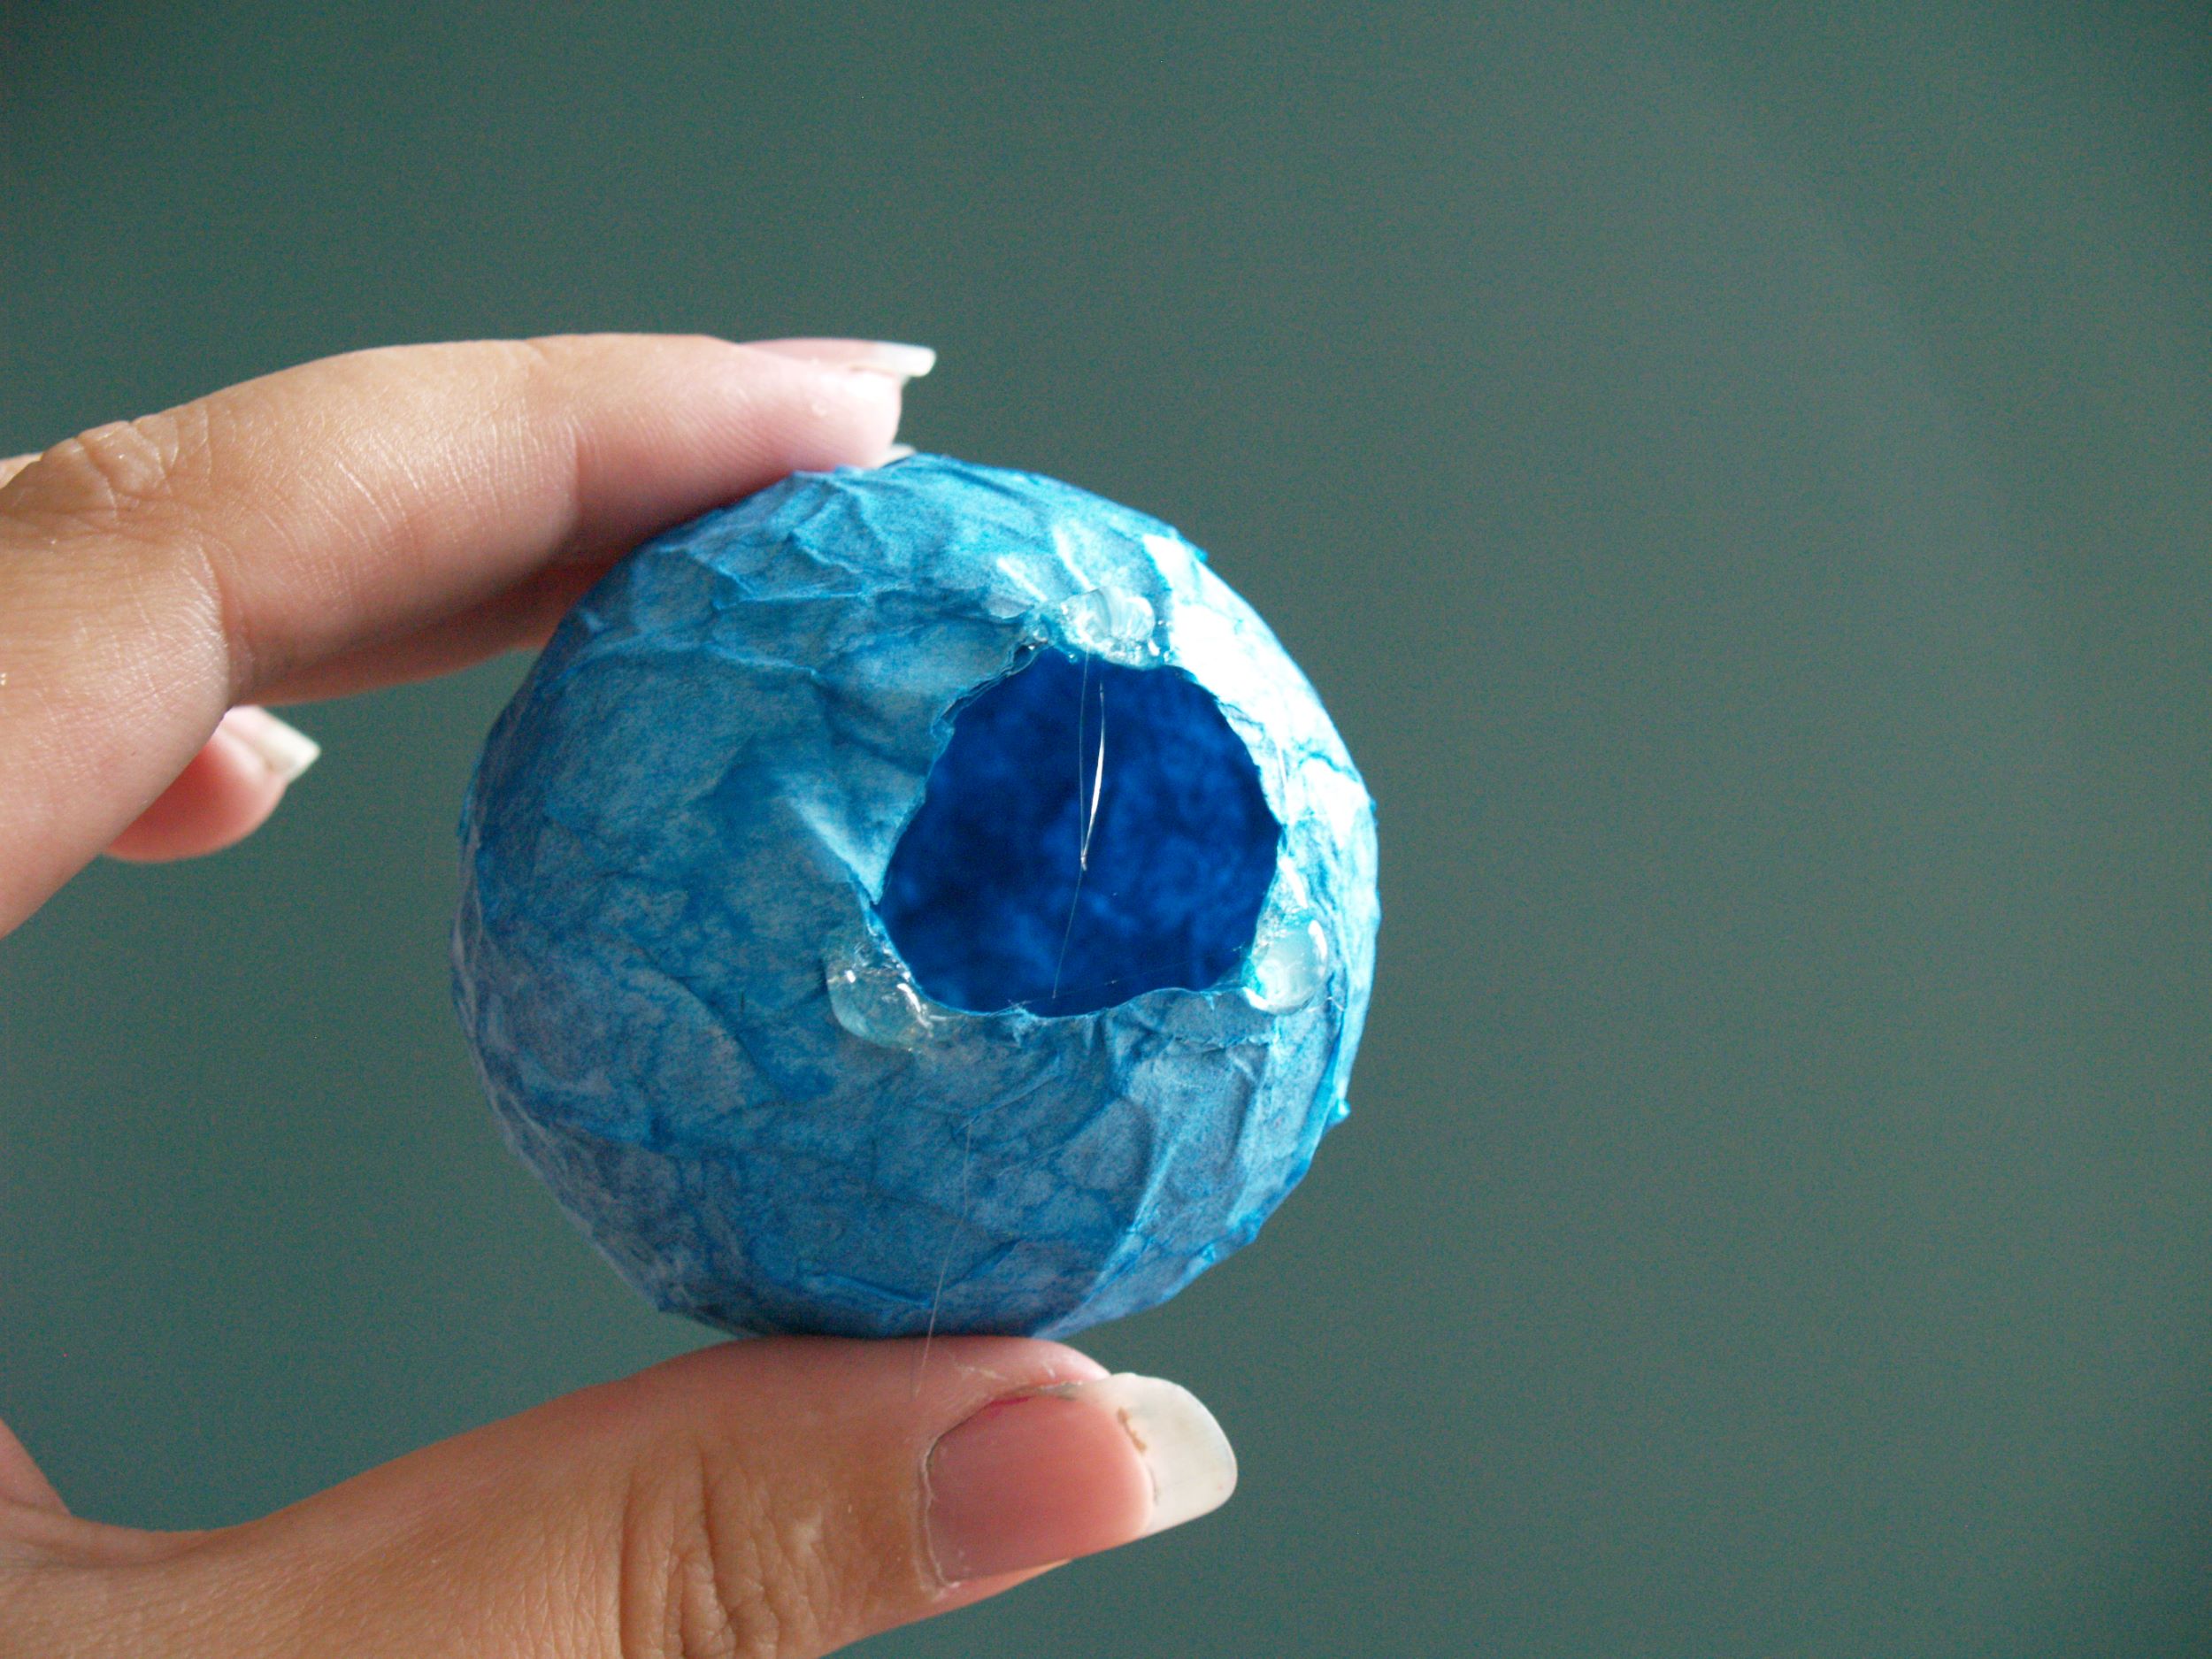
Using a hot glue gun, make three little dots of glue around the perimeter of the hole. Do not surround the hole with glue, you’ll need to leave yourself space for the steps coming up.
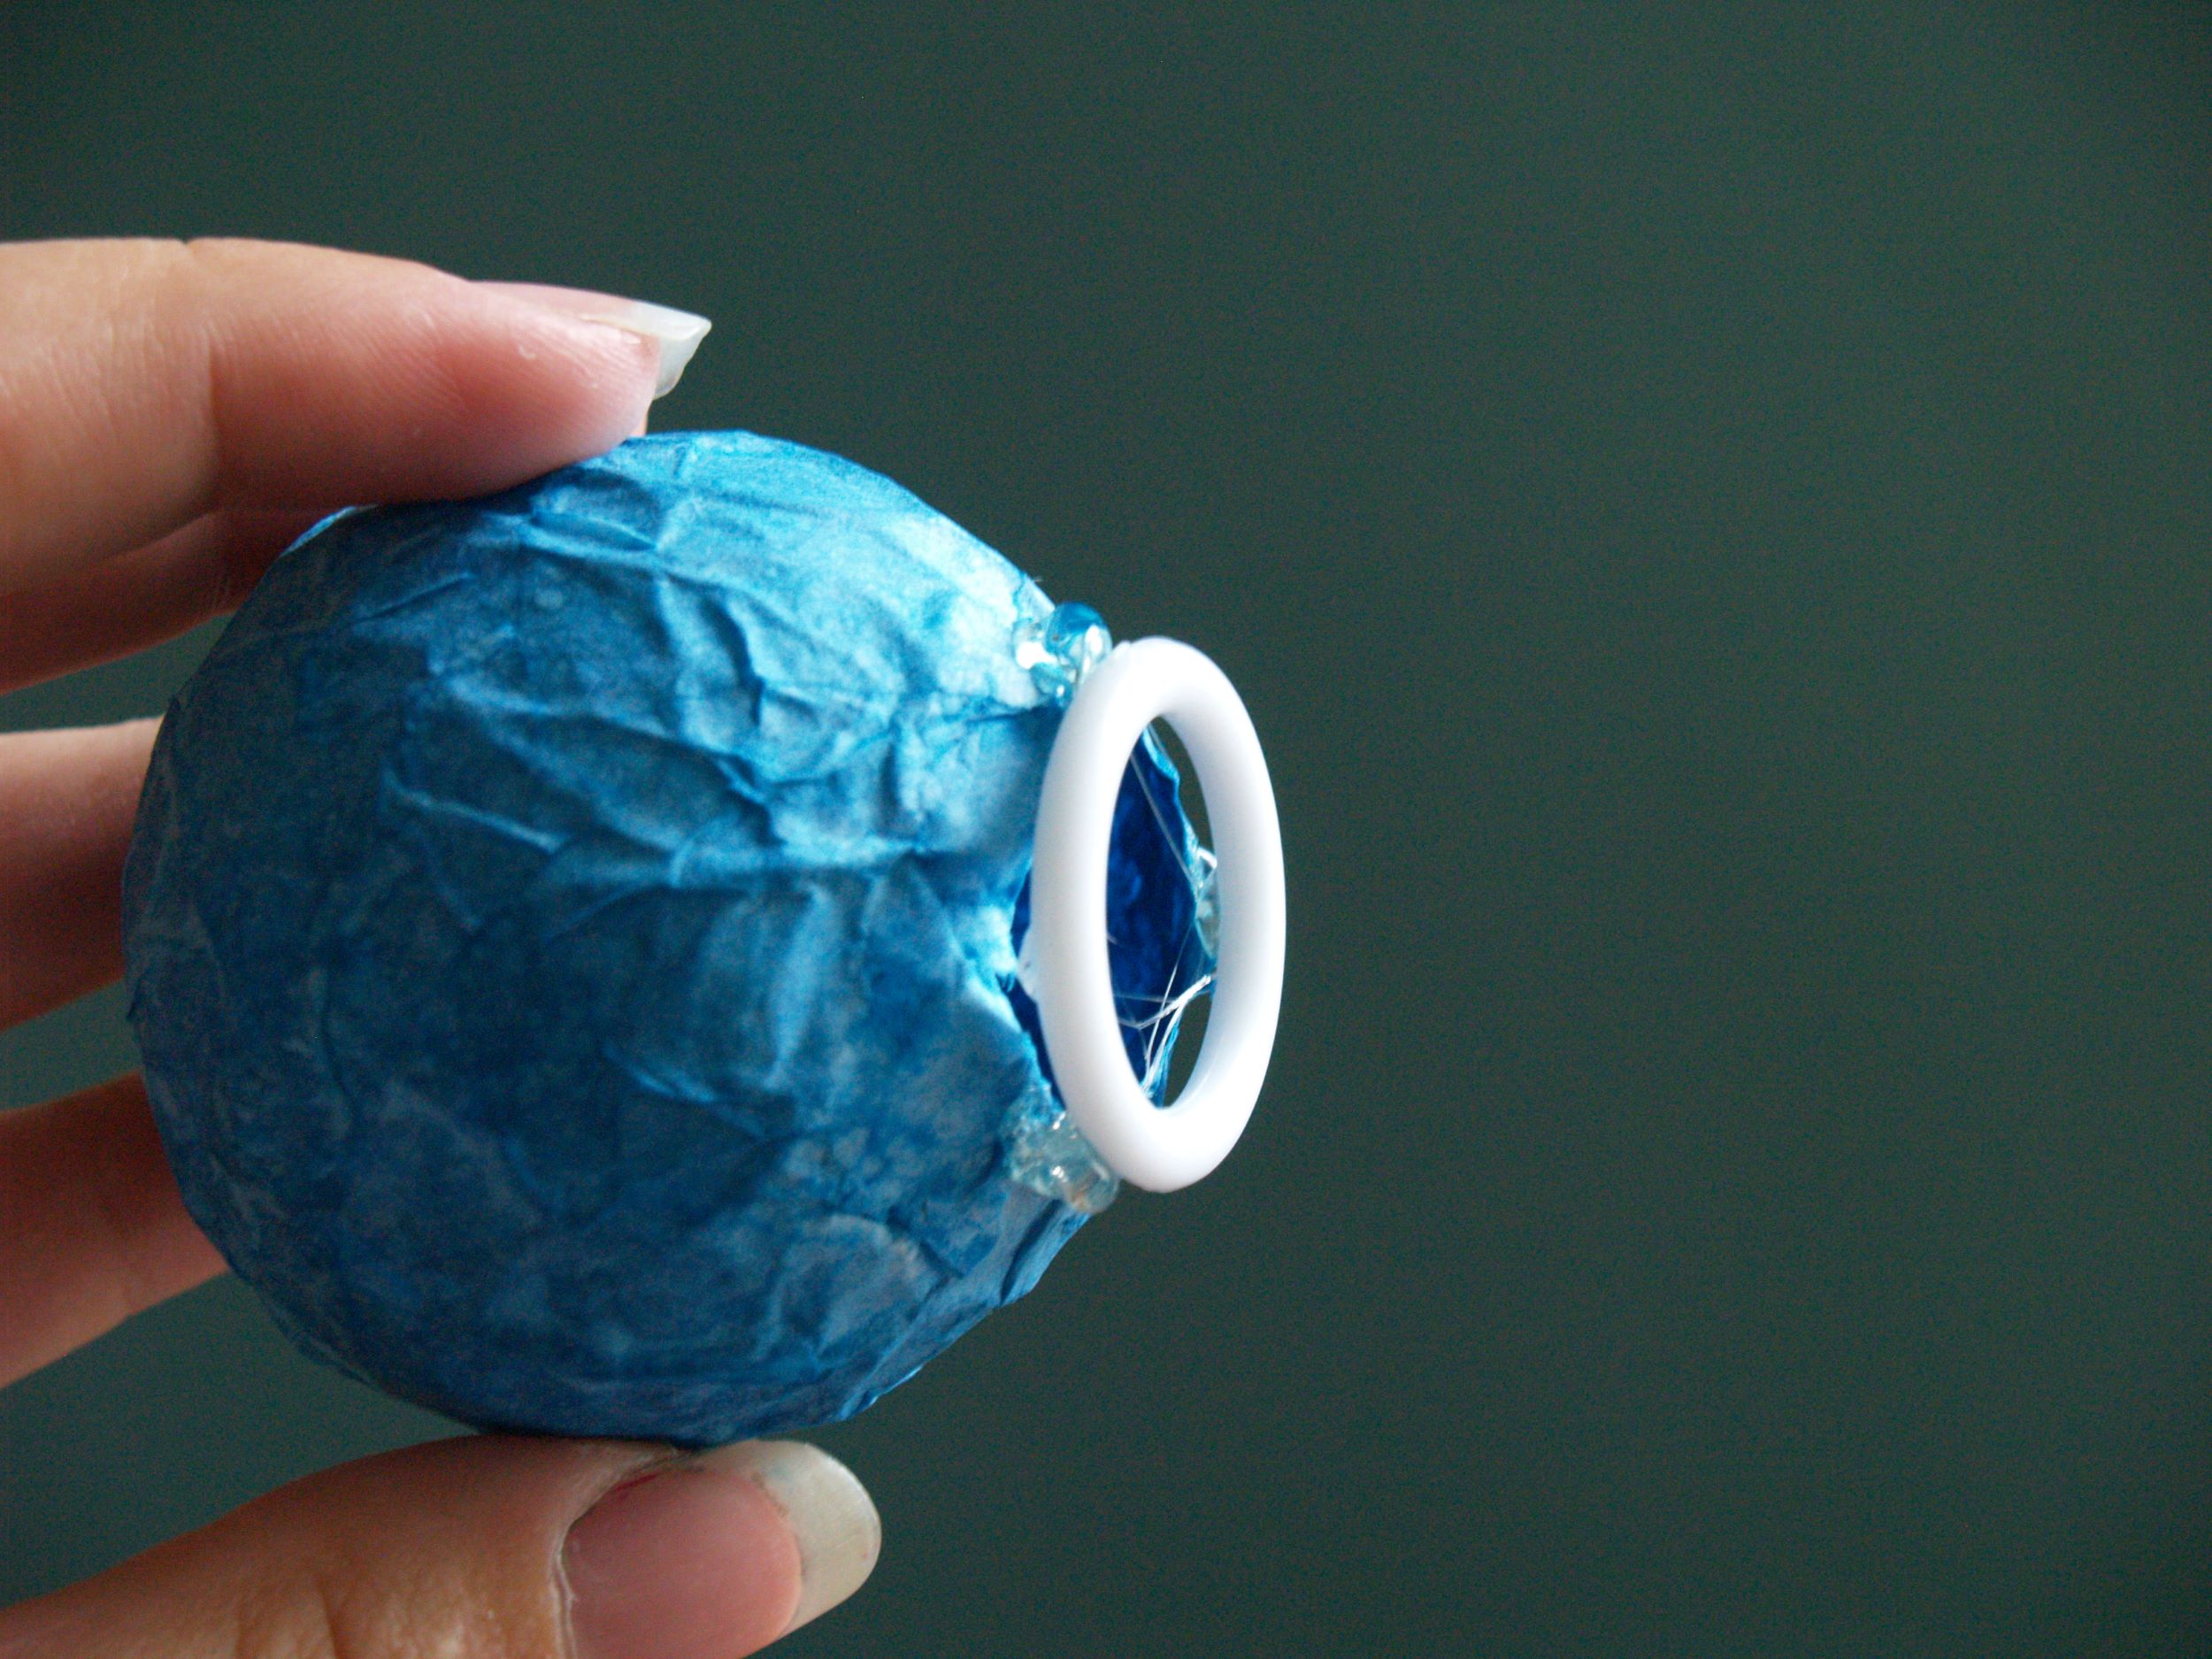
Put a plastic ring in your hot glue, making sure that there are spaces in between the ring and the paper mache. These rings are used in crochet, so look in the aisle with the knitting needles, or the sewing notions. I found these ones at Michaels in the section with the quilting supplies.
The next time I make these I’ll take the rest of my paint and glue mixtures and paint that ring at this point to make it blend it. It’s not an important step, but those white rings are bugging me now.
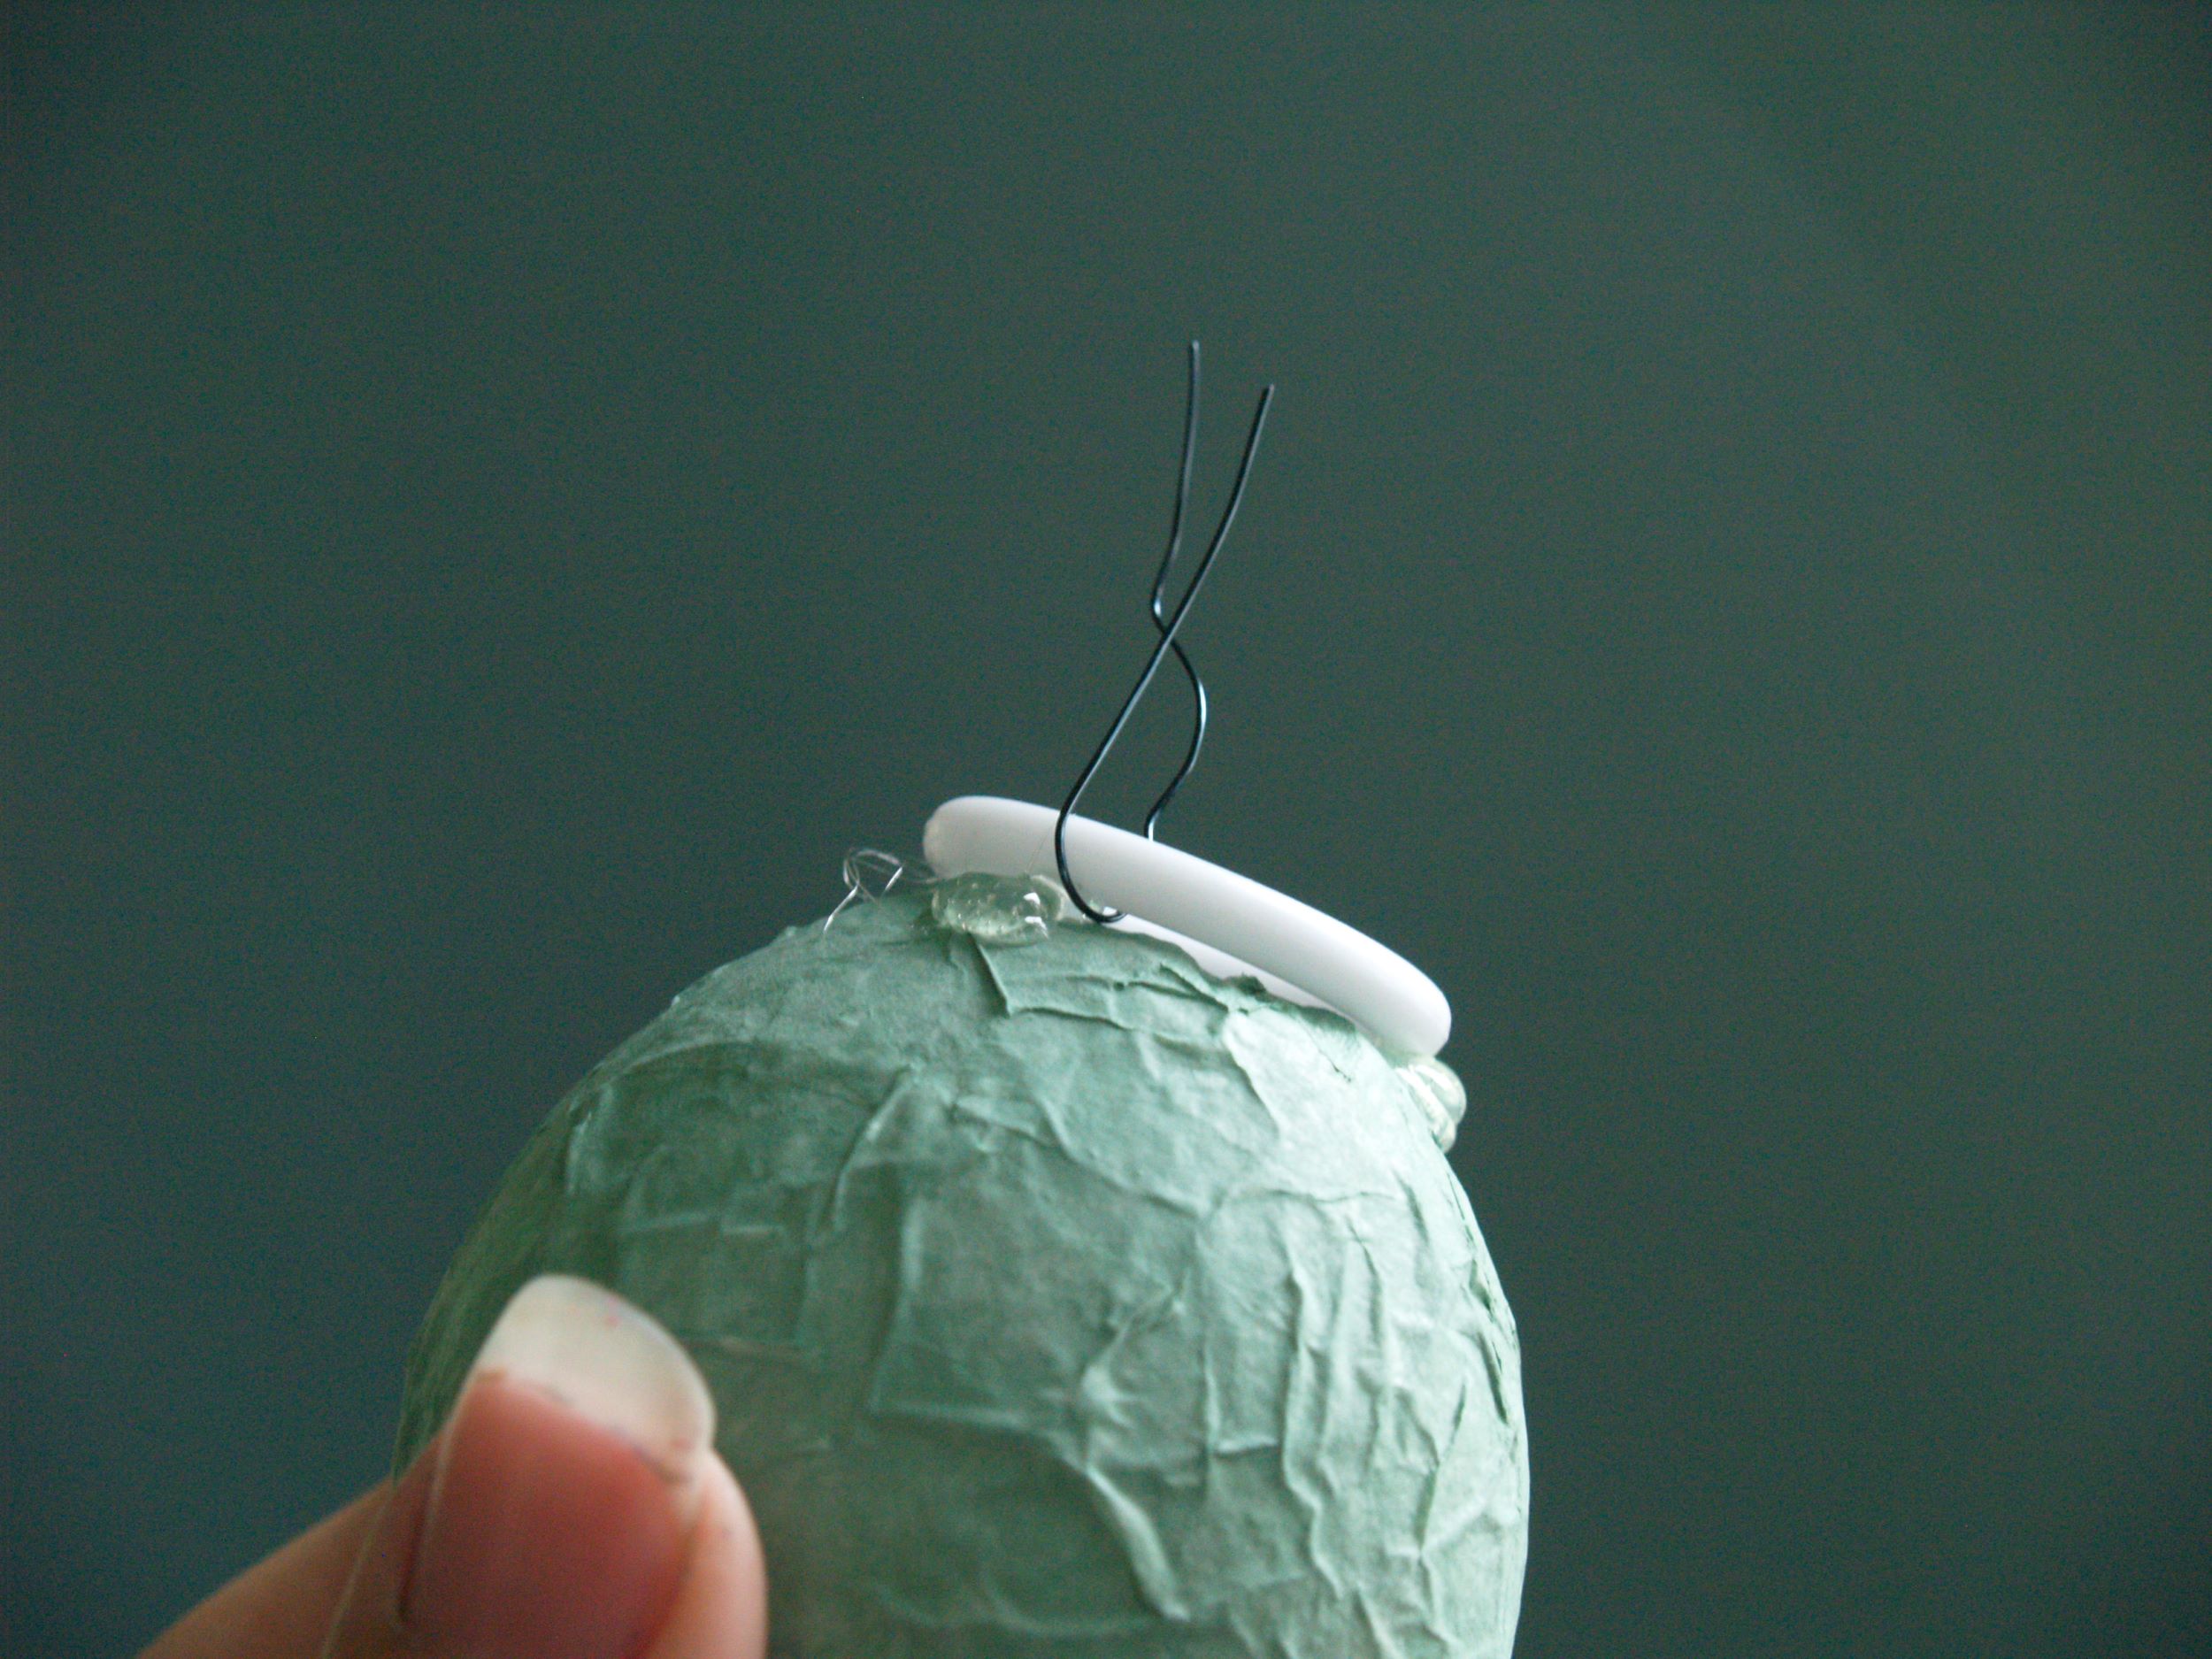
Take a little bit of florists wire and thread it through that space we left so that it wraps around the plastic ring. I used green because it will match the string of lights I’m using. Put another bit of wire on the other side of the ring.
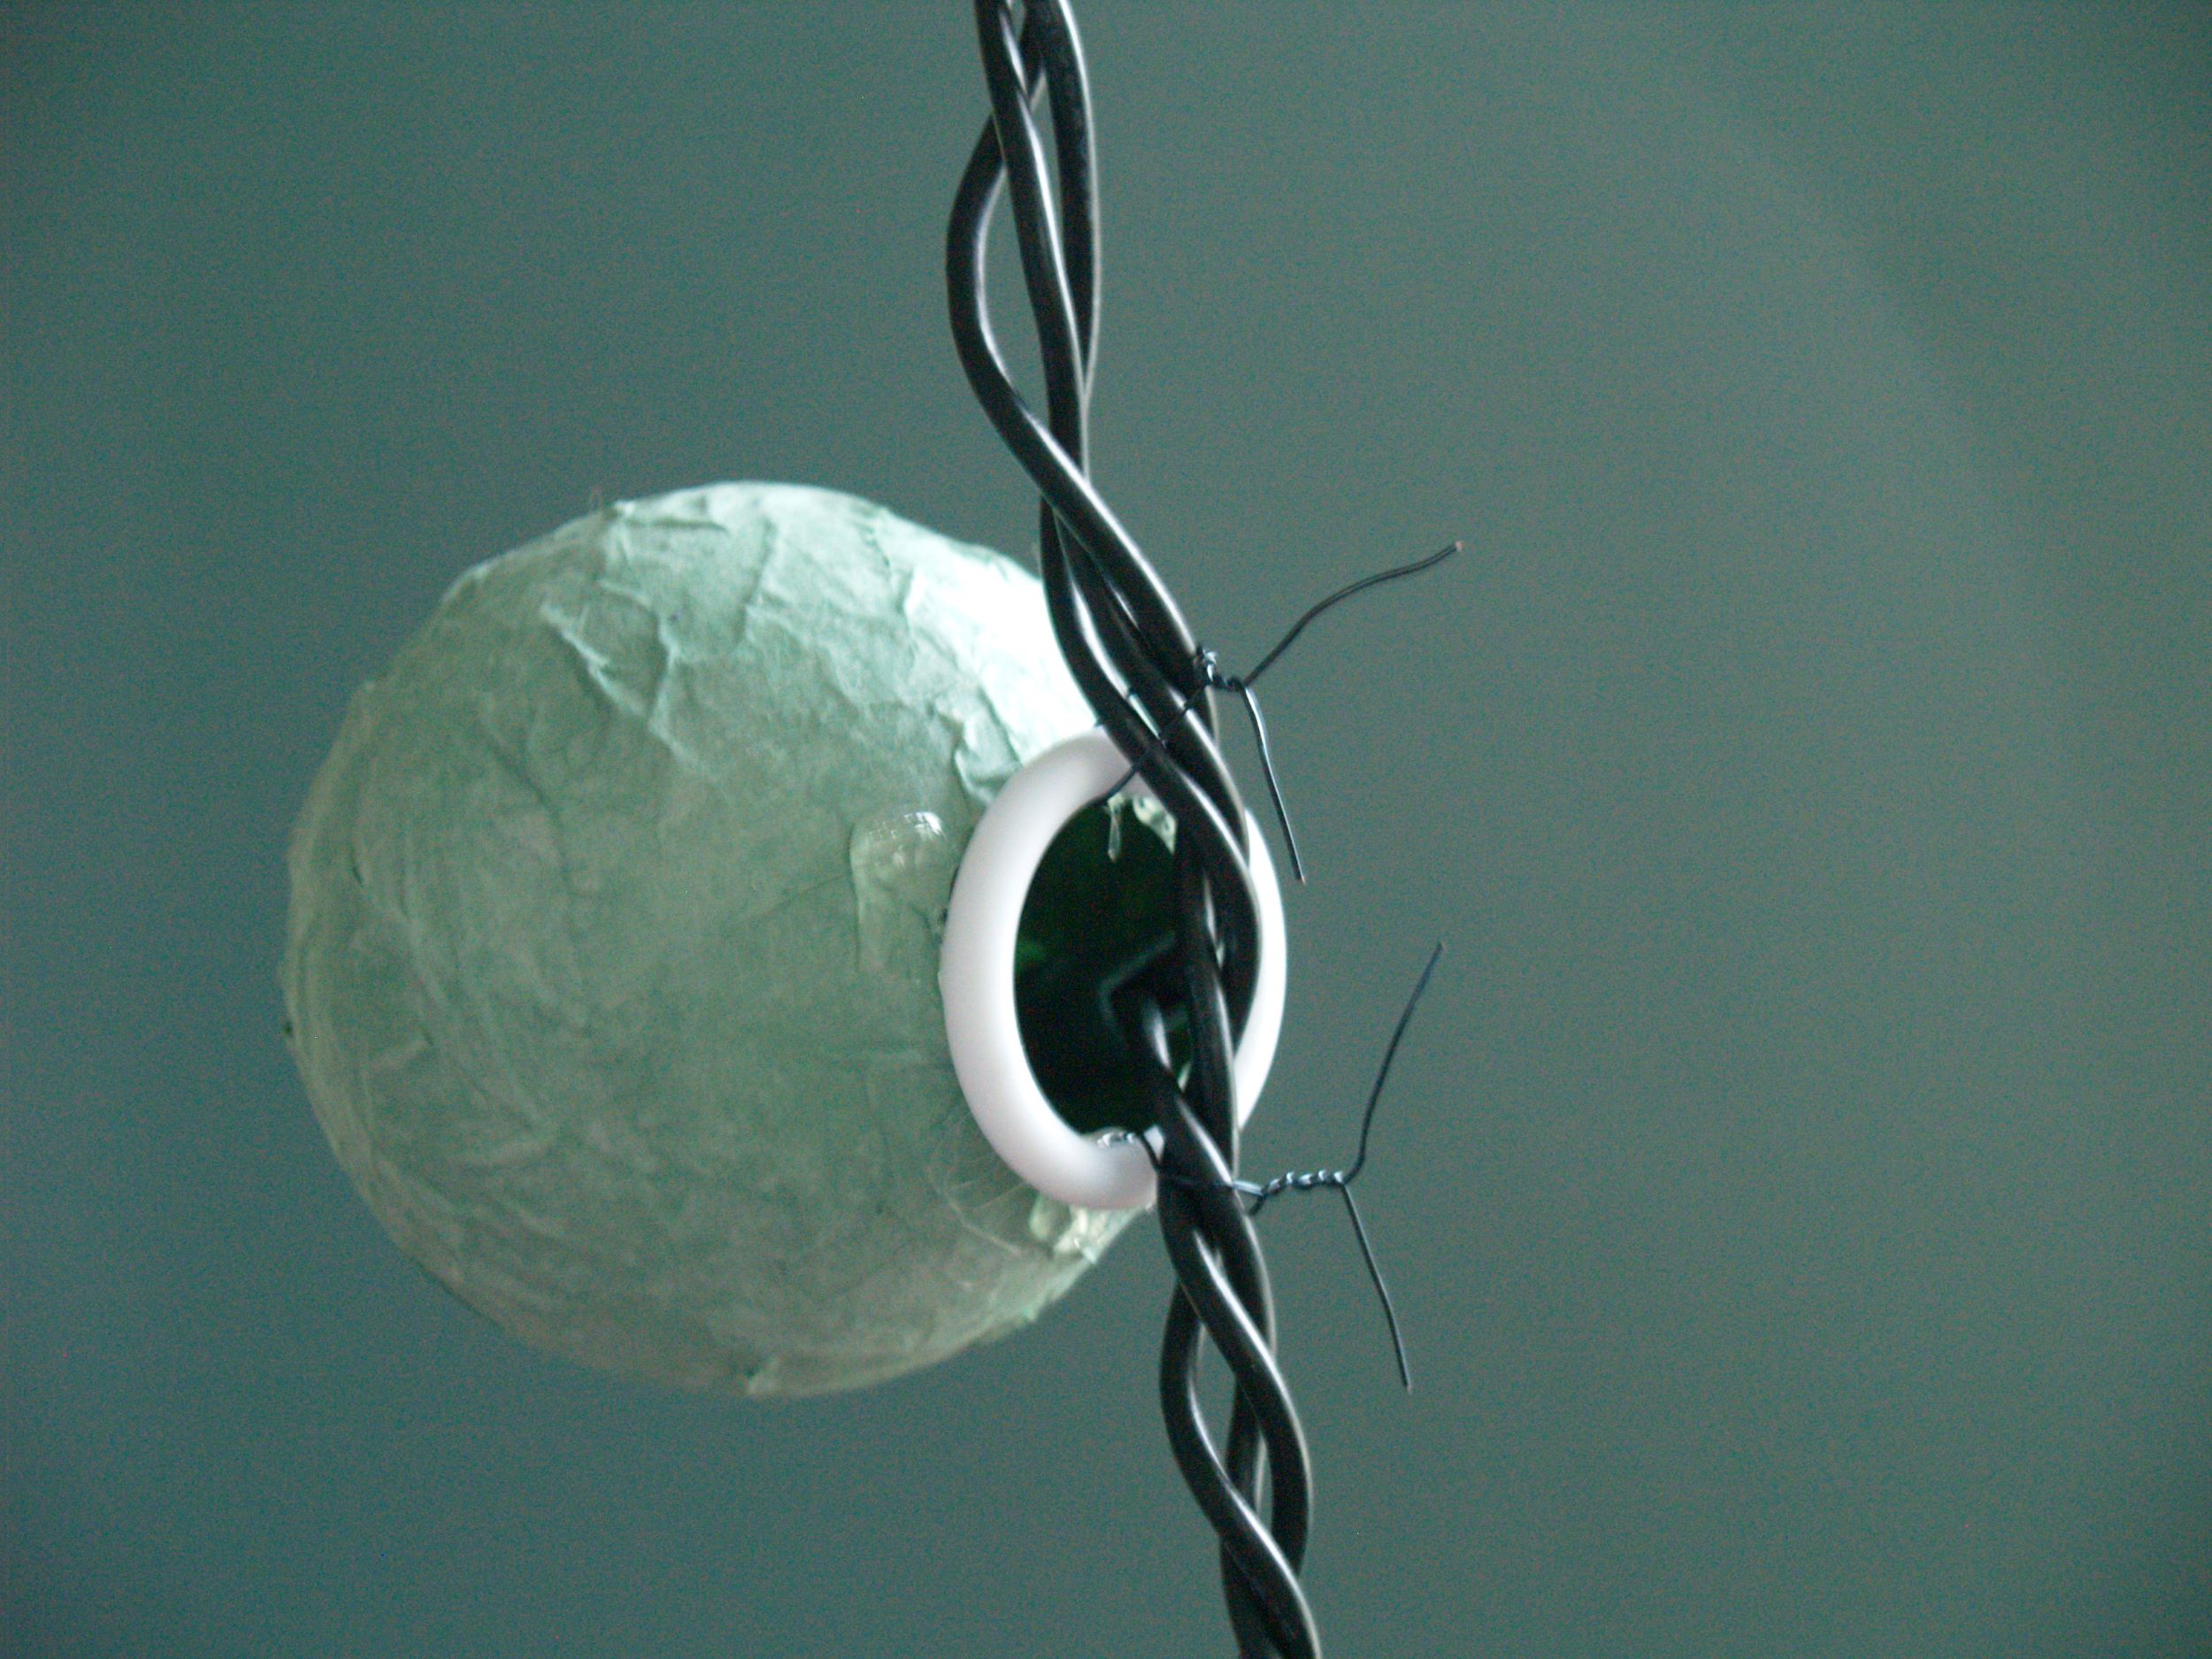
Insert one of the lights into the center of your party light, and wrap those two wires around the string of Christmas tree lights. All done!
Since lights made for Christmas trees tend to have their lights closer together than the strings of party lights, I put a paper mache bulb on every other light on the strand. I think this actually adds to the effect, it makes it sparkly and festive at the same time. sextape RealDC


Awesome idea!!! Thanks for sharing…I might try this for a graduation party I'm having for my sone!Hugz,Michele
I love these. It's almost worth throwing a party just to have to make them. Then I remember the cleaning.I wonder if colored tissue paper would work? I may have to try it.
These are so cute! I love the idea.
These are great! I want to add…that if you don't want to buy the rings, and if you happen to get your pharmacy meds from Target, they have these little colored rings on the top of their bottles that are removable and look like they are the perfect size for this…just a though.
this is such a brilliant idea. I am definitely going to be trying this out for around the pool this summer.
How freaking cute are those! Nice one, dude.
Wow, what a pretty project! They turned out great! I'll be linking.
Oh my gosh, I love these! I cannot wait to make them and add them to the patio. Everyone will love them when they're over for a BBQ.Thanks!
I LOVE THESE!!!!! What a great way to bring a little color to my back yard. THANK YOU!!!!Jen http://pipandpipper.blogspot.com
would you really have to go to all the trouble of hot-gluing on the plastic ring? couldn't you just wire the actual paper ball to the wire? you could use some little hole protectors for 3-hole punch paper. that would take much less time.
So simple, but so effective. Wow, I'm going to make a mess in my kitchen making a set of these, and I can't wait! Thanks for the great how-to.
I actually experimented with that Anonymous, but the paper mache was too fragile. I didn't find that the hot glue took anytime at all, and it helped to stabilize it.
Oh, these are the CUTEST. I will definitely try this someday. I wonder if you could use the rings on milk and pop bottles that break away when you unscrew the cap instead of the little crochet rings? I am VERY cheap and also trying to recycle as much as I can this year, so that might be something I'll try.
I think instead of the glue/paint mixture, I'll try Outdoor Mod Podge – it's supposed to be water-resistant, so maybe after I make these, I can leave them on the porch (under the roof) without as many worries about them going bad. That with colored tissue paper and I think it's a great idea! Thanks!
i really like how you did this!
I love this! I actually really like the white rings.
Apologies, the above post was me. 🙂
How industrious! What a simple, yet genius thought to use the balloon. Love it.
When I was a kid, we did paper mache on balloons in school to make big Santa heads. (Weird to think about it now.) Instead of glue or Gesso (aka modge podge), we used liquid starch, which you can find in the laundry detergent section of the supermarket. It dries pretty fast and is very stiff. I doubt, however, that it's waterproof.I'm going to try your project — it's brilliant — and I'm going to see how the starch works. I think I might enlist a couple of helpers (that is, children) to get them all done in one batch.
Lovely! I like the colored tissue paper idea, too – they might be more transparent – but colored tissue does fade pretty easily.Feed stores may be another source for rings of various sizes; they're used for banding poultry and the like. They may or may not be cheaper than the craft store.
I really love these! Very festive and pretty. Thanks for sharing!
Such a cool project! I am in the process of redecorating my room and really want to add some lights above my bed, since I don't have a headboard. This is the perfect project. I'm linking from my blog, thanks for the tutorial and the inspiration!
SO pretty! I forwarded this to my daughter and I'm thinking about trying them too. Do you think they'd hold up outside or get all mushy?
I bet you could sprinkle on or roll the wet finished "orbs" in some white sand or something with crystals for texture and sparkle.What about using paper strips and making a basket weave effect around the balloon, leaving slight spaces between the papers, or varying the colors of each layer so you see a different color underneath each weave?
That is terrific. Wedding season coming up – must make these!
Those are so beautiful! I can't wait to make these to use on my deck –hopefully we will find a house we like this summer! Congrats on being featured on Apartment Therapy.
Thanks for a great tips for my up coming party!Regarding the rings, if you already have the florist wire, why don't you do your rings with that?Just find something with the diameter same as you whish and spin arround it. Glue that to the paper.I'm writing my shoppinglist already!Thanks!
I'm loving this! Last summer I had looked for some paper lanterns to attach to my Christmas lights, but they were all too big.This would be perfect project to do with the kiddos – in fact, they would love these in their playroom :)We have oodles of white tissue paper since we buy it in bulk. I am going to skip the paint step and just leave them white. Great post!Jessica http://www.designingafamily.com
I love this idea only I chose to use cheescloth instead of the paper mache and it came out wonderful!! I used two layers of cheesecloth for stability. And instead of the rings which I found to be to heavy for the cheesecloth…I put the wire through the cheesecloth with no problems.Rachele
how very clever! Halloween is a day closser not oo soon to begin the planning…thanks for the awesome tute!!!!
I love these! they're fab!So many ideas to use them for summer BBQ, parties, halloween! Am going to add them to my 'to make list' 🙂
Hi, that party lights concept is really good. I just wonder: do you know how to make party lights that will have this plant's shape: <a href="http://sklep.centrum-sojka.com.pl/photo/tinyMce/miechunka%20zd.jpghttp://sklep.centrum-sojka.com.pl/photo/tinyMce/m… />if you can help me or you know some tutorials how to make such party light please write to my email: nellis@wp.pl
Thank you so much for your amazing creativity… I was looking for paper lanterns to purchase and came across this and now I can make as many as I want and do a great look in my living room…This is a fabulous day!!!!
I have been admiring a neighbor's outdoor Round lights for some time now and trying to find an inexpensive substitute. Thanks for the tutorial!.. As to the rings, what about a green pipe cleaner? It would blend with the green wires on the string of lights. ~Gwen~
Thanks so much for the idea my daughters birthday is coming up and these will be perfect to decorate with. I wonder what it would look like with bigger ones hanging in bunches with the battery operated tea lights inside?
Those are beautiful! What a fun idea! Thanks for sharing.
How awesome!
Love your idea! I agree with the store bought decorator lights being too expensive. Plain white ones would be so pretty for a wedding!
Thank you. I made a lot of your organza flowers and instead of putting beads in the middle of them, I made holes, to be albe to attach them to a light chain. Now I was looking for something to go on every other light. This is just perfect for it! Now there is just one more thing. I don't use glue to make paper maché, I simply mix water with flour (always worked well so far)… But I'm not sure, if I can add the color direktly to my mix, or if I will have to apply the color seperately from my maché.
Amke, I don't know how long ago you posted this, but I have a suggestion. Since you're using flour and water, why not just use food coloring. While the liquid will work, if you have any gel or better yet, some of the paste colorant it will work. After all, it does dye food stuffs.
I love this idea! Thanks so much for sharring.
So cool! Love it! Neat idea! Smiles,Katie 🙂
I do this myself, but in a much easier way. I use tissue paper of various colours, and watered down white glue. It's much easier this way, and less messy. Most paper lanterns are made with tissue and white glue. Check out lantern festivals, like Luminara Victoria.
I like the rings white. It unifies all the different colors.
one question, what type of collors did you use?
I love these cute paper mache string lights and really appreciate the nice photo illustrated tutorial. I hope it's okay, I featured your pretty paper mache lights on my new blog here:
http://frugal-home-design.blogspot.com/2012/02/di…
Thank you so much for sharing!
Great article. I will be experiencing a few of these issues as well..
Liked yokսr ƅlߋg page dude, continue the great
work. I can nnot waijt to see your next installation.
The other day, while I was at work, my cousin stole my iphone and tested
to see if it can survive a thirty foot drop, just so she can be a youtube
sensation. My iPad is now broken and she has 83 views.
I know this is entirely off topic but I had to share it with someone!
Excellent website you have here but I was wanting to know if you
knew of any discussion boards that cover the same topics
discussed here? I’d really love to be a part of group where I can get opinions from other knowledgeable individuals that share the
same interest. If you have any recommendations, please let me know.
Cheers!
At this timе it sounds like Expression Engine iss the top blogging platform out there right now.
(from what I’ѵe read) Is that ԝhat you’re սsing on your
blog?
Hi there. Only desired to ask an instant query. I am assembling my own weblog as well as wish to recognize
where you still have the style? Ended up being the item cost-free?
Or perhaps seemed to be this paid for? Could not often come across anything competitive with this place, so with any luck ,
it is possible to ok, i’ll recognize. Cheers. PS, my apologies.
Uk just isn’t our first language.
Wonderful web site, previously been scouting forever and a
day for ideas on the perfect rattan furnishings for
our home and in our back garden. The site truly helpedgreat blog some great info here
Adore this web site, really good information here, was actually a tad bit sceptical around getting a steam shower unit for
our house however, the amount of information here sorted
my mind out, amazing thanks for the tips
It’s an awesome article for all the internet people; they will obtain advantage from
it I am sure.
Just found this and wanted to say THANK YOU. Looking for outdoor lighting to hang from trees in my yard during parties and this is an awesome idea. Thanks for sharing.
I have made these figures, imitating all your steps and have been amazed at the result. Thank you very much. You made me feel happy and creative !!!
Do you think this would work on a paper mache animal sculpture? I want to make a lamp and I wanted to know if the light would still shine through.