Today I have a big fat tutorial to share with you. It looks really really scary and detailed, but it’s not so bad. Trust me. I’ll hold your hand through the whole thing.

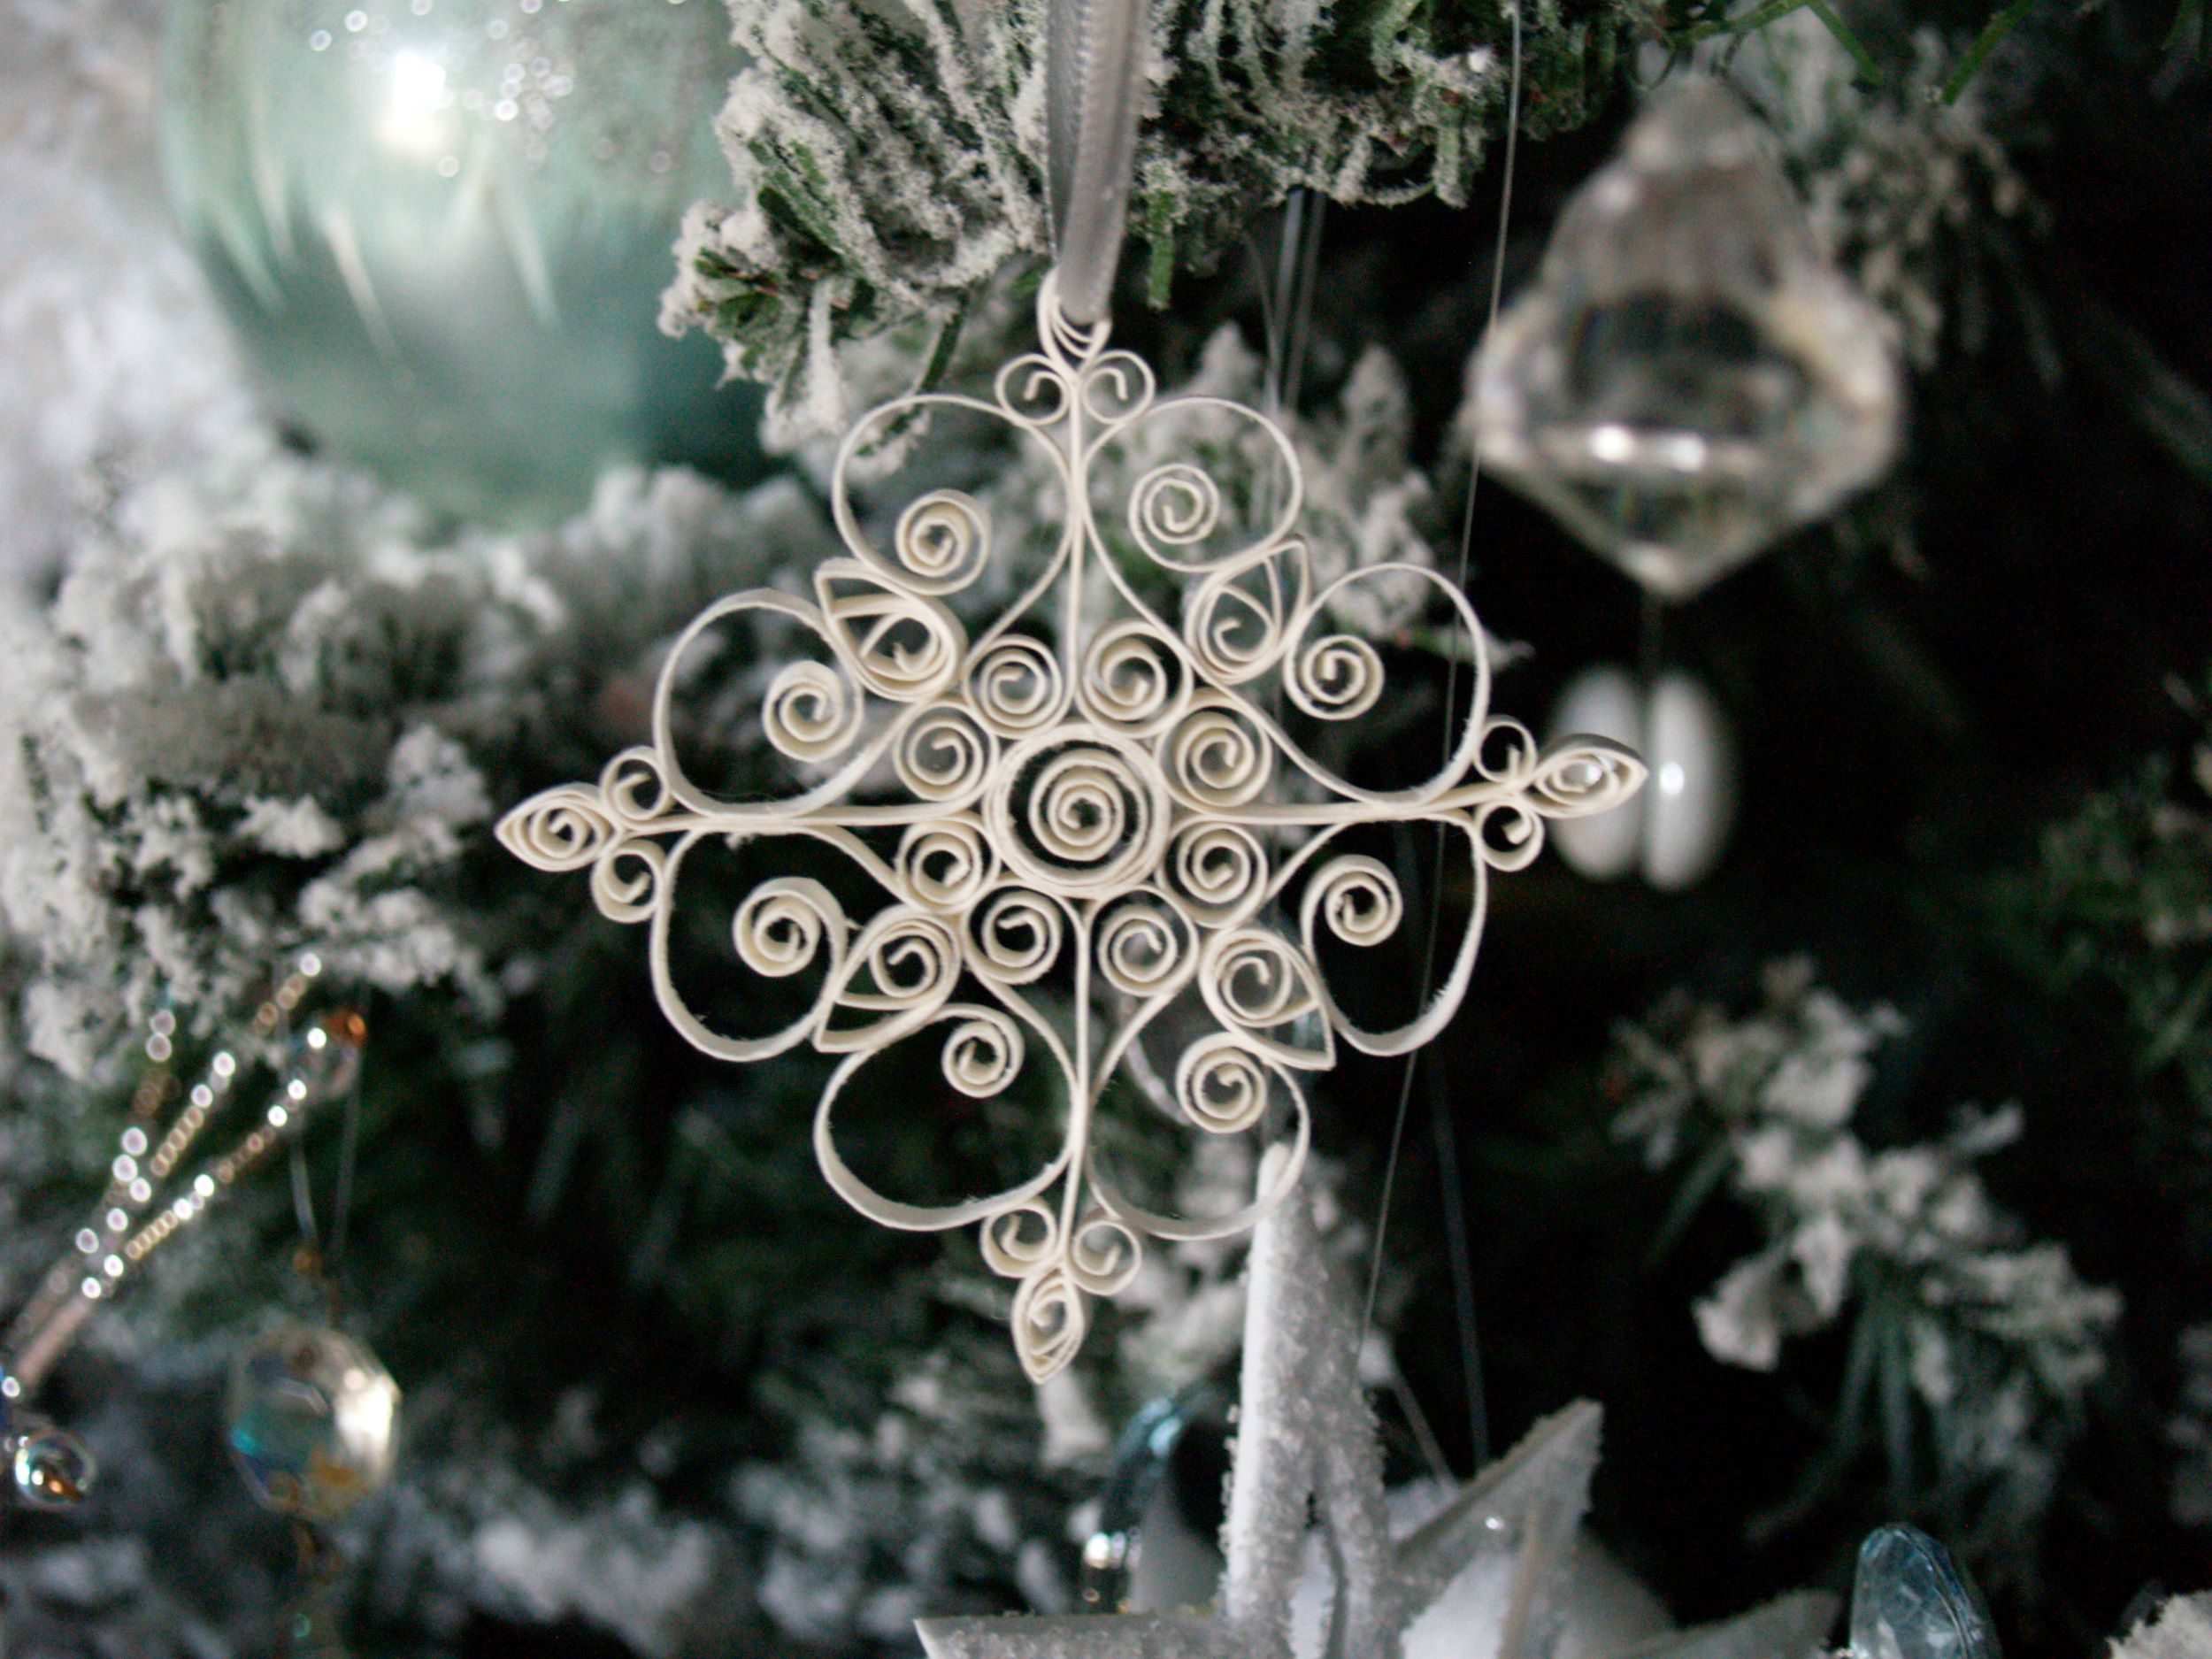
I’ve made a ton of these over the years and they never fail to elicit oohs and aahs. This is a perfect application for quilling. Snowflakes are best when they’re all scroll-y and complicated, and that’s when quilling is at its best too. You just need to remember that it’s only rolled up paper, and break it down to each little piece.
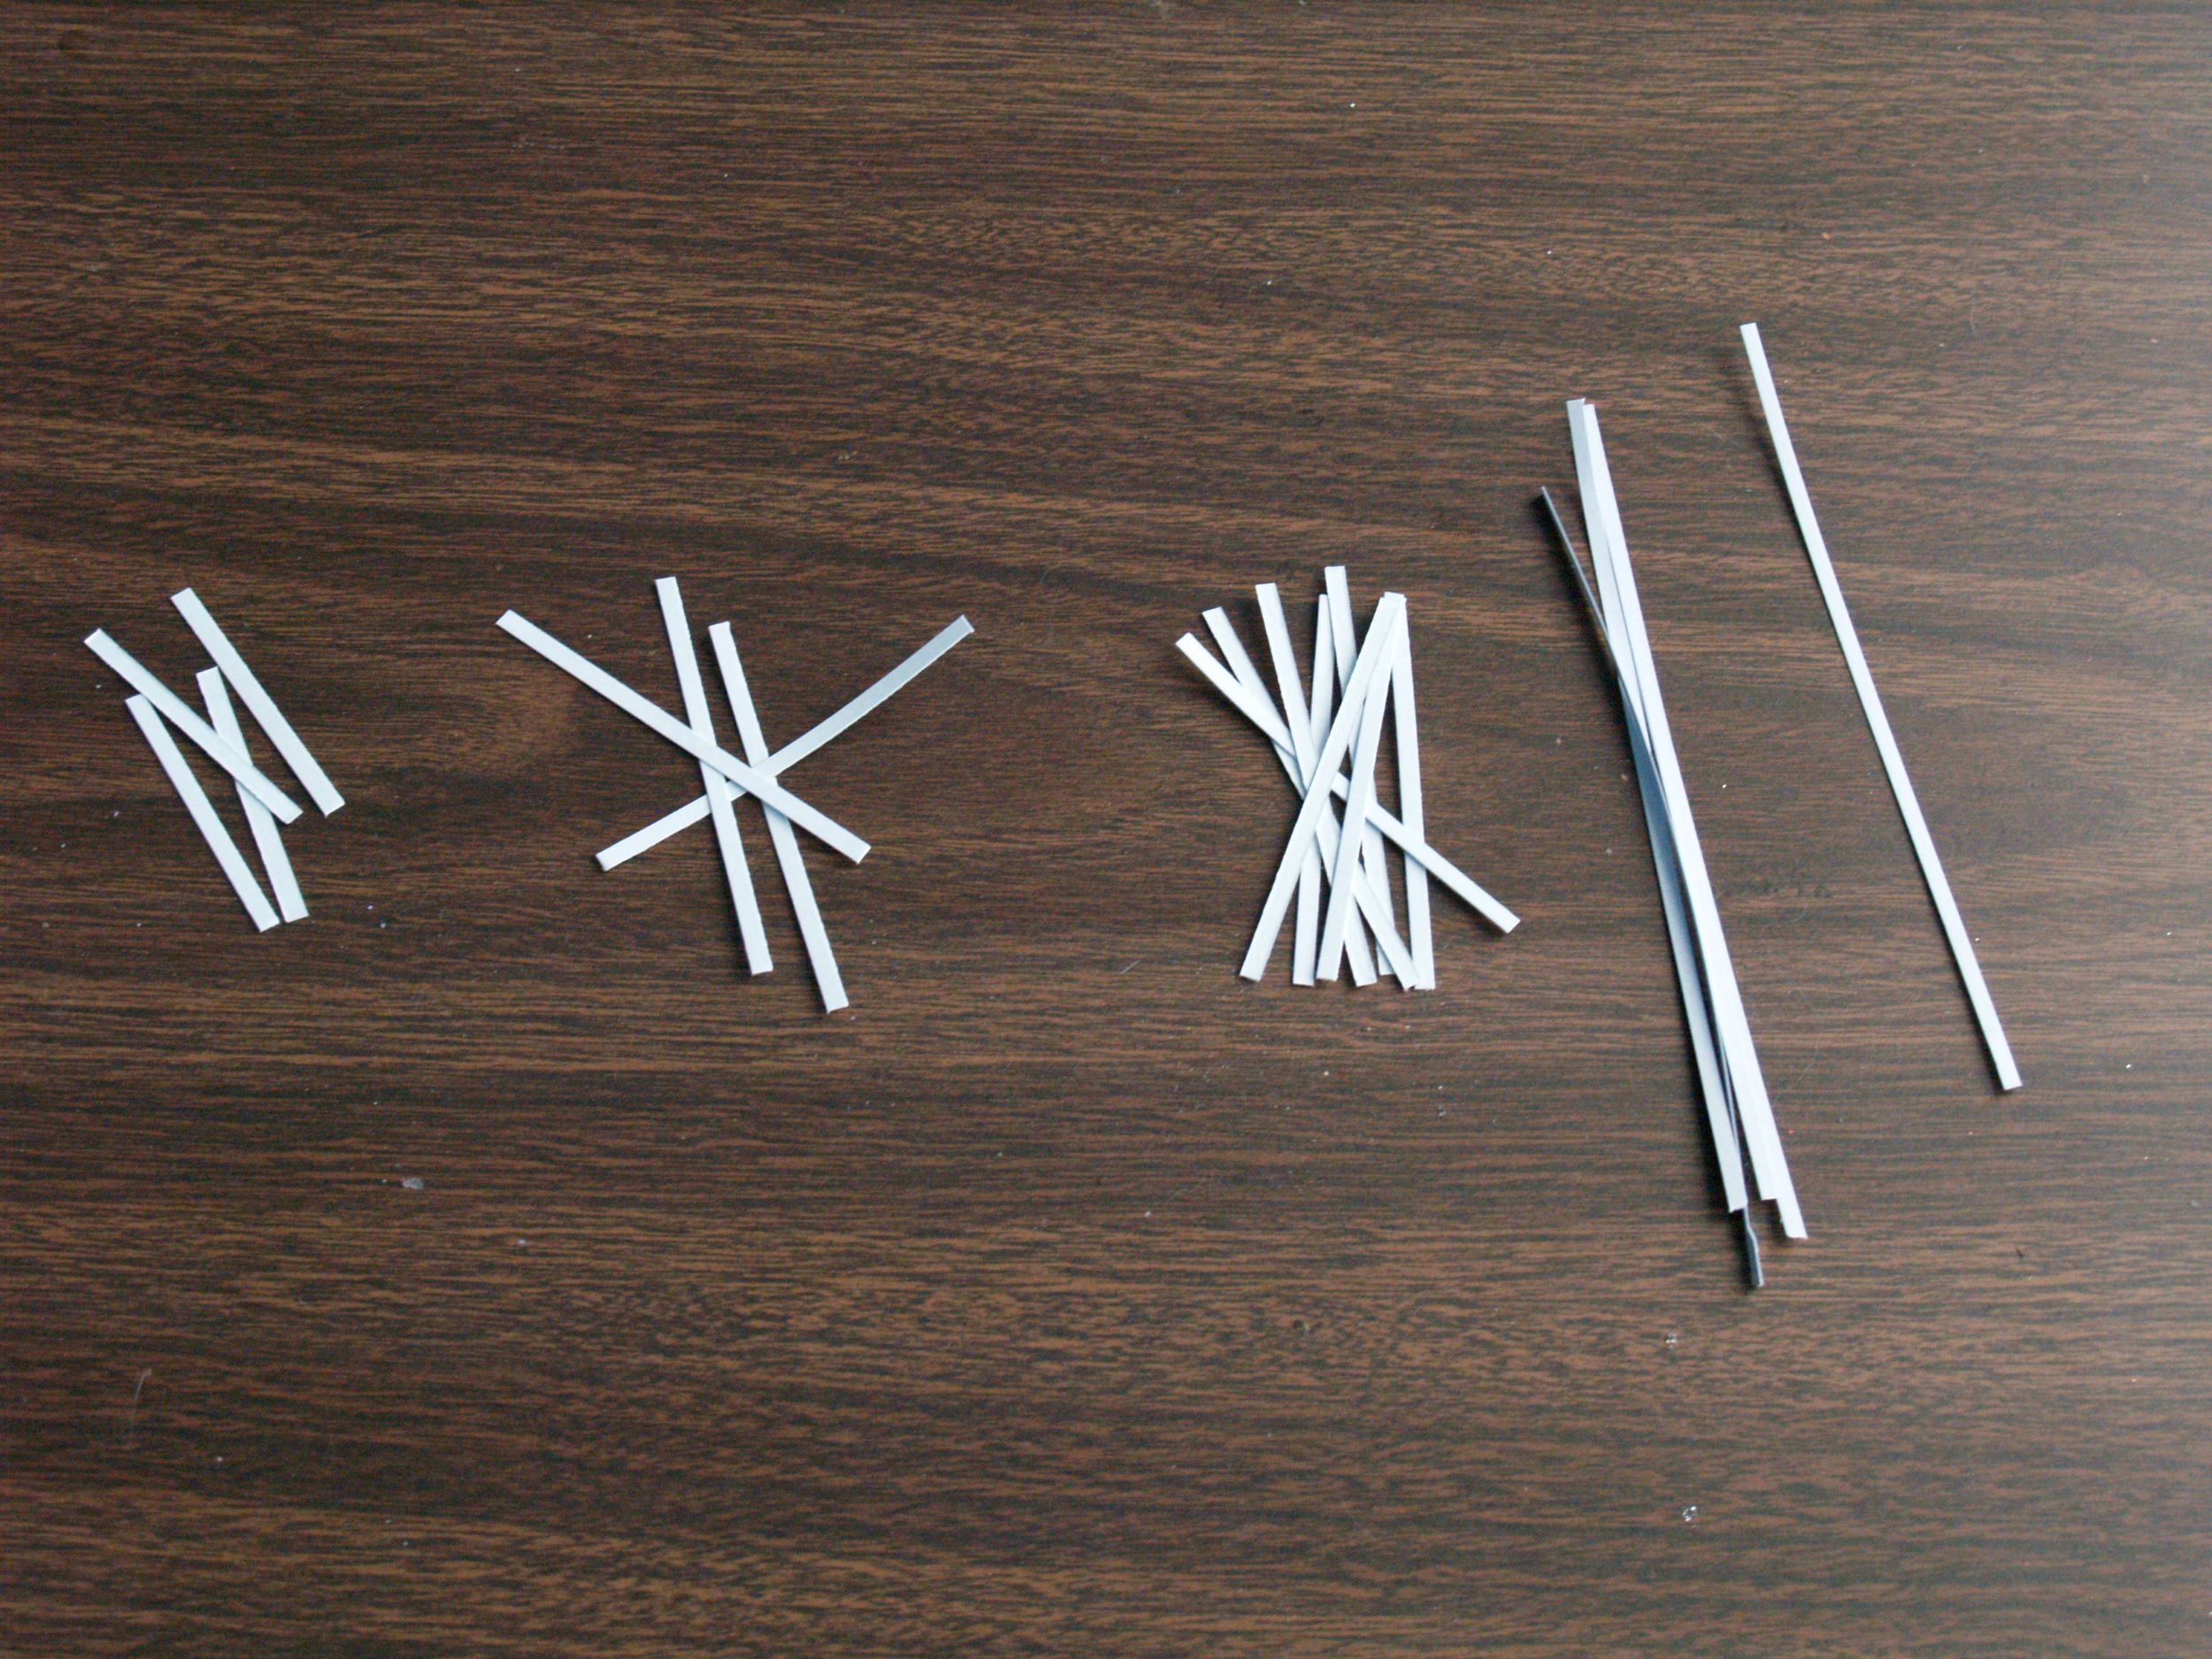
Cut a bunch of 1/4″ strips from a piece of 12 x 12 cardstock. I like using an icy blue color, but a true white looks great too. You can make your strips thicker if you want and it will work just great. They’ll look a little more substantial against the tree or on a package and they’ll be a little more sturdy. I happen to like the lacey look of the thinner strips and find them to be sturdy enough.
From those thin strips, here’s what you need to cut
1 – 6″ strip for the center round
8 – 3″ strips for the arms
4 – 6″ strips for the scrolls
4 – 3″ strips for the teardrop
4 – 2″ strips for the marquis
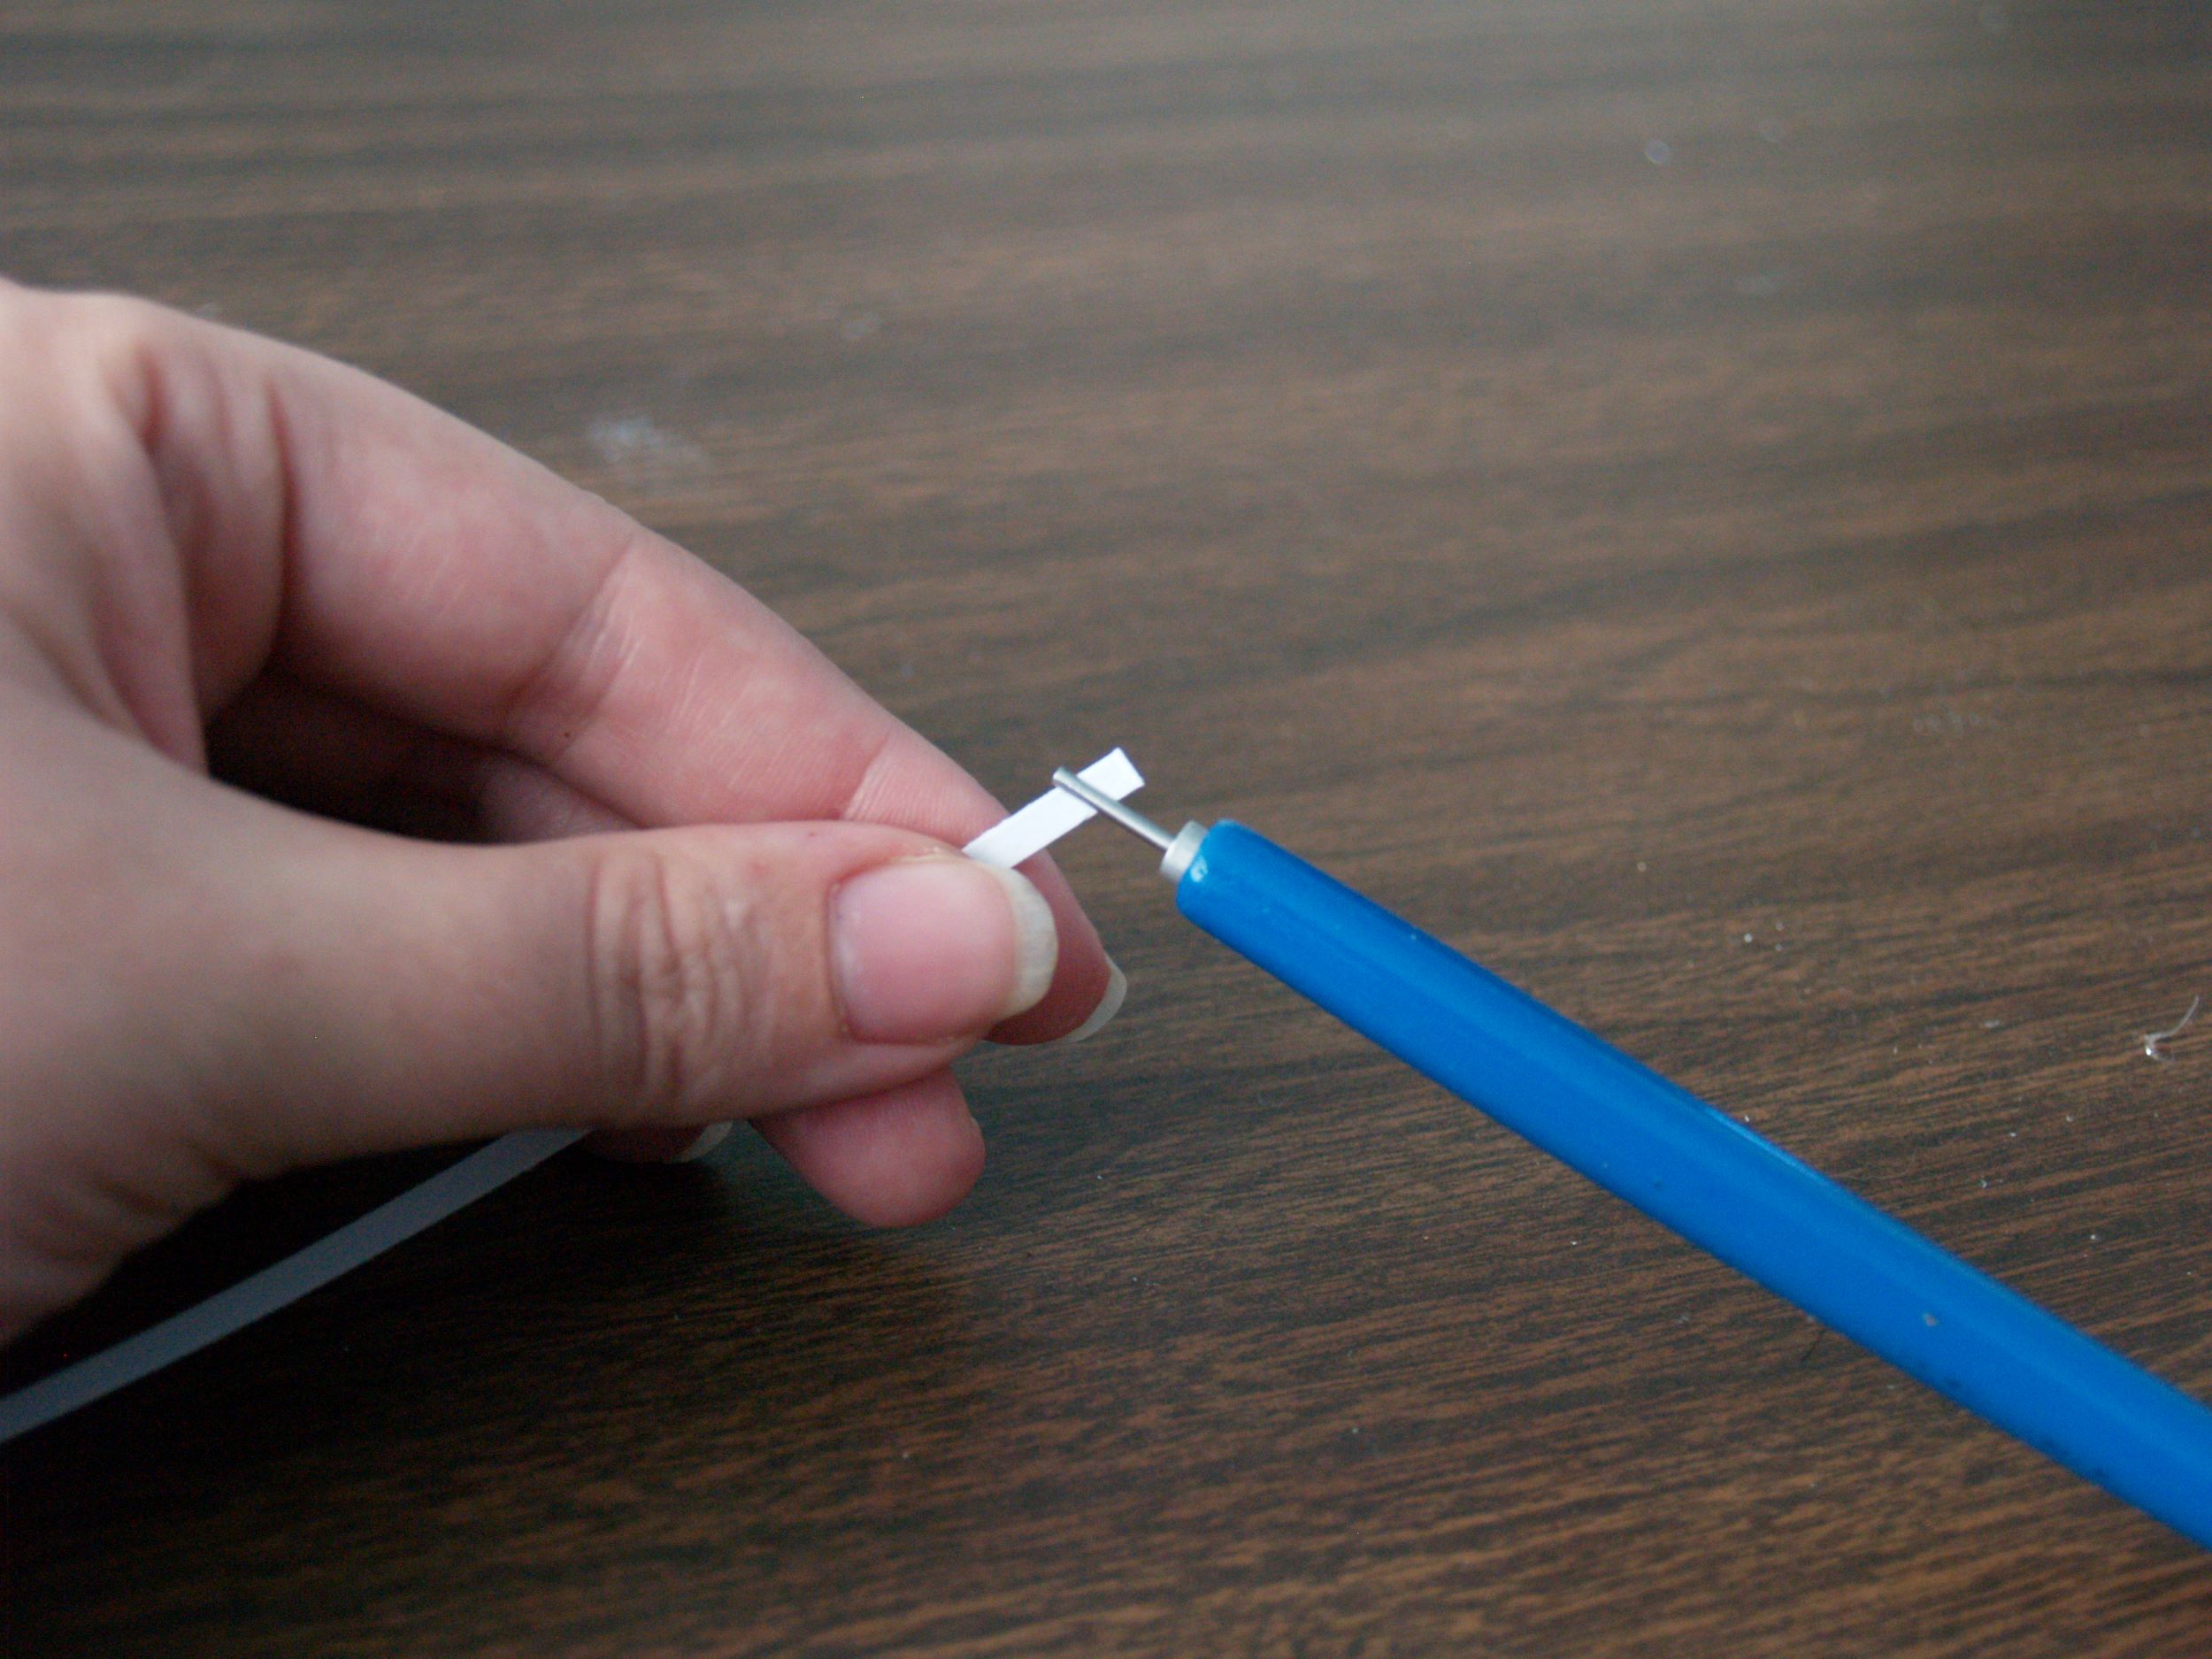
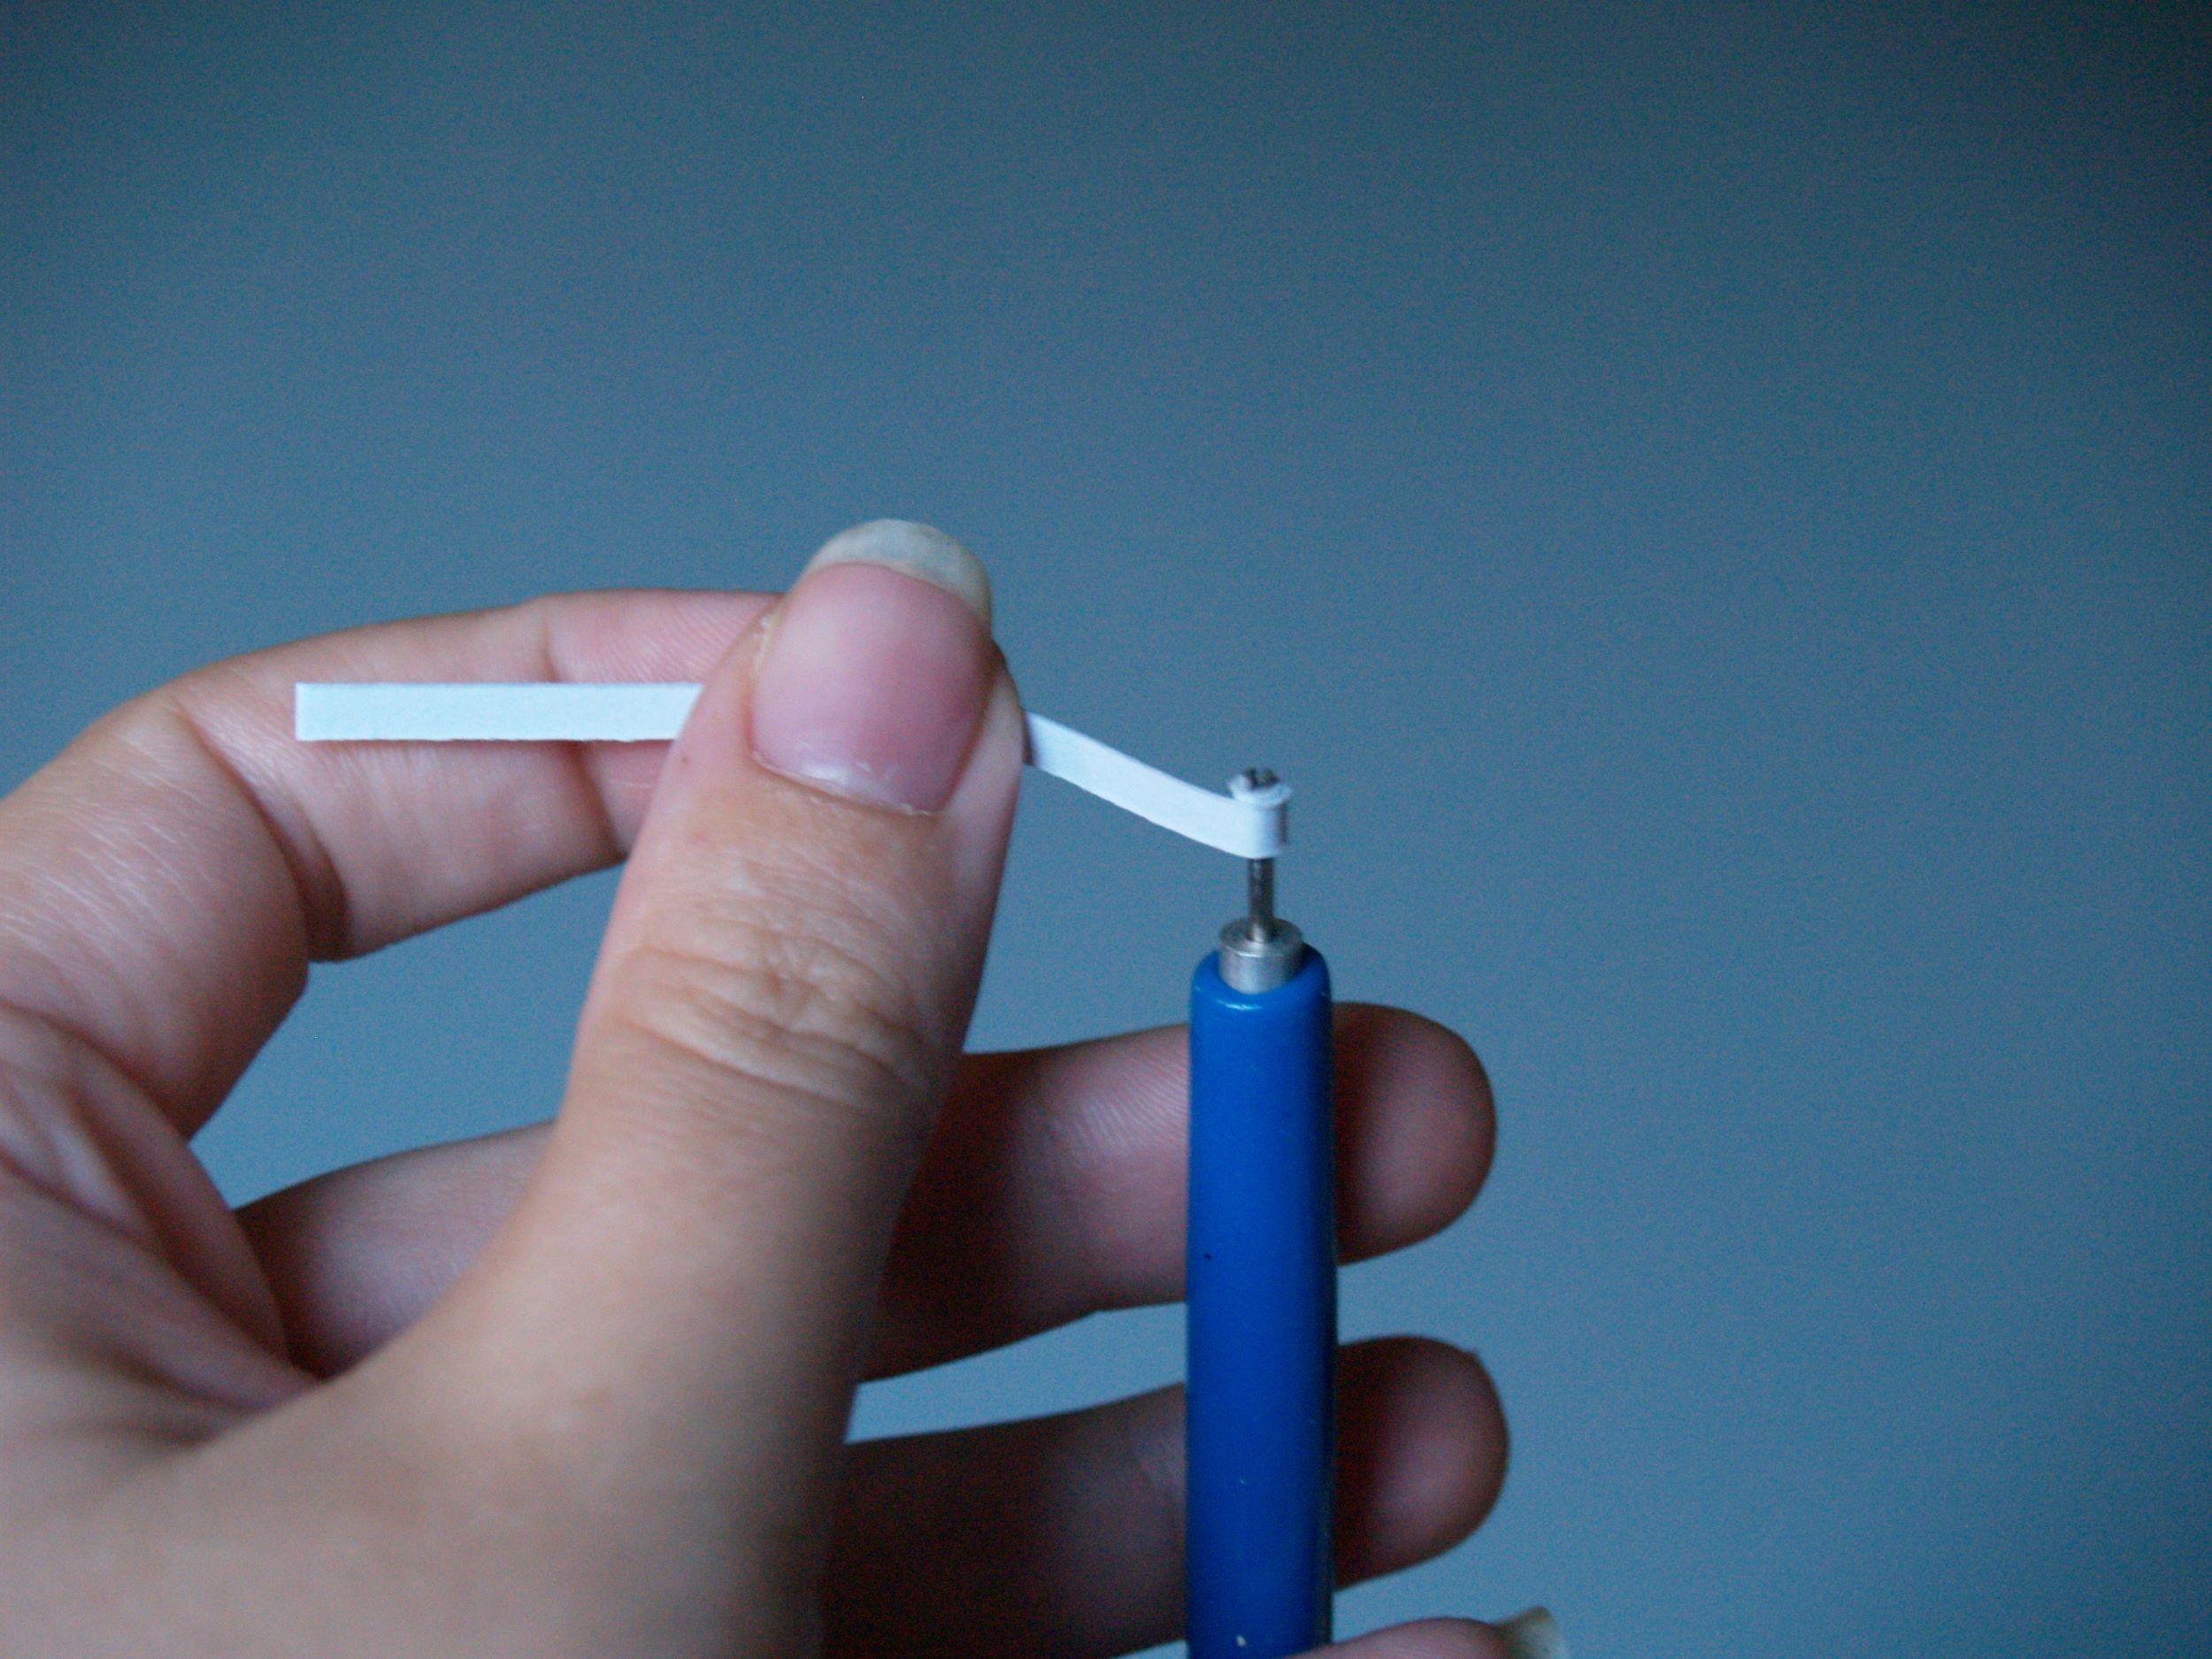
You’ll need some kind of a quilling tool, which you can find at Michael’s in the stamping aisle, or you can just make your own by cutting the top off of a needle with a pair of tin snips or wire cutters.
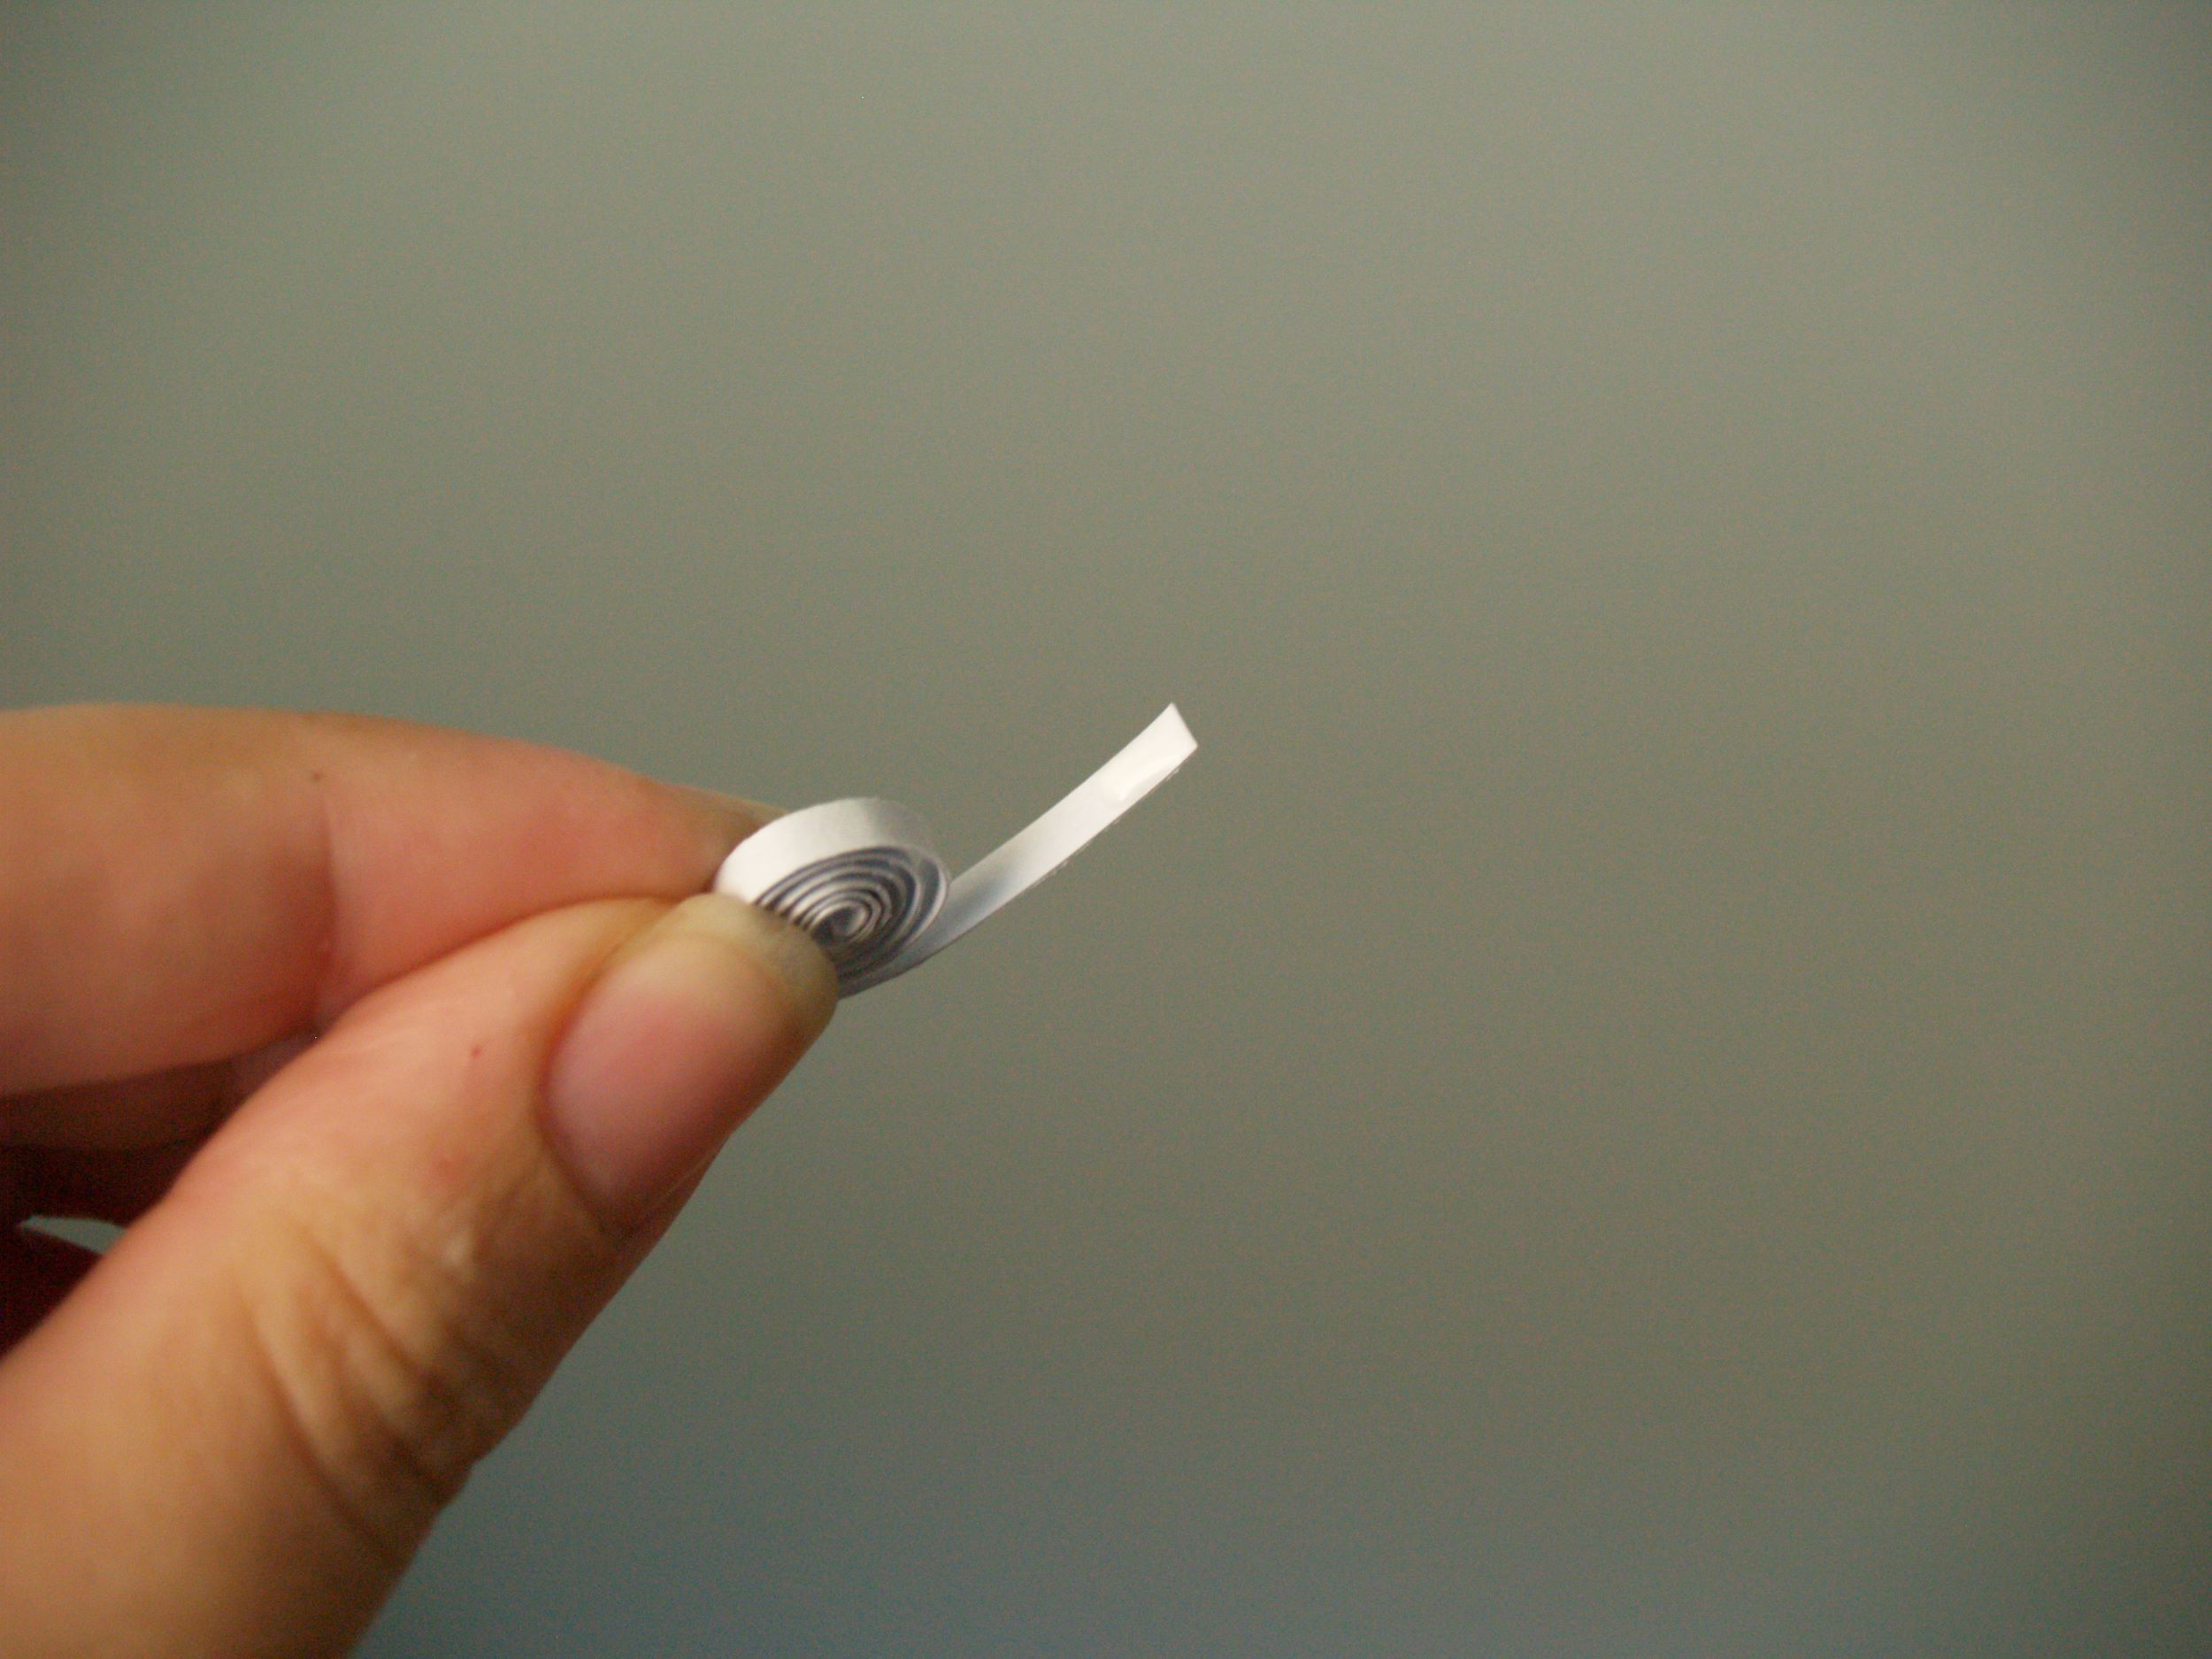
Insert the paper strip into the notch of the quilling tool, bring the tool to the very end of the paper, and begin rolling.
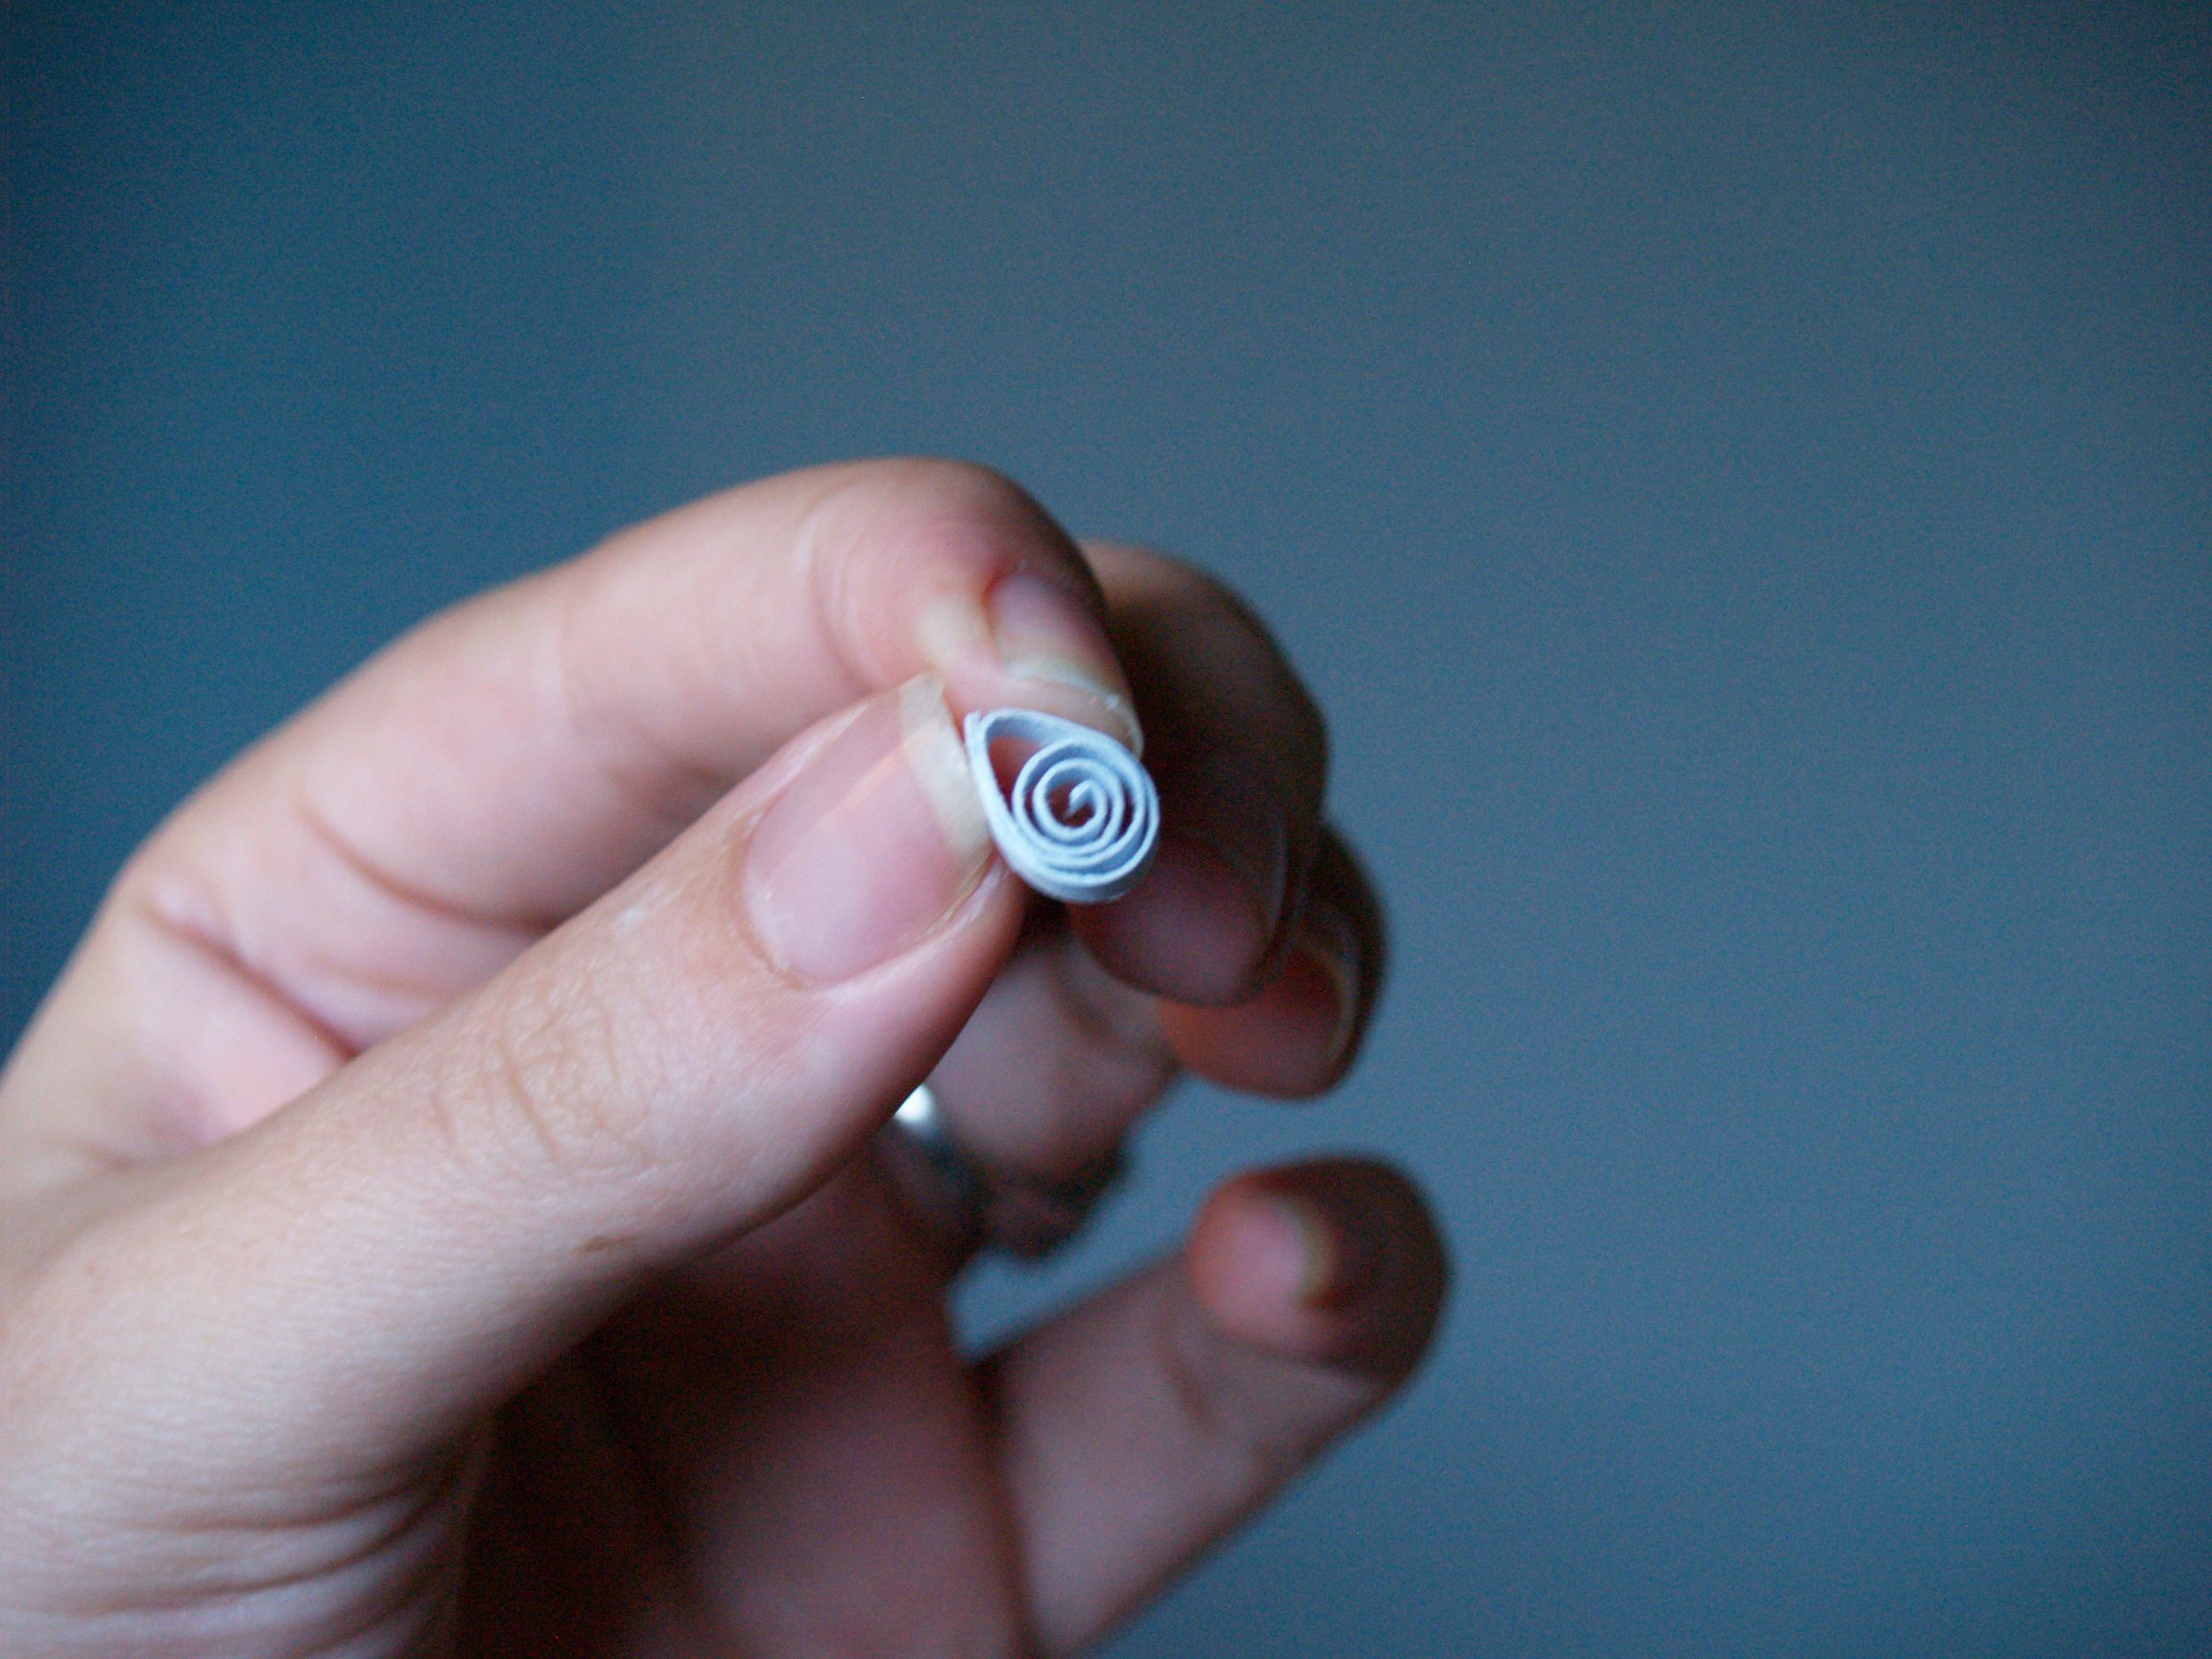
Let’s start with the 6″ center round. Once you master making the round, you can make any other shape. And it’s even easier than it sounds. Roll it all the way up, and then let it go so that it relaxes into a more loosely wound circle.
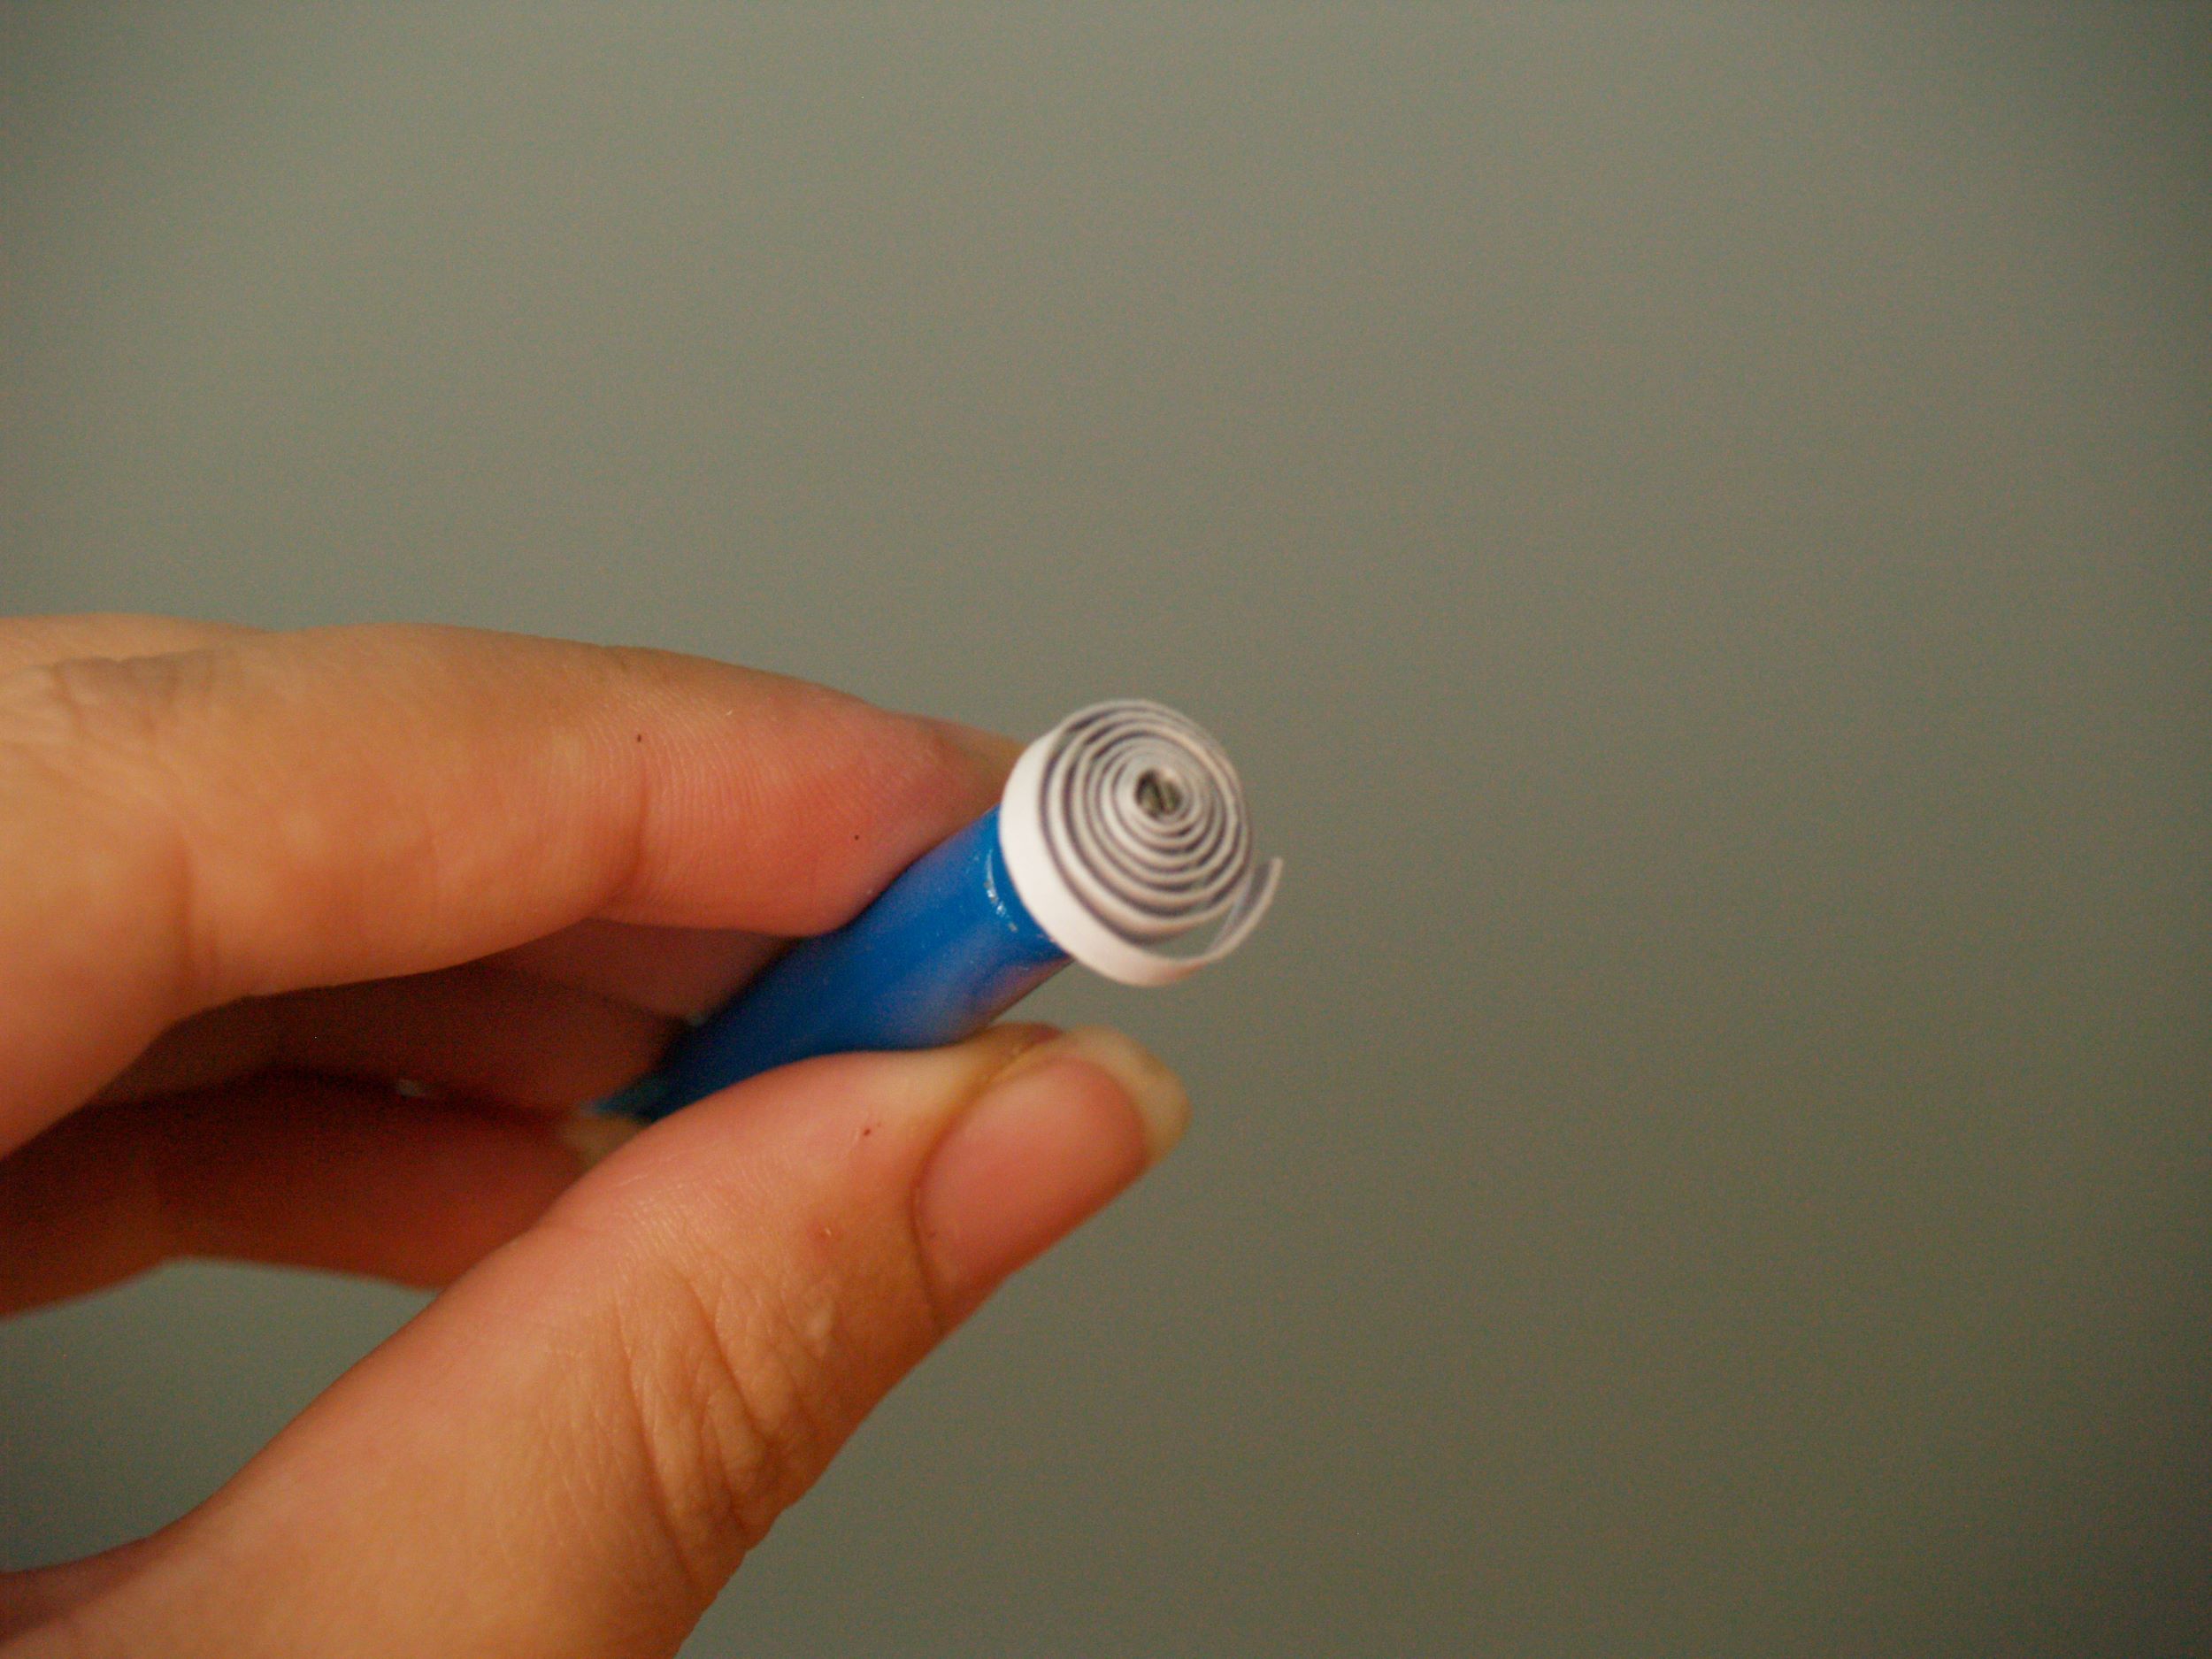
Spread a little glue on the tail end, and glue it down. Typically when you quill, you’d tear the very tip off before you glue down the other end. That feathery torn edge blends into the rest of the shape, where a cut end will form a definite ridge. Here, you won’t notice any ridge so it’s not worth the extra step.
The Round shape also provides a basis for the teardrop shape and the marquis.
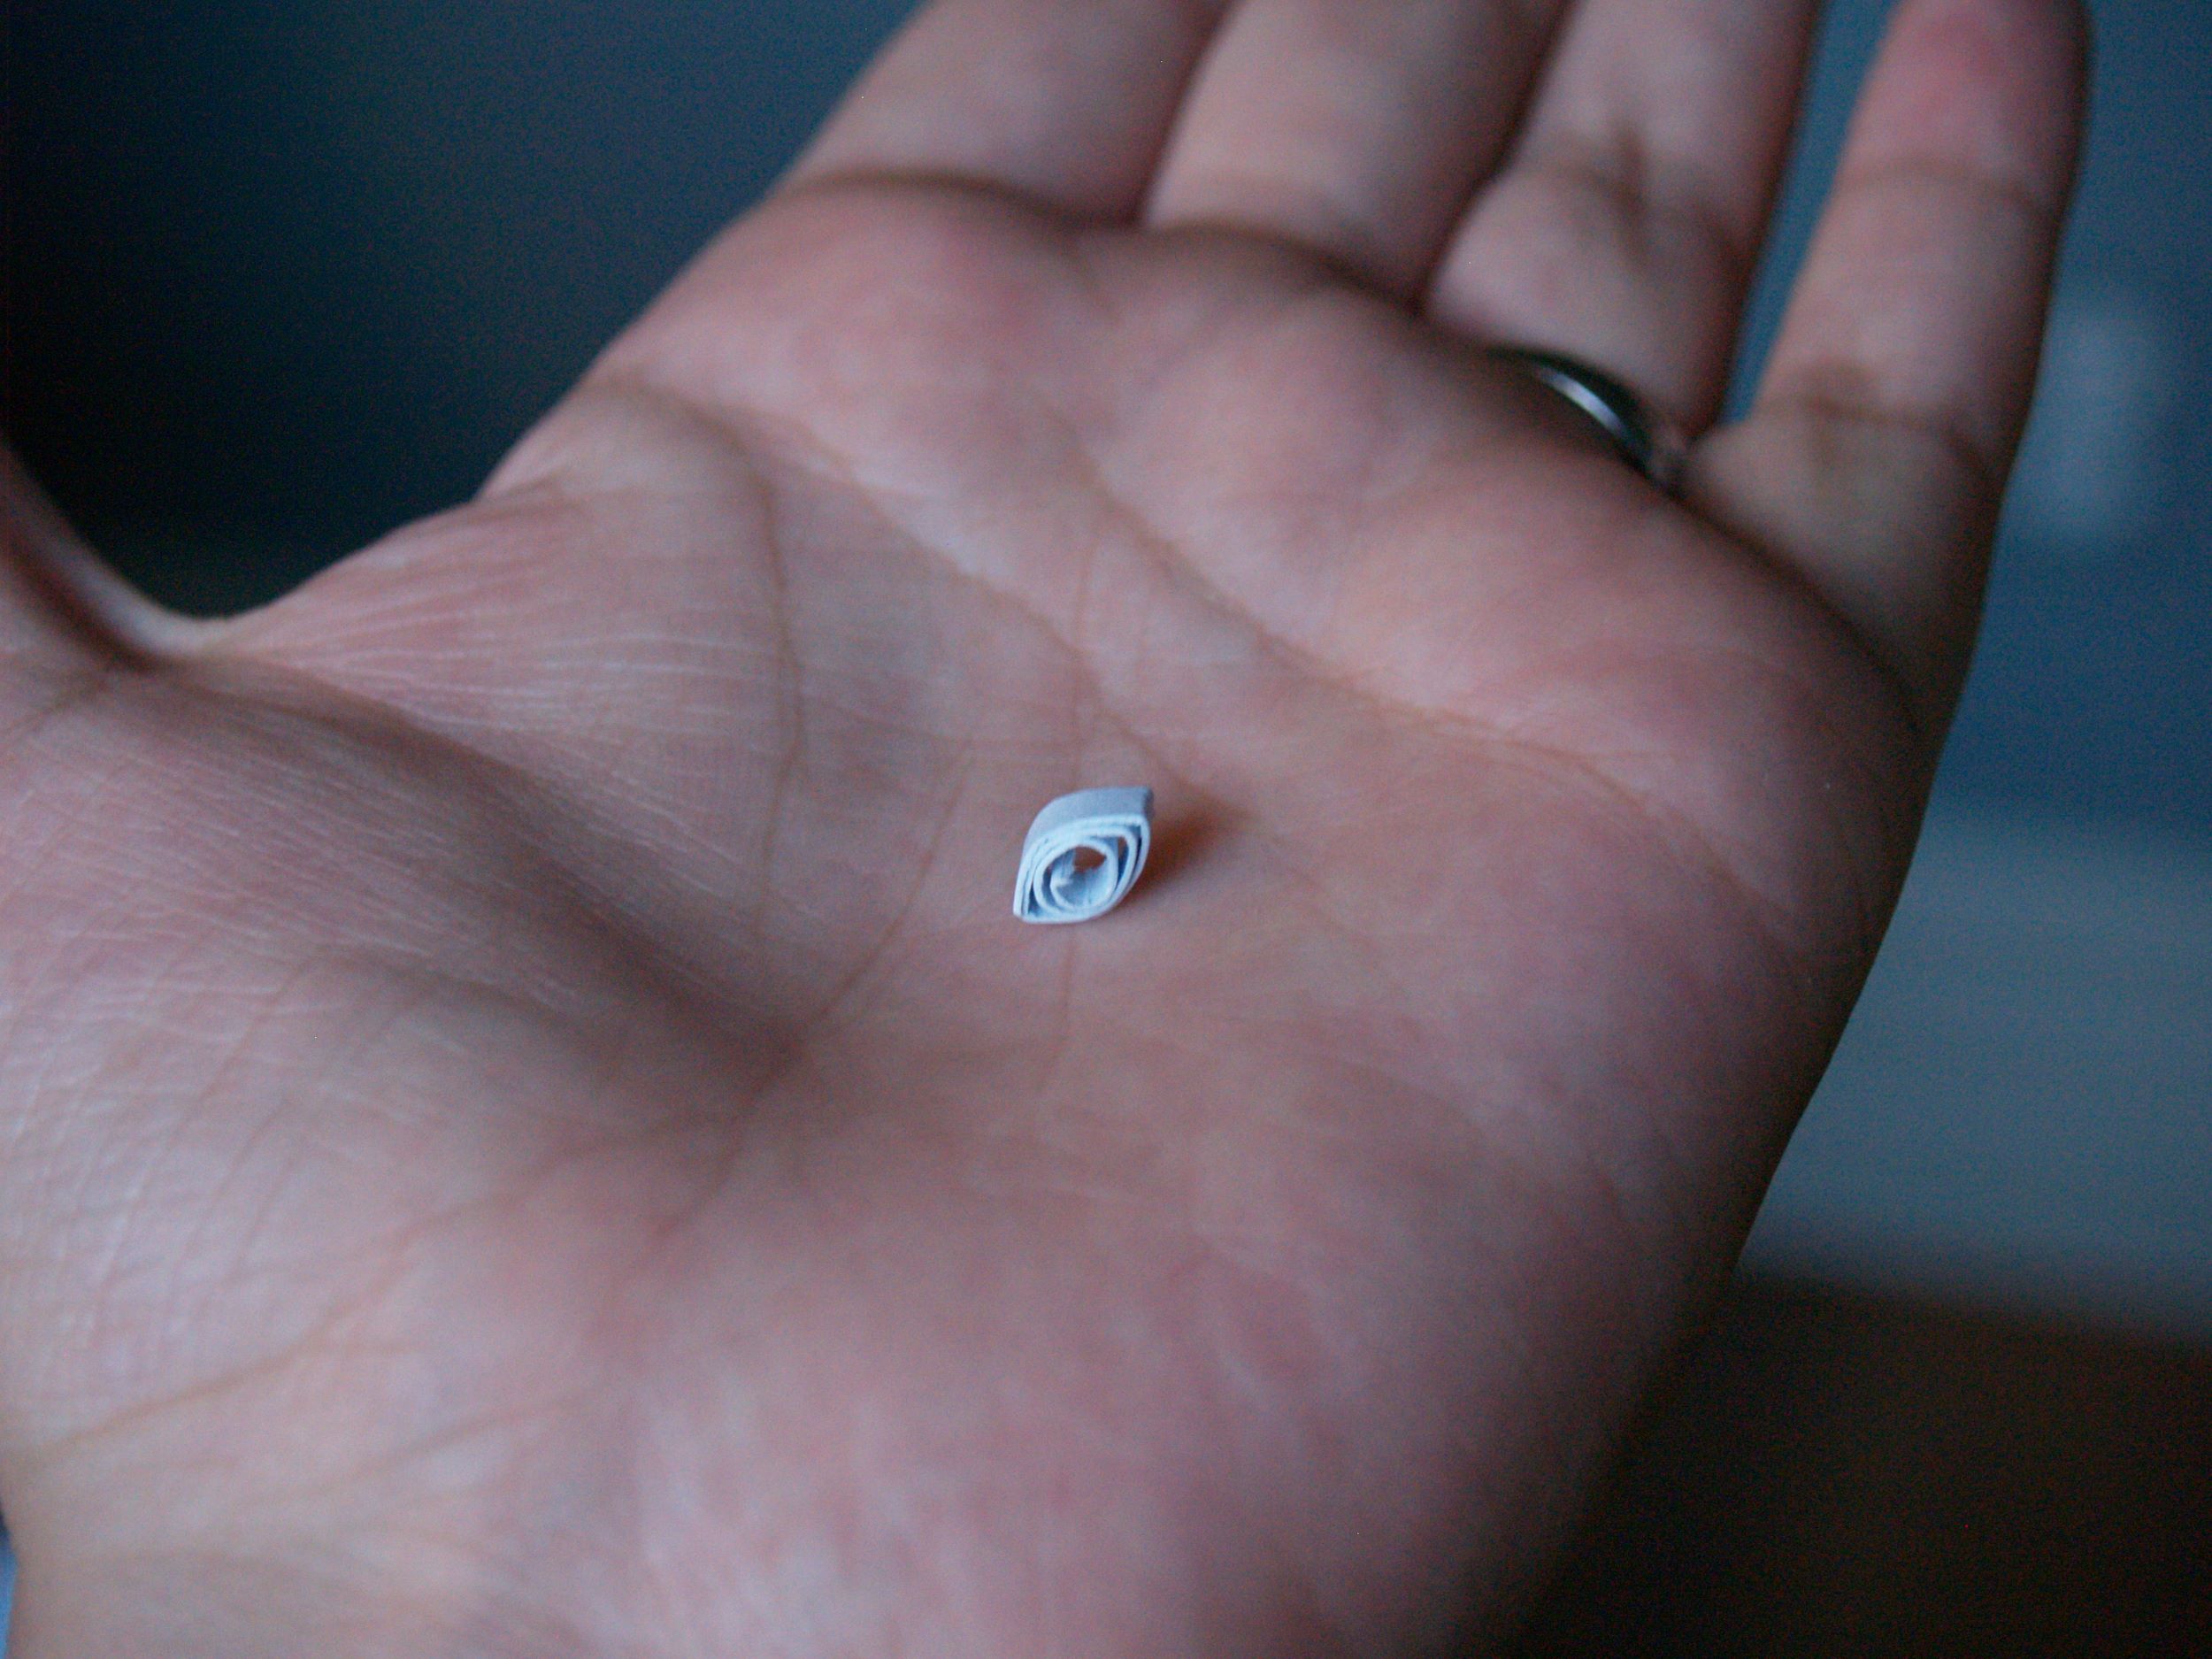
For the teardrop shape, you’ll take one side of a round made from one of the 3″ strips and pinch it to create a point. Since we haven’t bothered to blend our ends in, I try to line up that ridge with the point at the top of the teardrop to disguise it.
The marquis is made the exact same way. Make a Round out of a 2″ strip, glue the end in place, and pinch both ends to create two points.
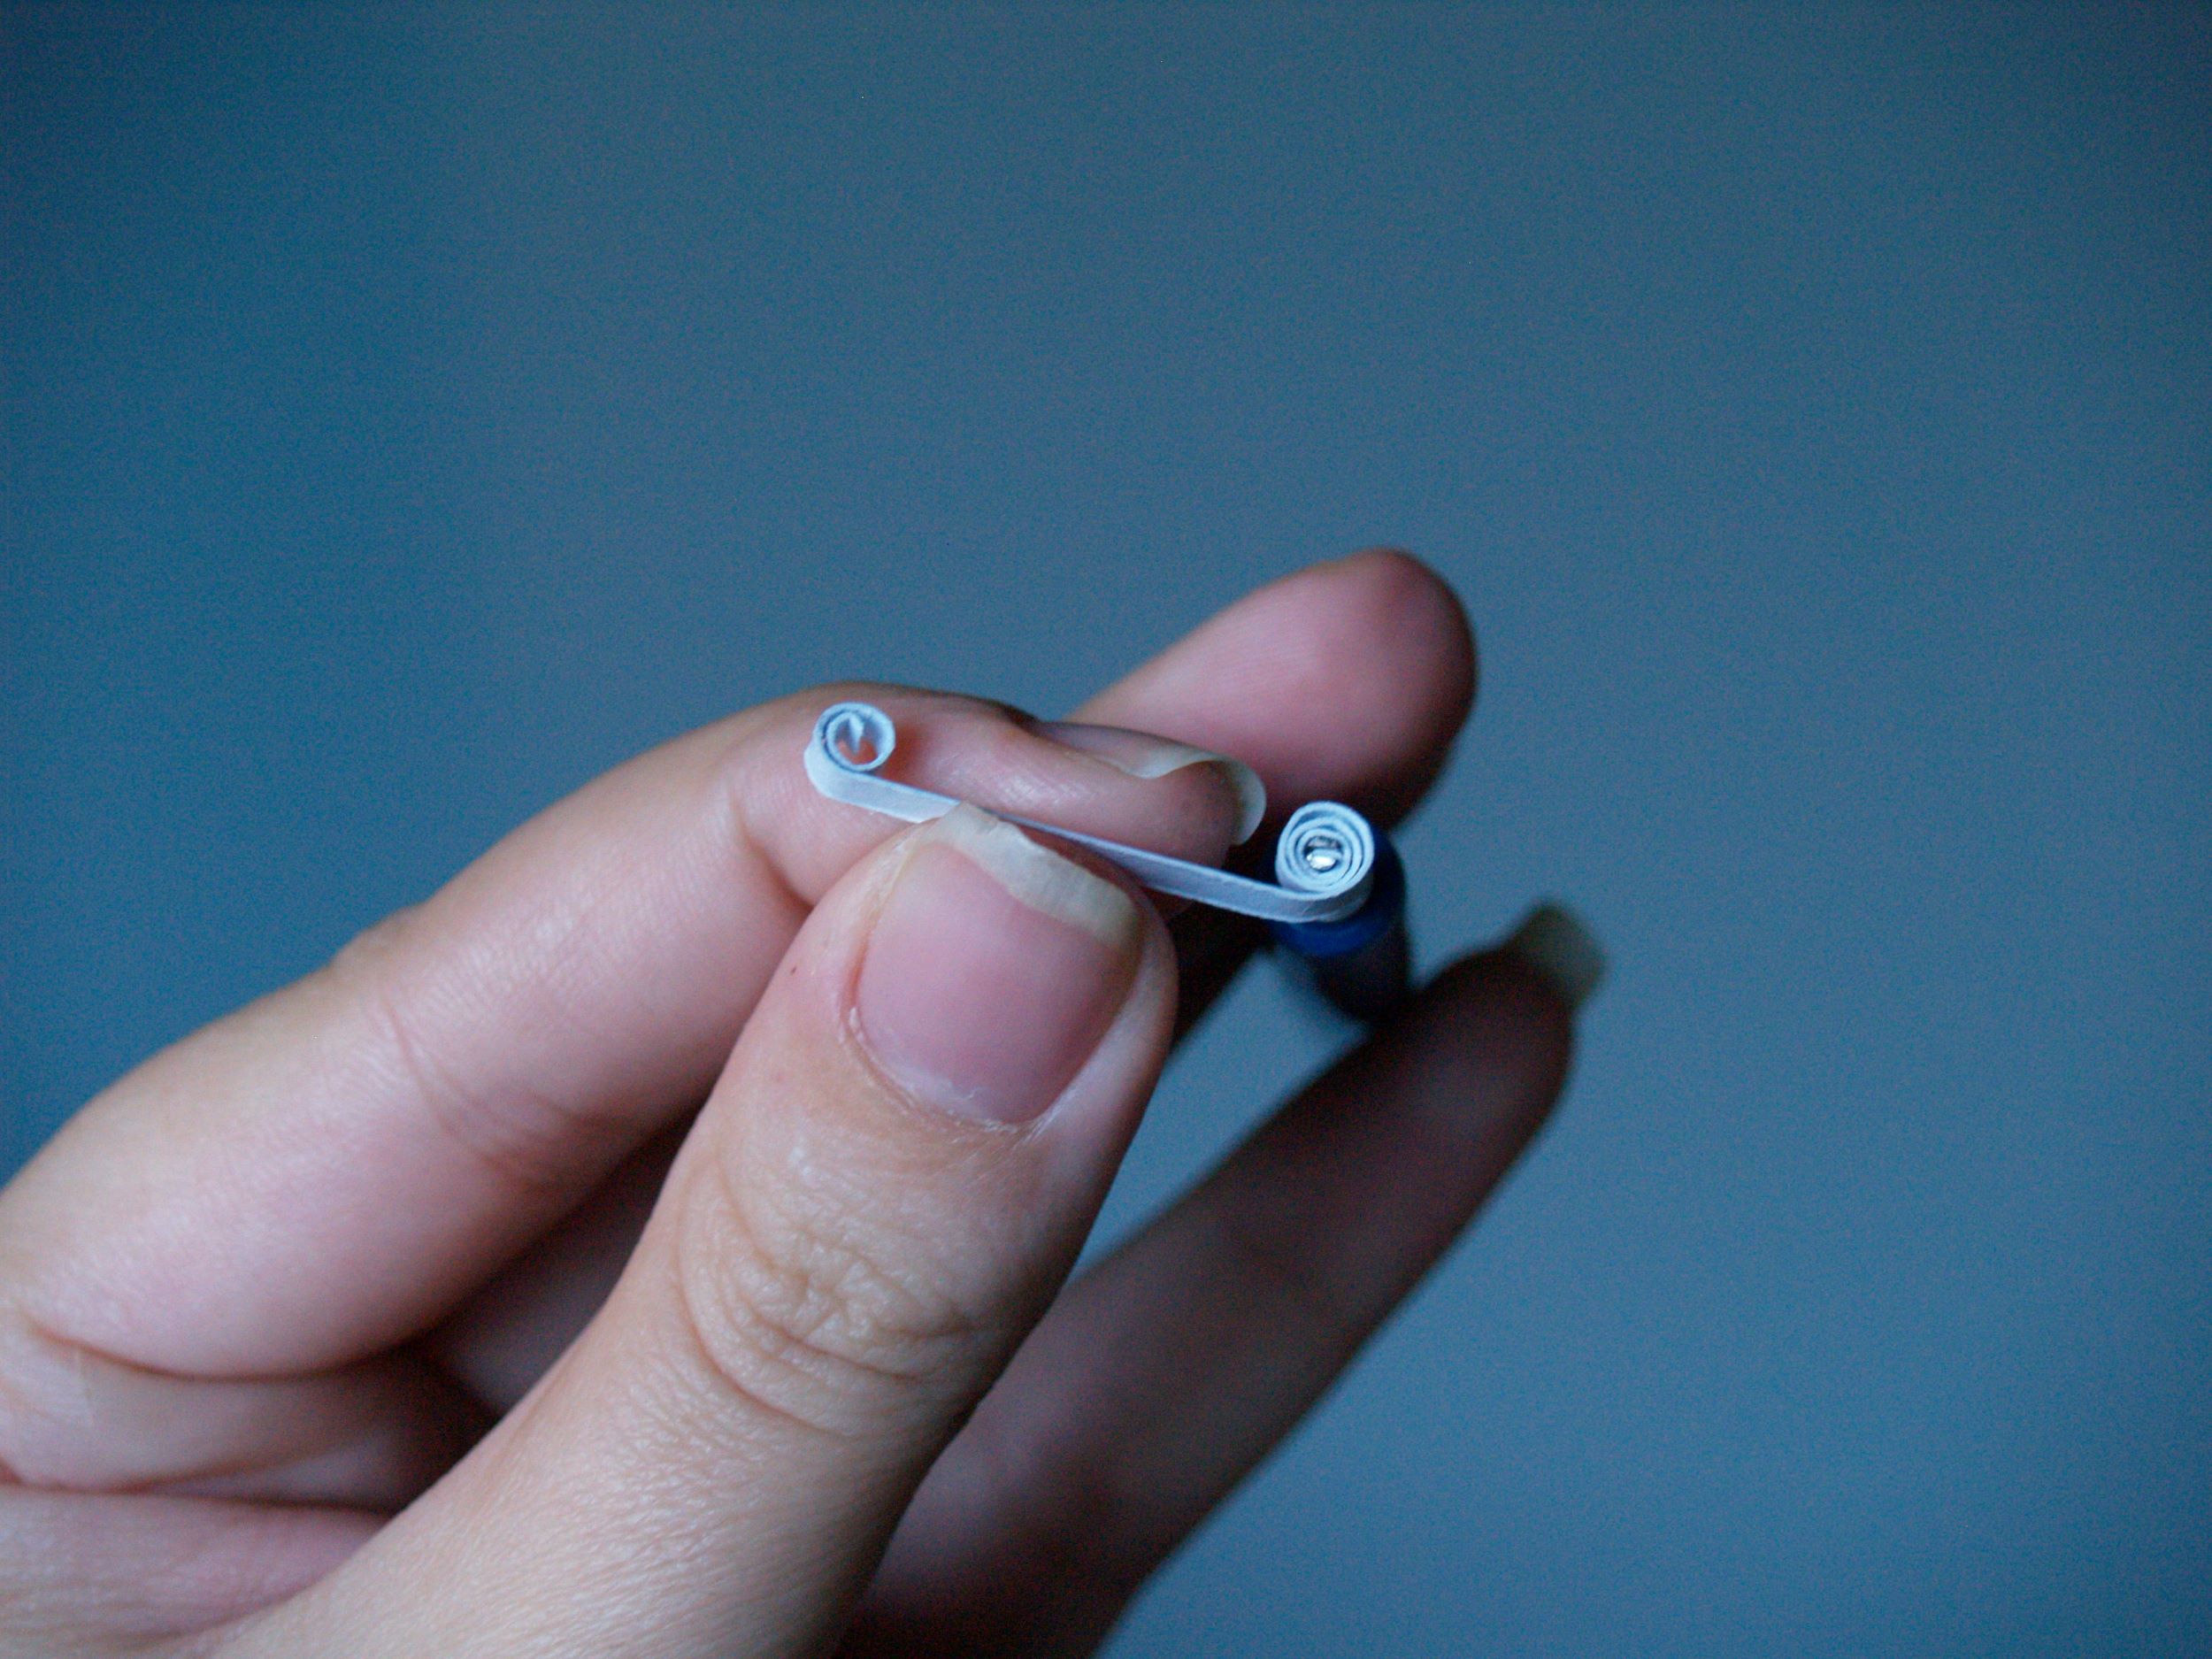
Next let’s make the scrolls. Fold a 6″ strip in half and roll each end up to that halfway point. As is this is a heart shape. Typically a scroll isn’t folded, but it helps to have a measuring point and we’ll be gluing that point down anyway, so it won’t show.
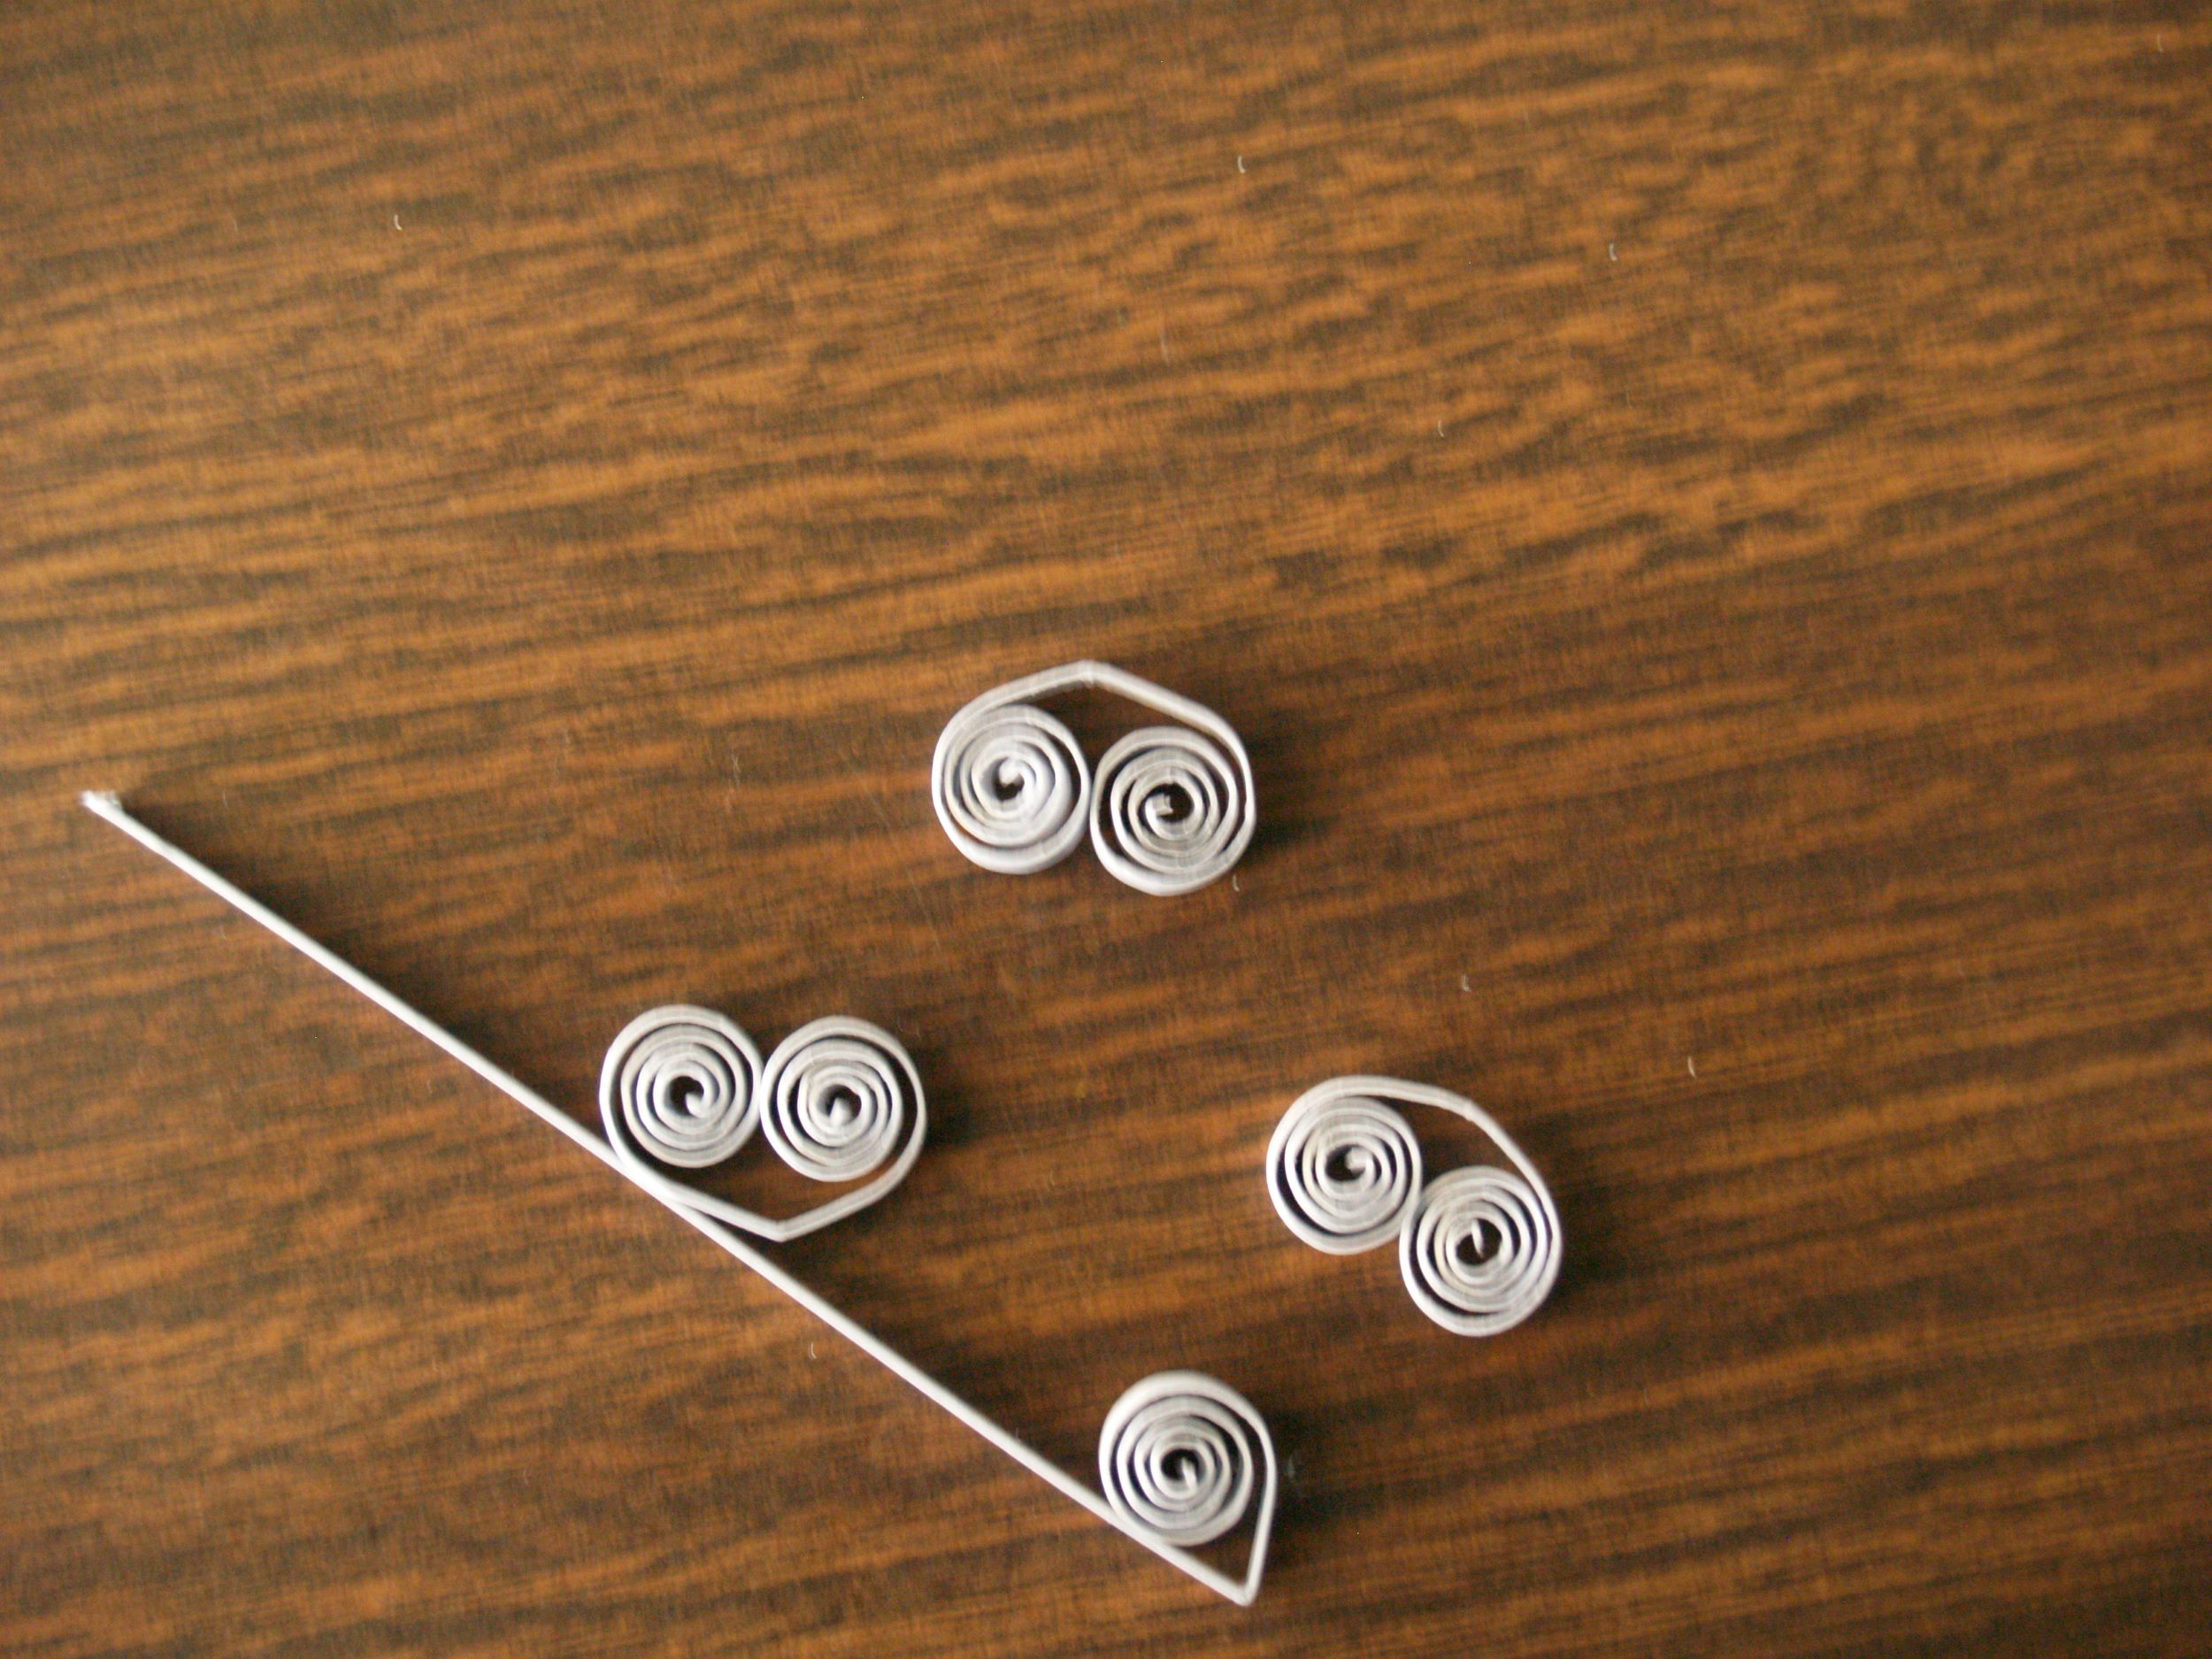
Sorry about the blurry pictures. I really needed a macro lens for this project.
The last piece is for the arms, made out of a 3″ strip. On one end of the strip, roll in about twice.
On the other end, roll in until the piece measures roughly 1″. Measurements are really loose here. The only thing that matters is that they’re all about the same height. Whether that height is a fraction of an inch taller or shorter doesn’t matter at all.
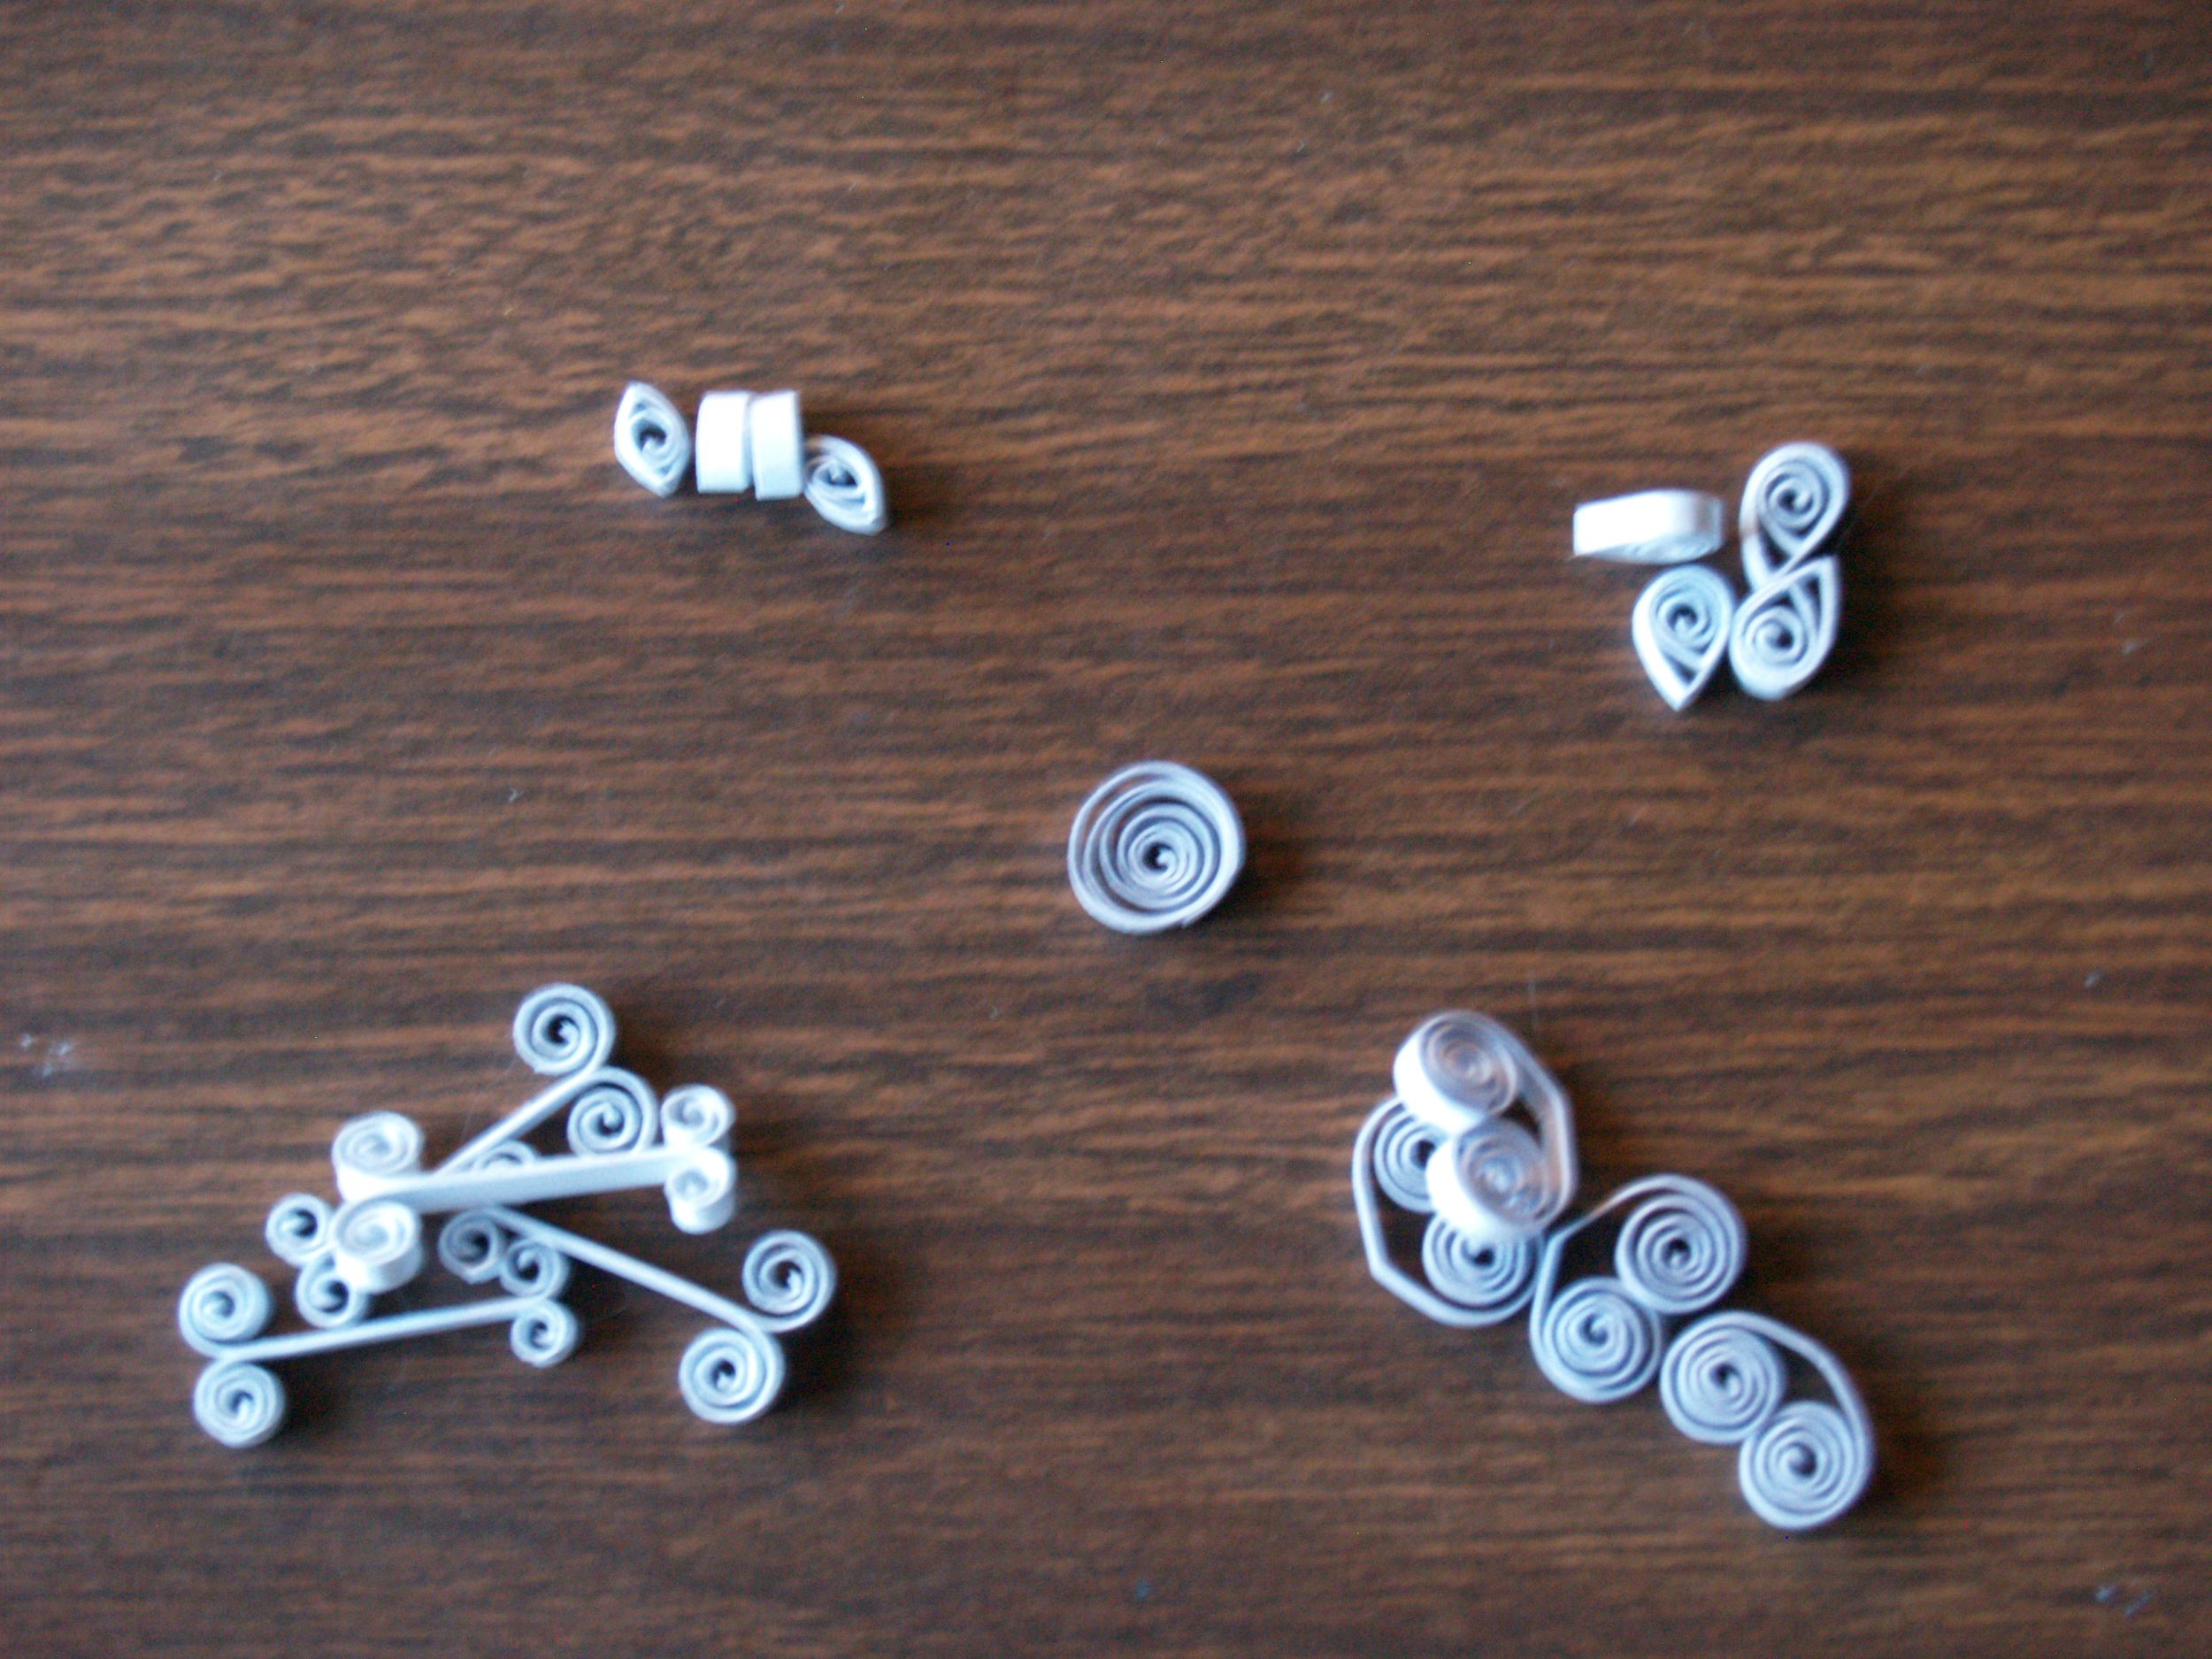
That’s it. You’ve made all your pieces. The rest is just putting it together. Start by taking 2 of the arms and glue them together back to back. With that step complete you should have:
1 Round
4 Teardrops
4 Marquis
4 Scrolls
4 Arm Pieces
Start with the Round piece. This will be the center. Next come the arm pieces. Bump the edges of those bottom loops up next to each other, and glue each piece down to the round.
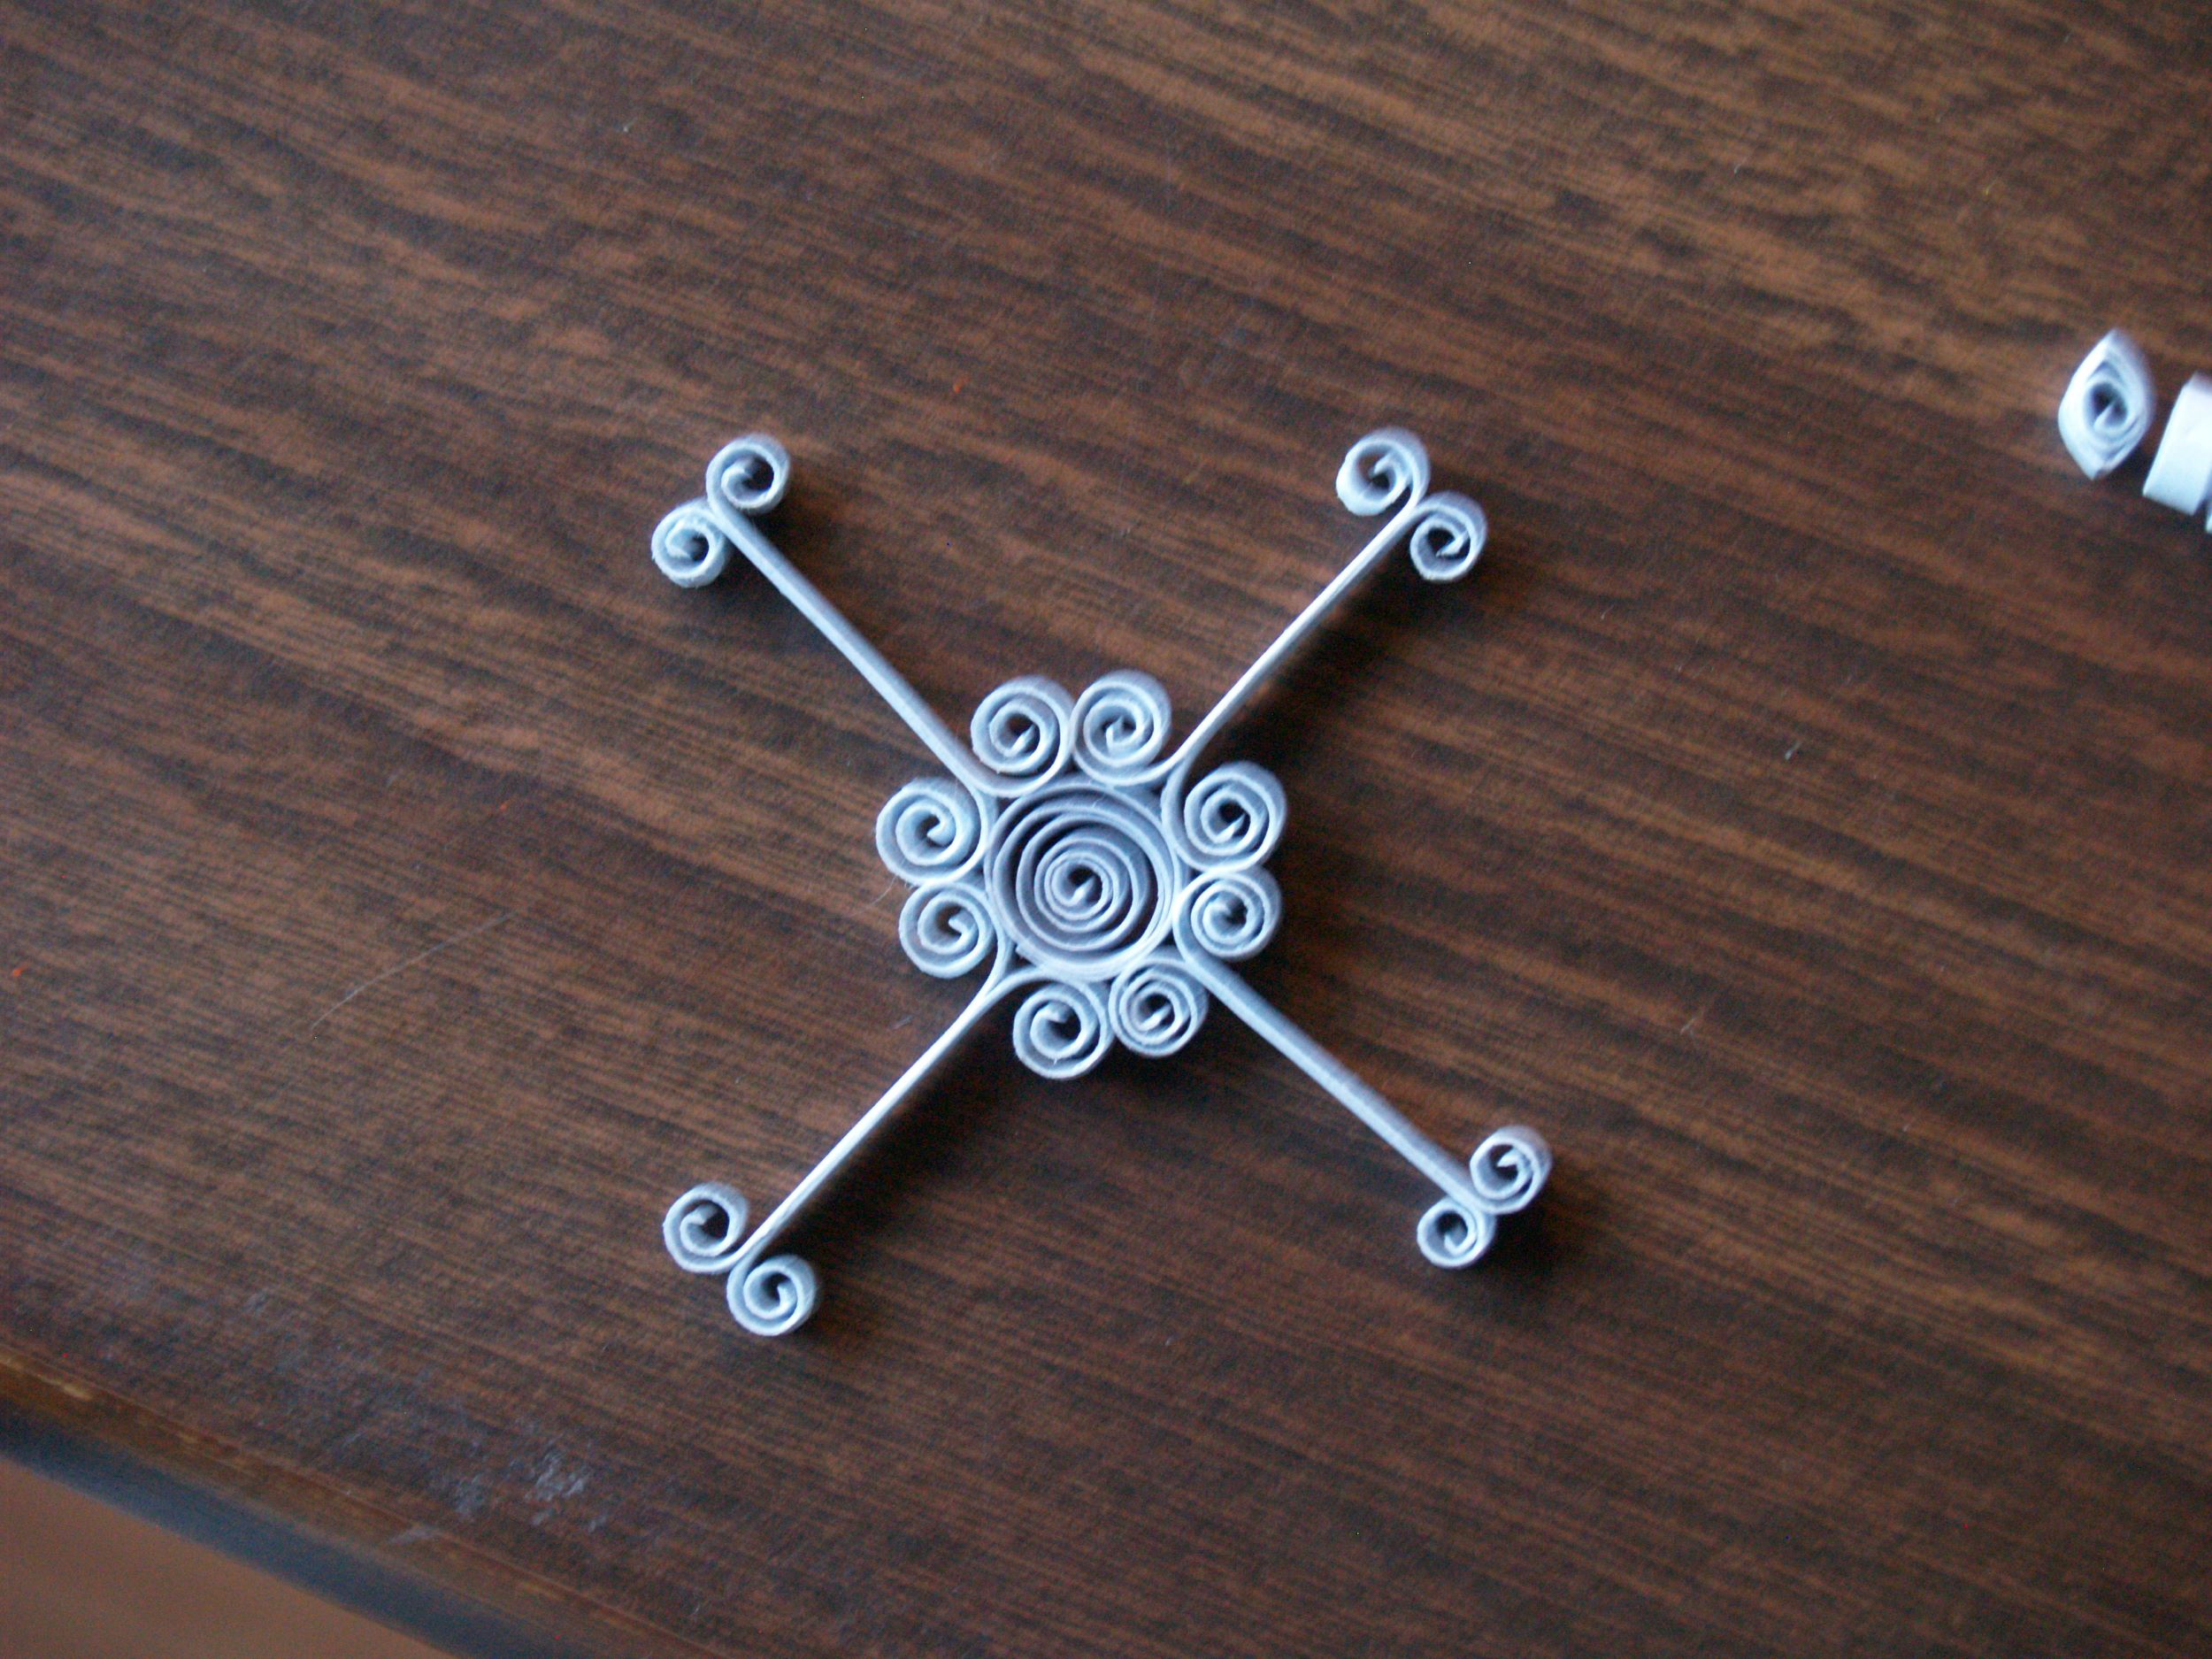
Now take a scroll and glue it onto those little loops you bumped together.
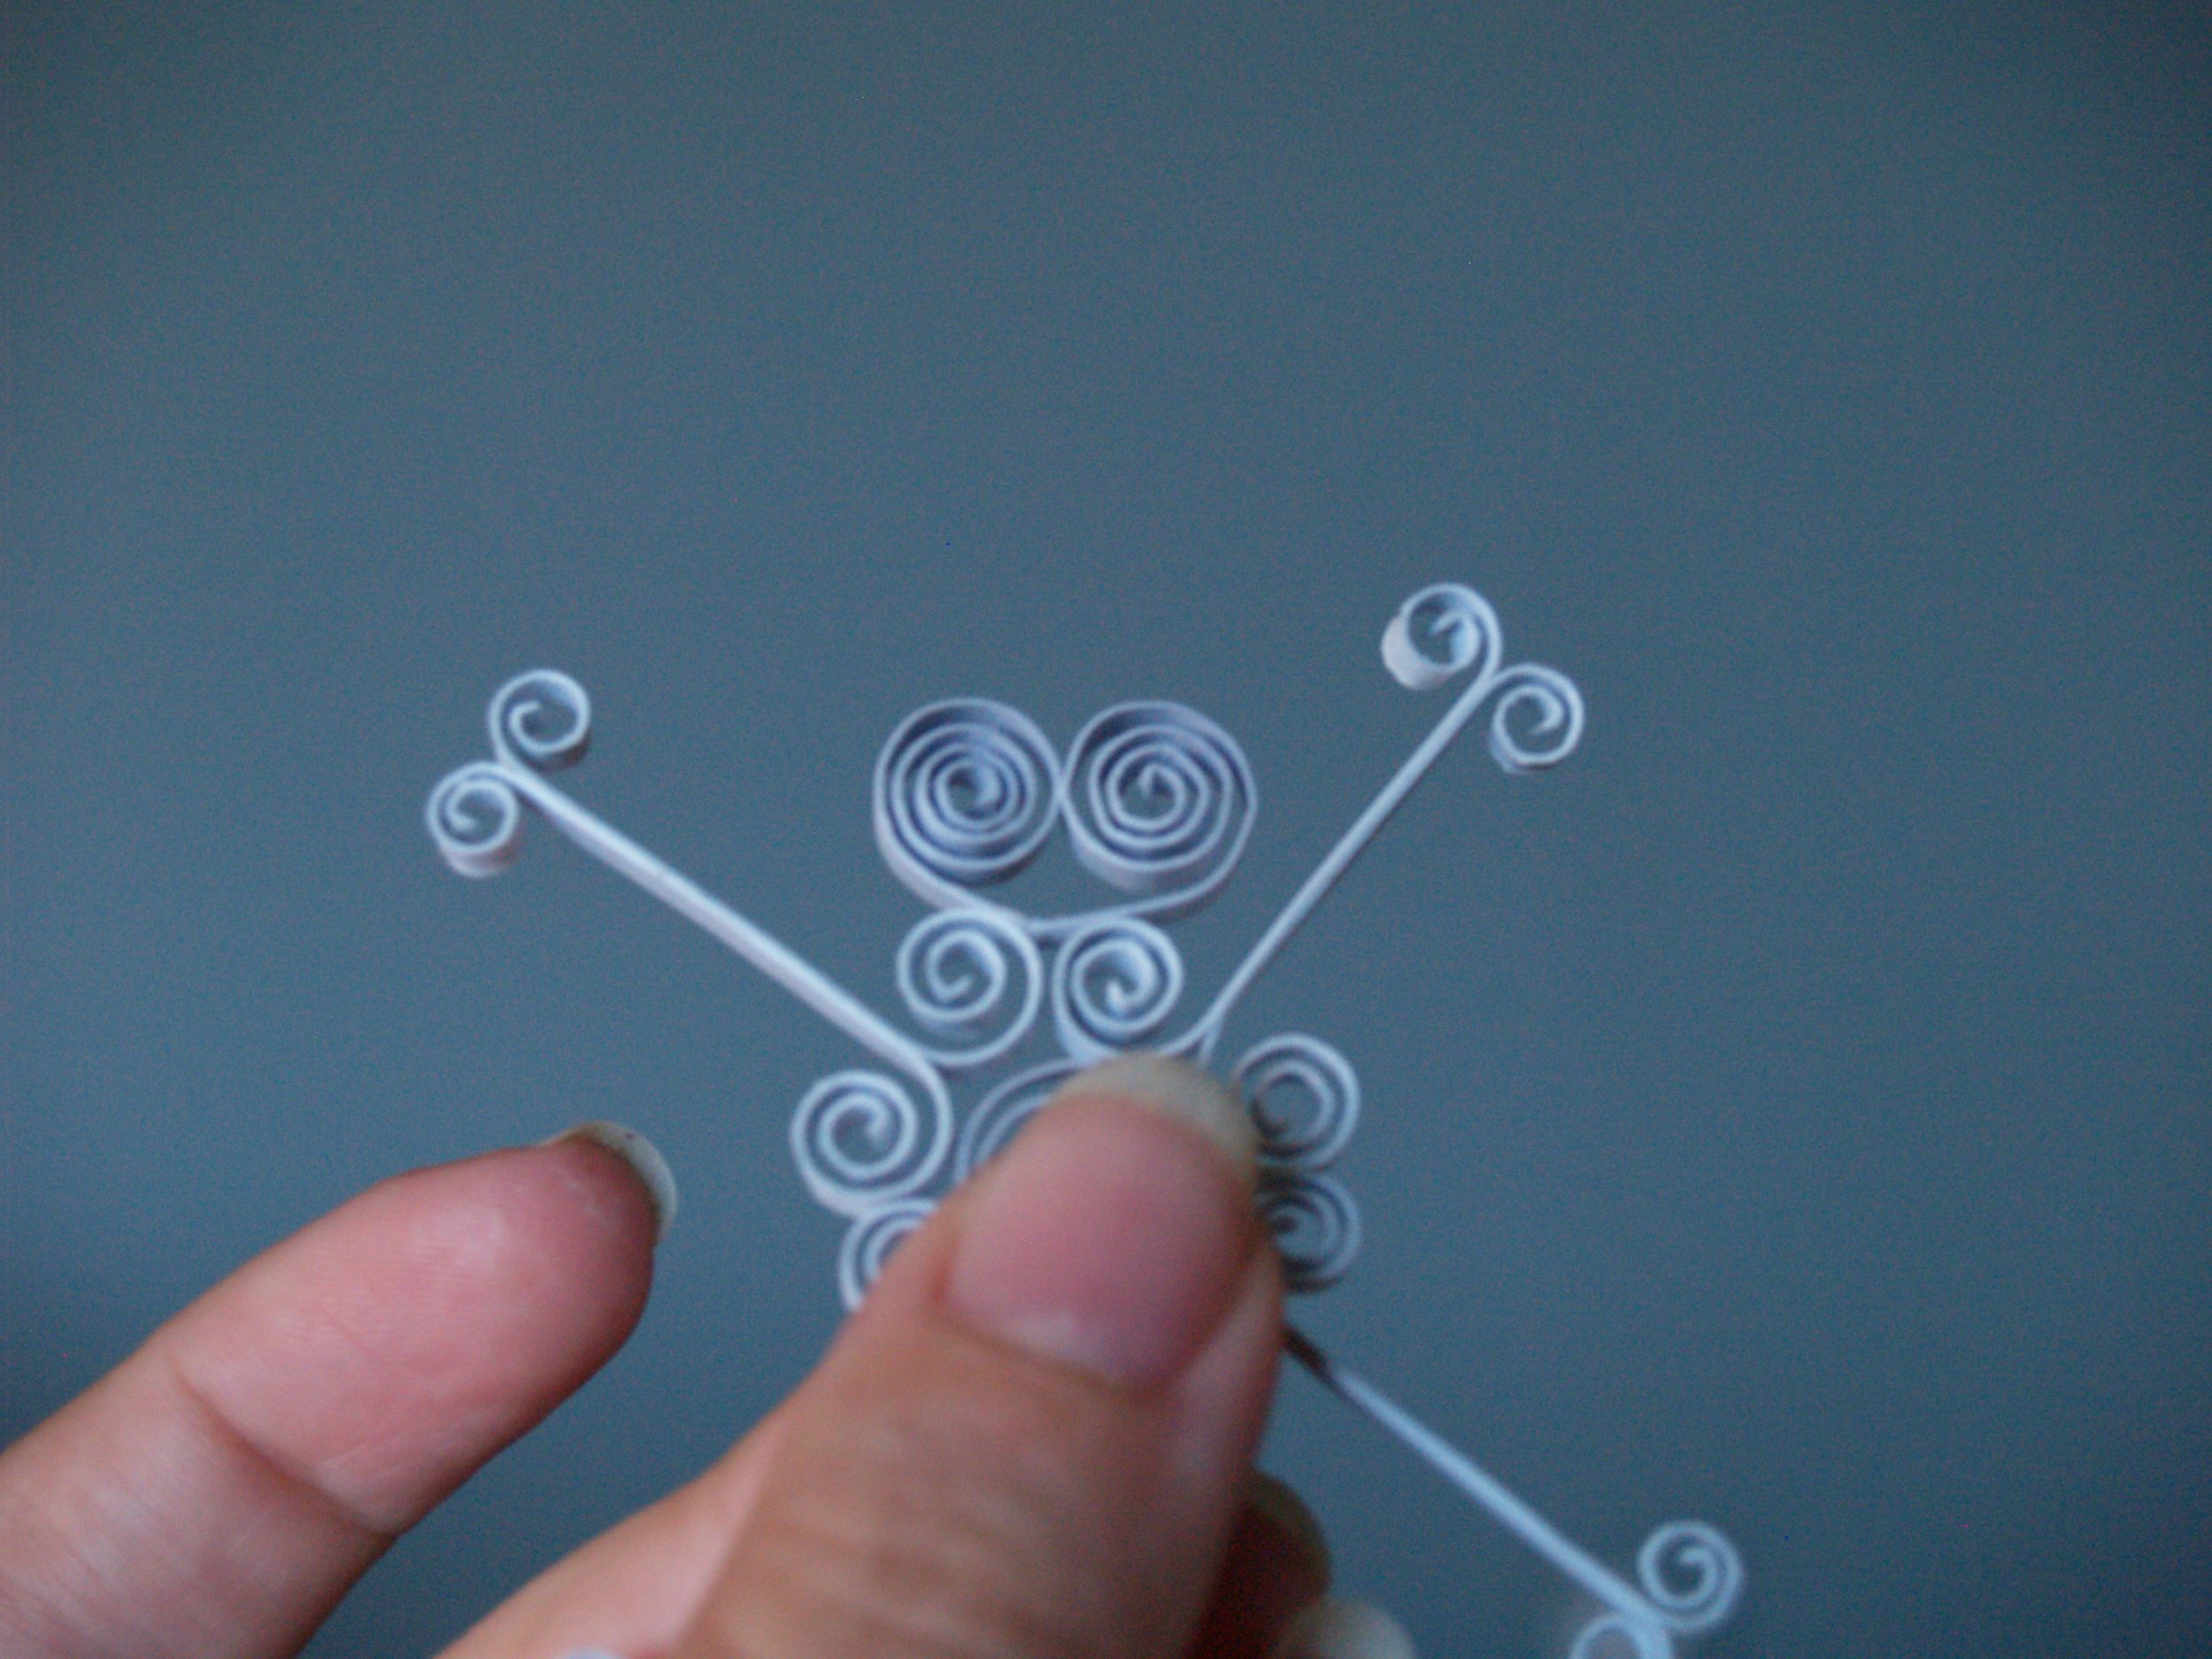
Gently pull the scroll out until it touches the arms, and glue them together where they meet.
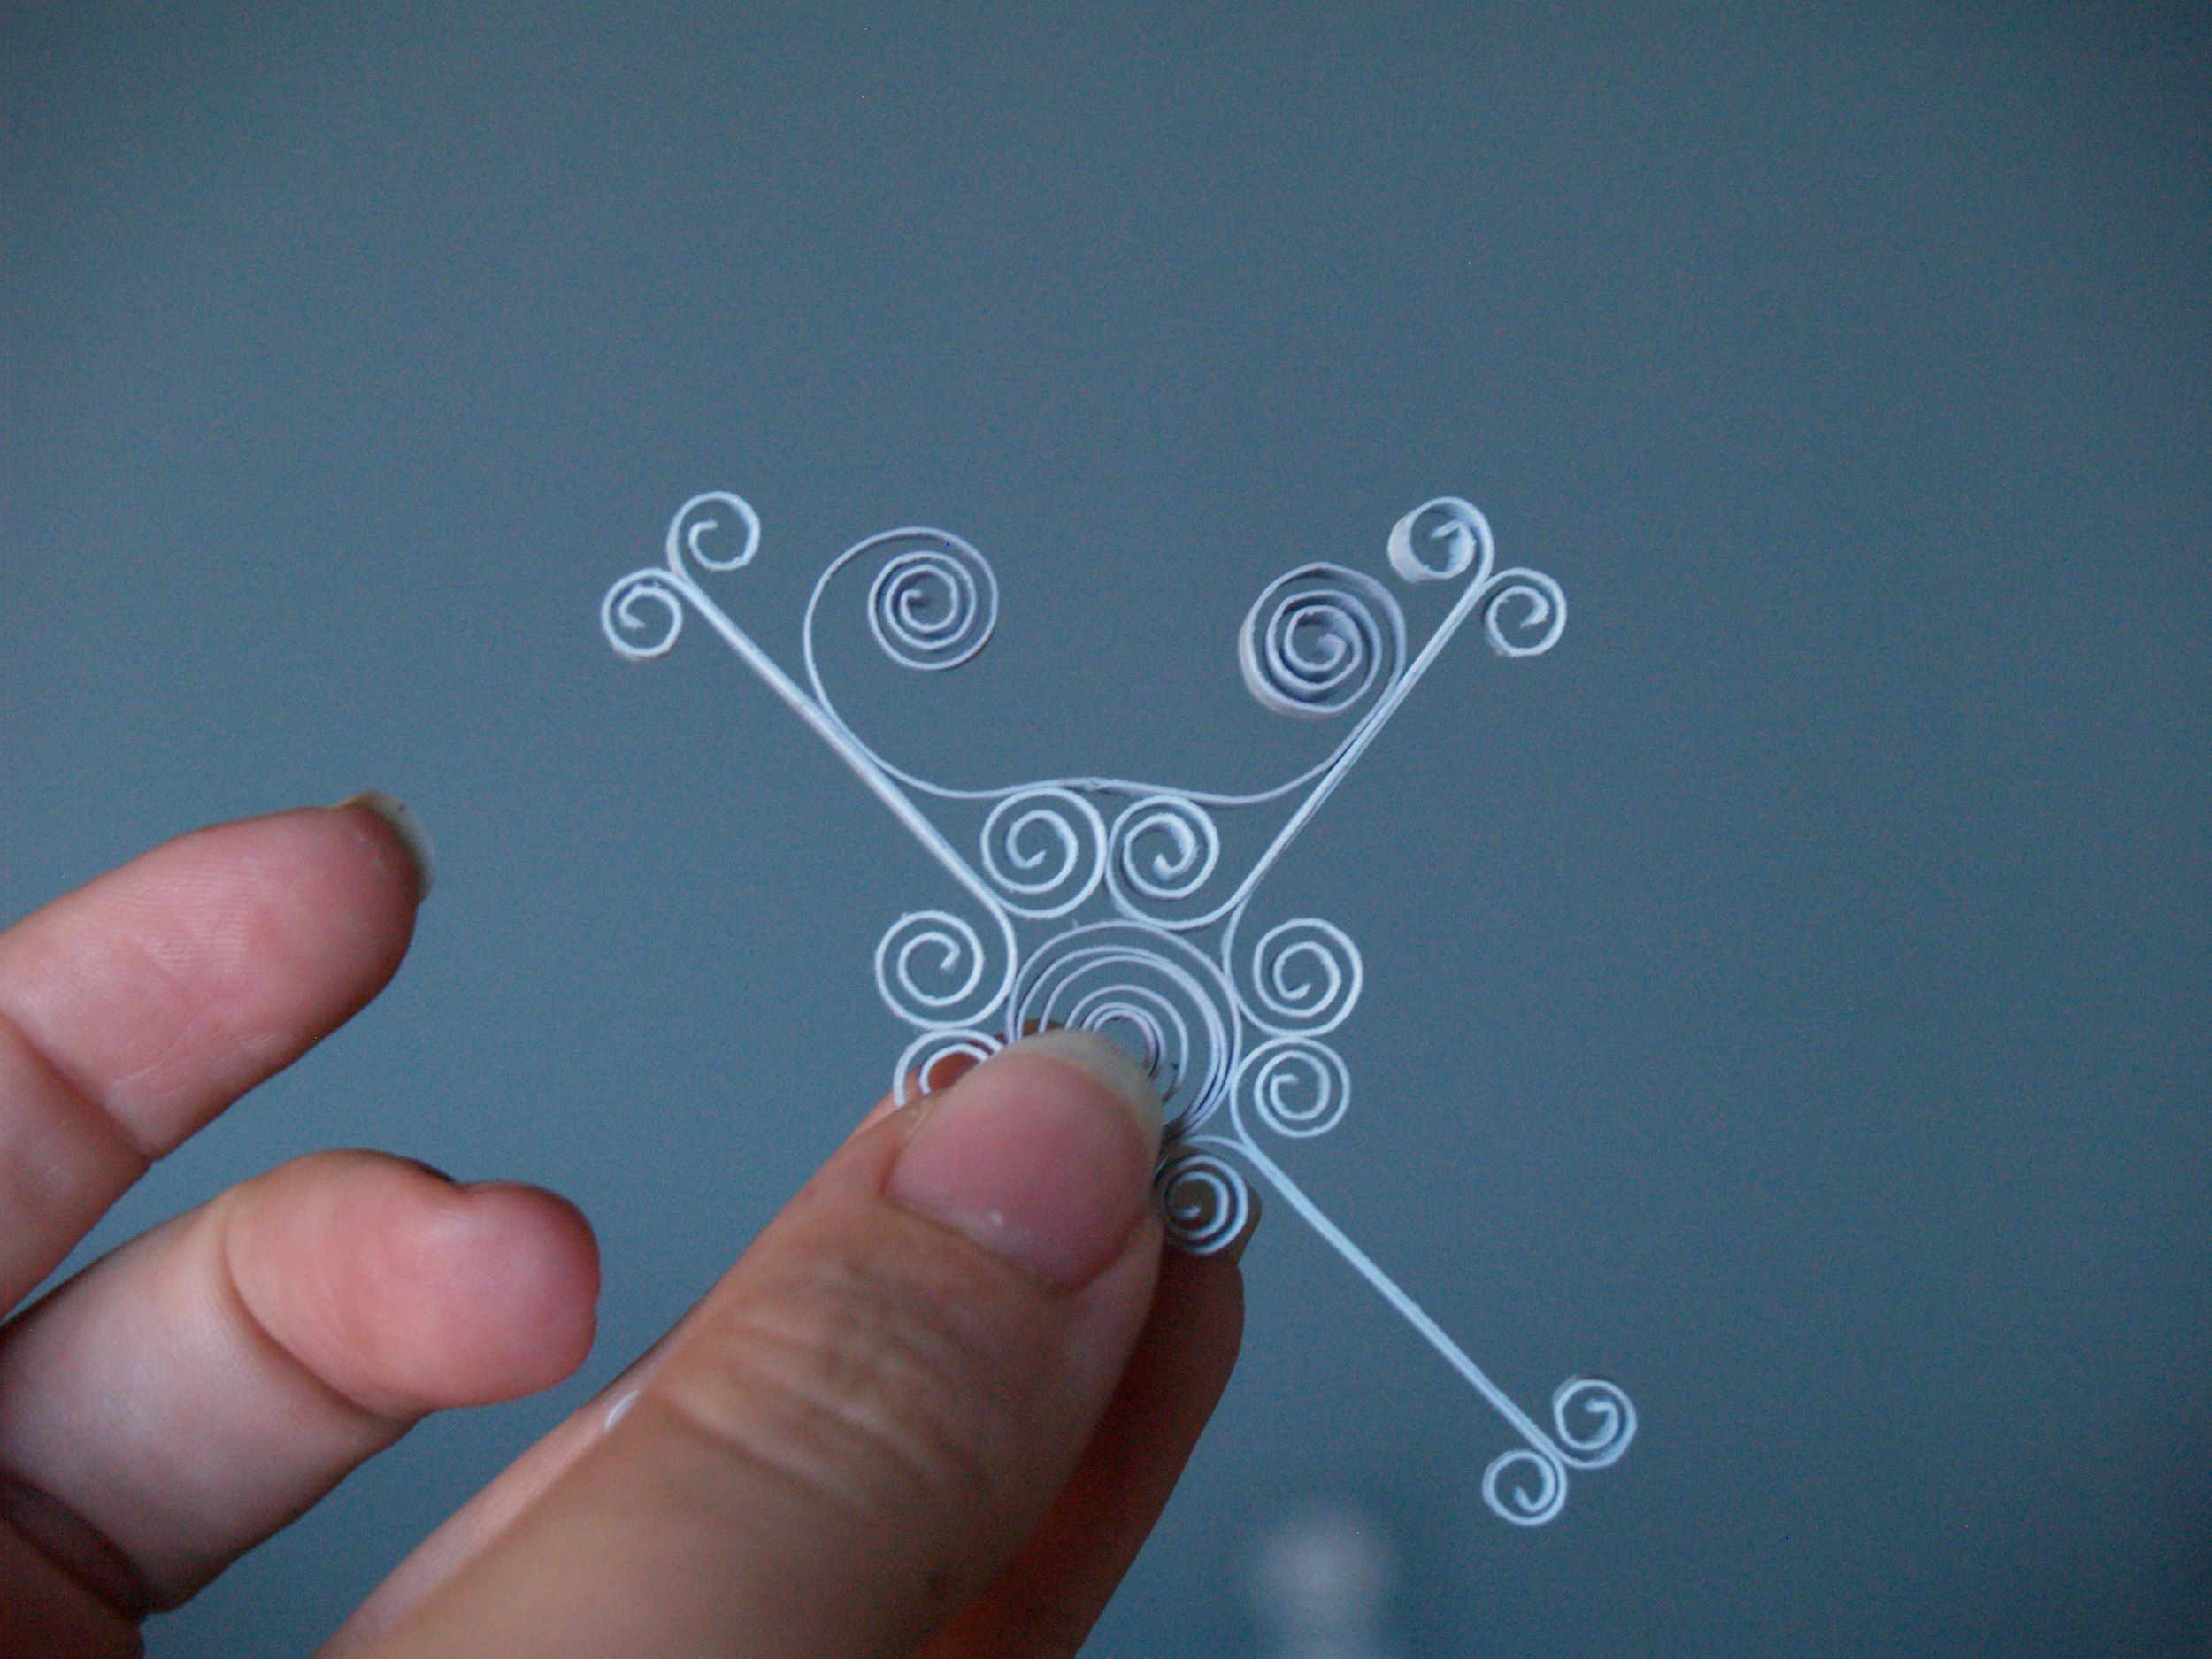
Take one of your teardrops and glue it down in the middle of the scroll. Then pull the scrolls over to meet the teardrop, and glue together. Don’t be afraid to unravel the scroll however much you need to. If the arm is bending or it doesn’t want to stick to the teardrop, you just need to give yourself a little more space.
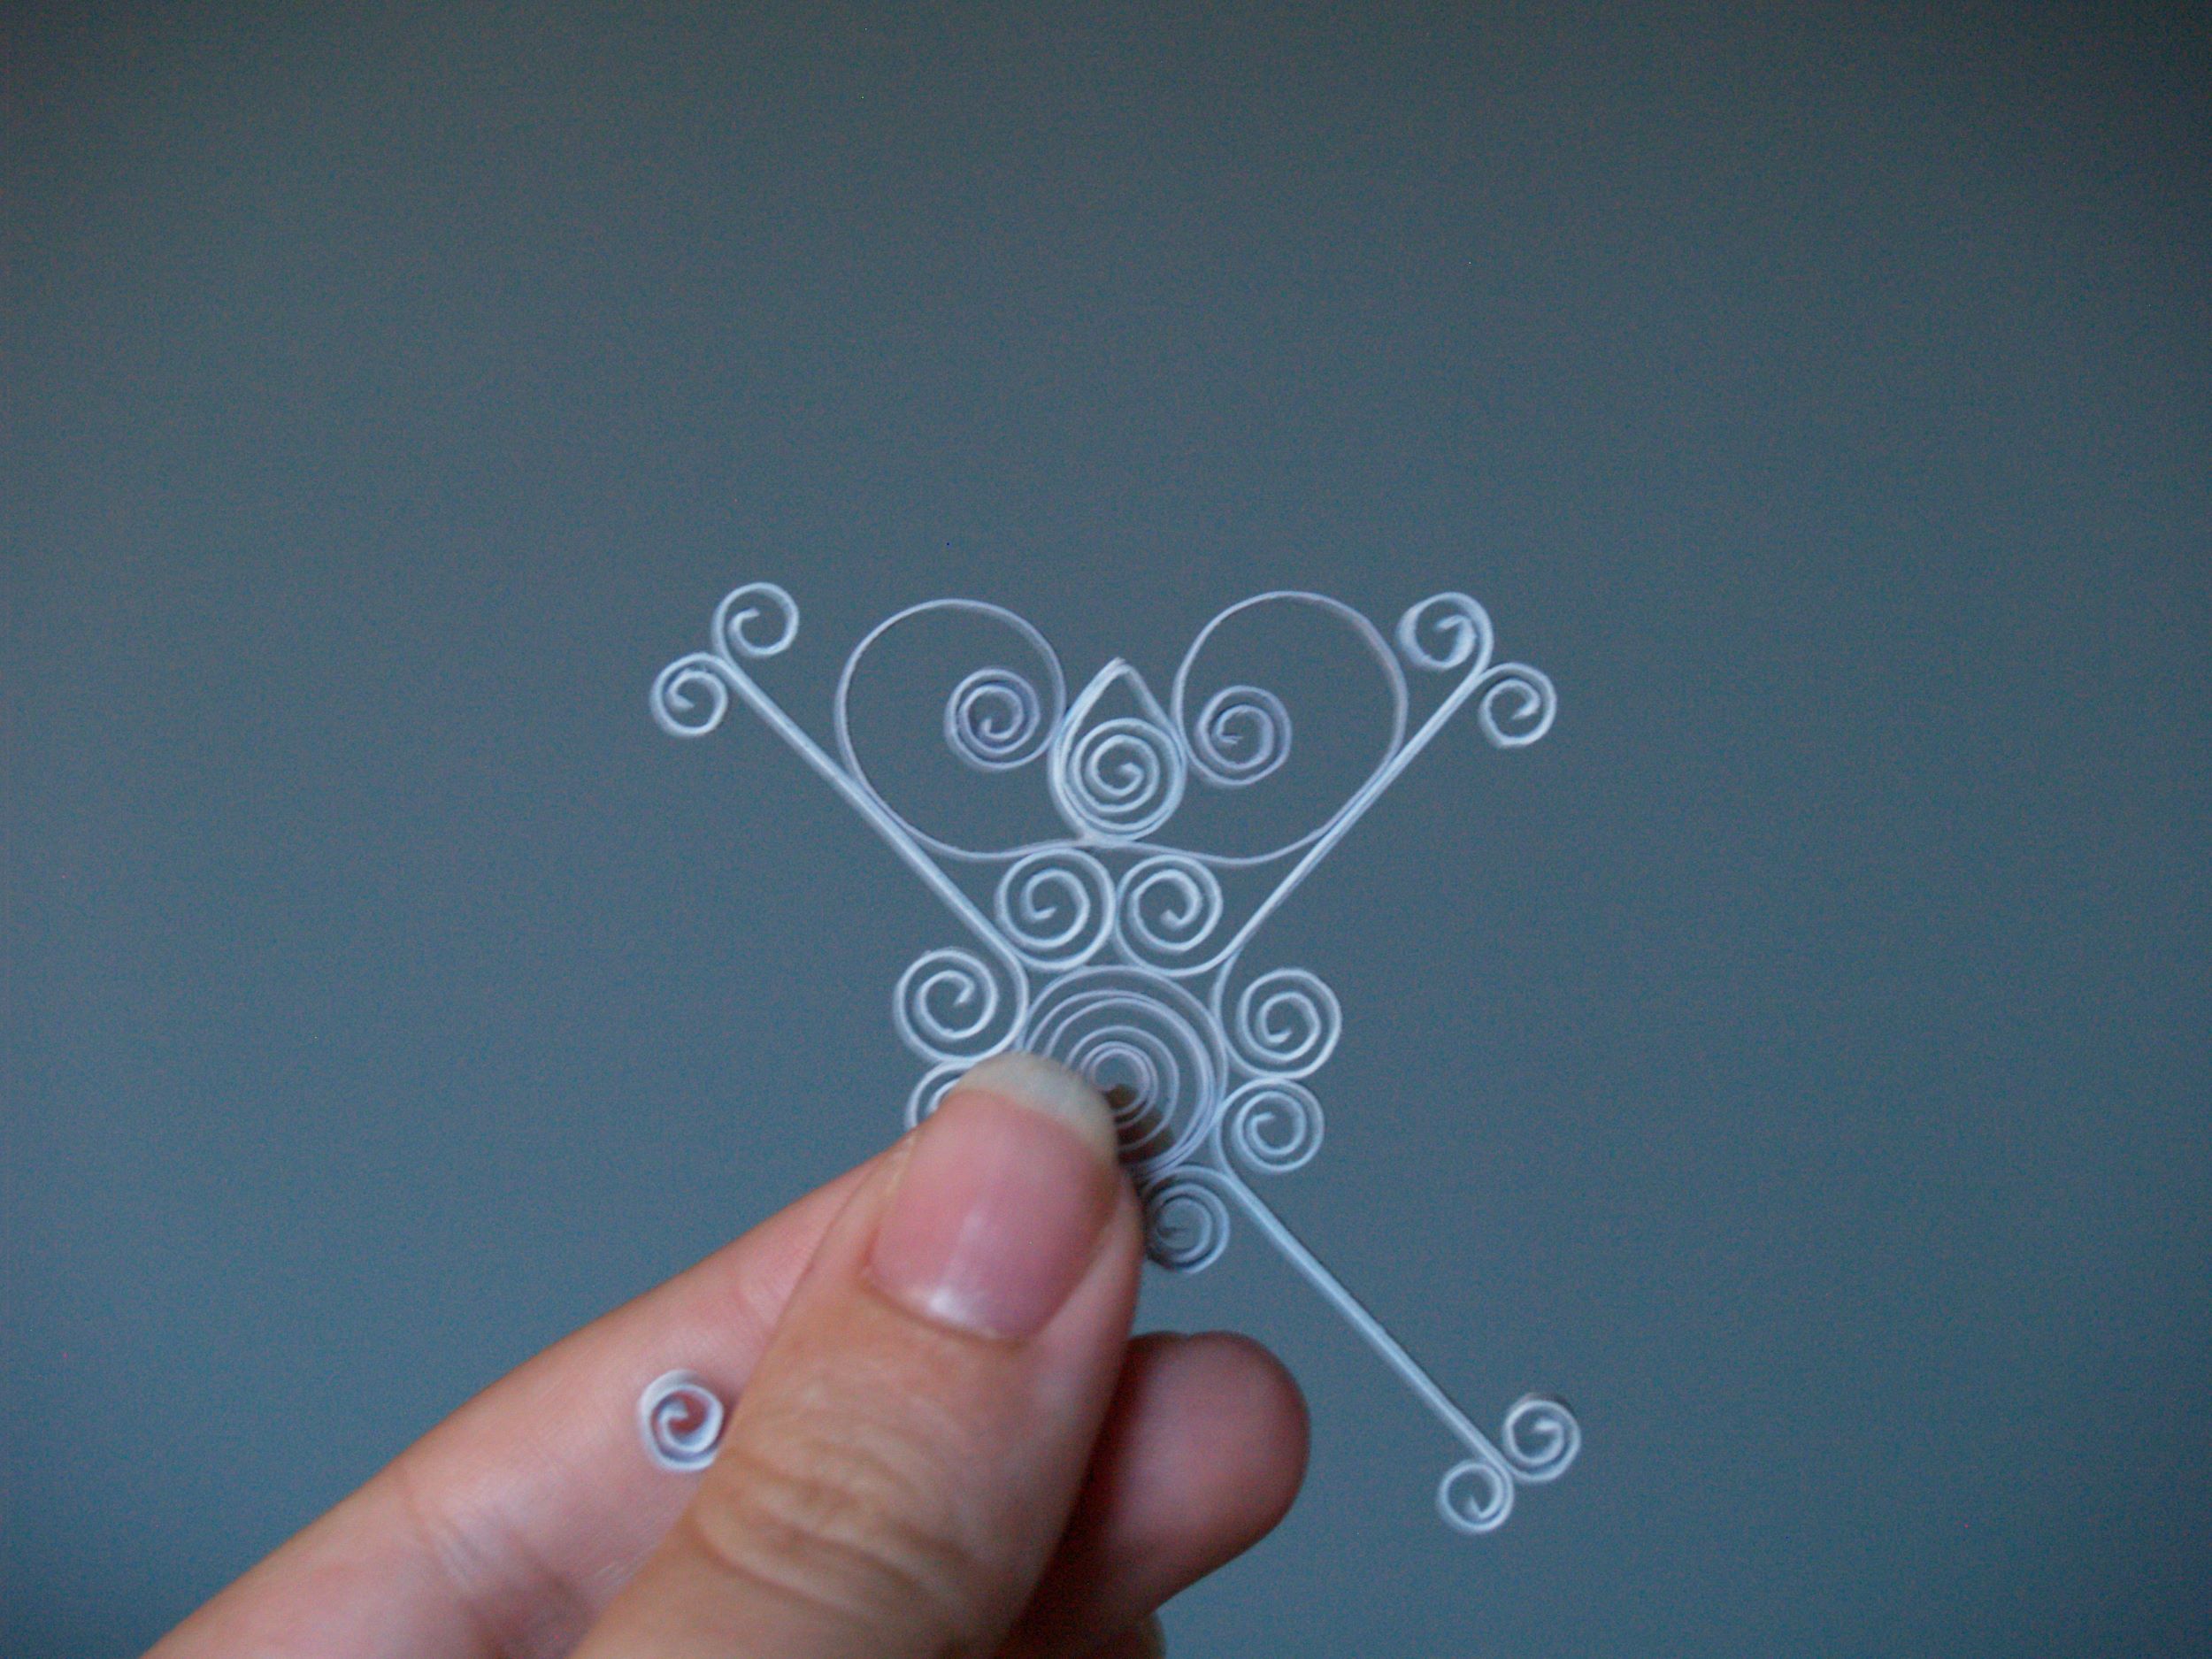
Repeat these steps for all sides, and then glue the marquis in the little space between the loops at the top of the arms.
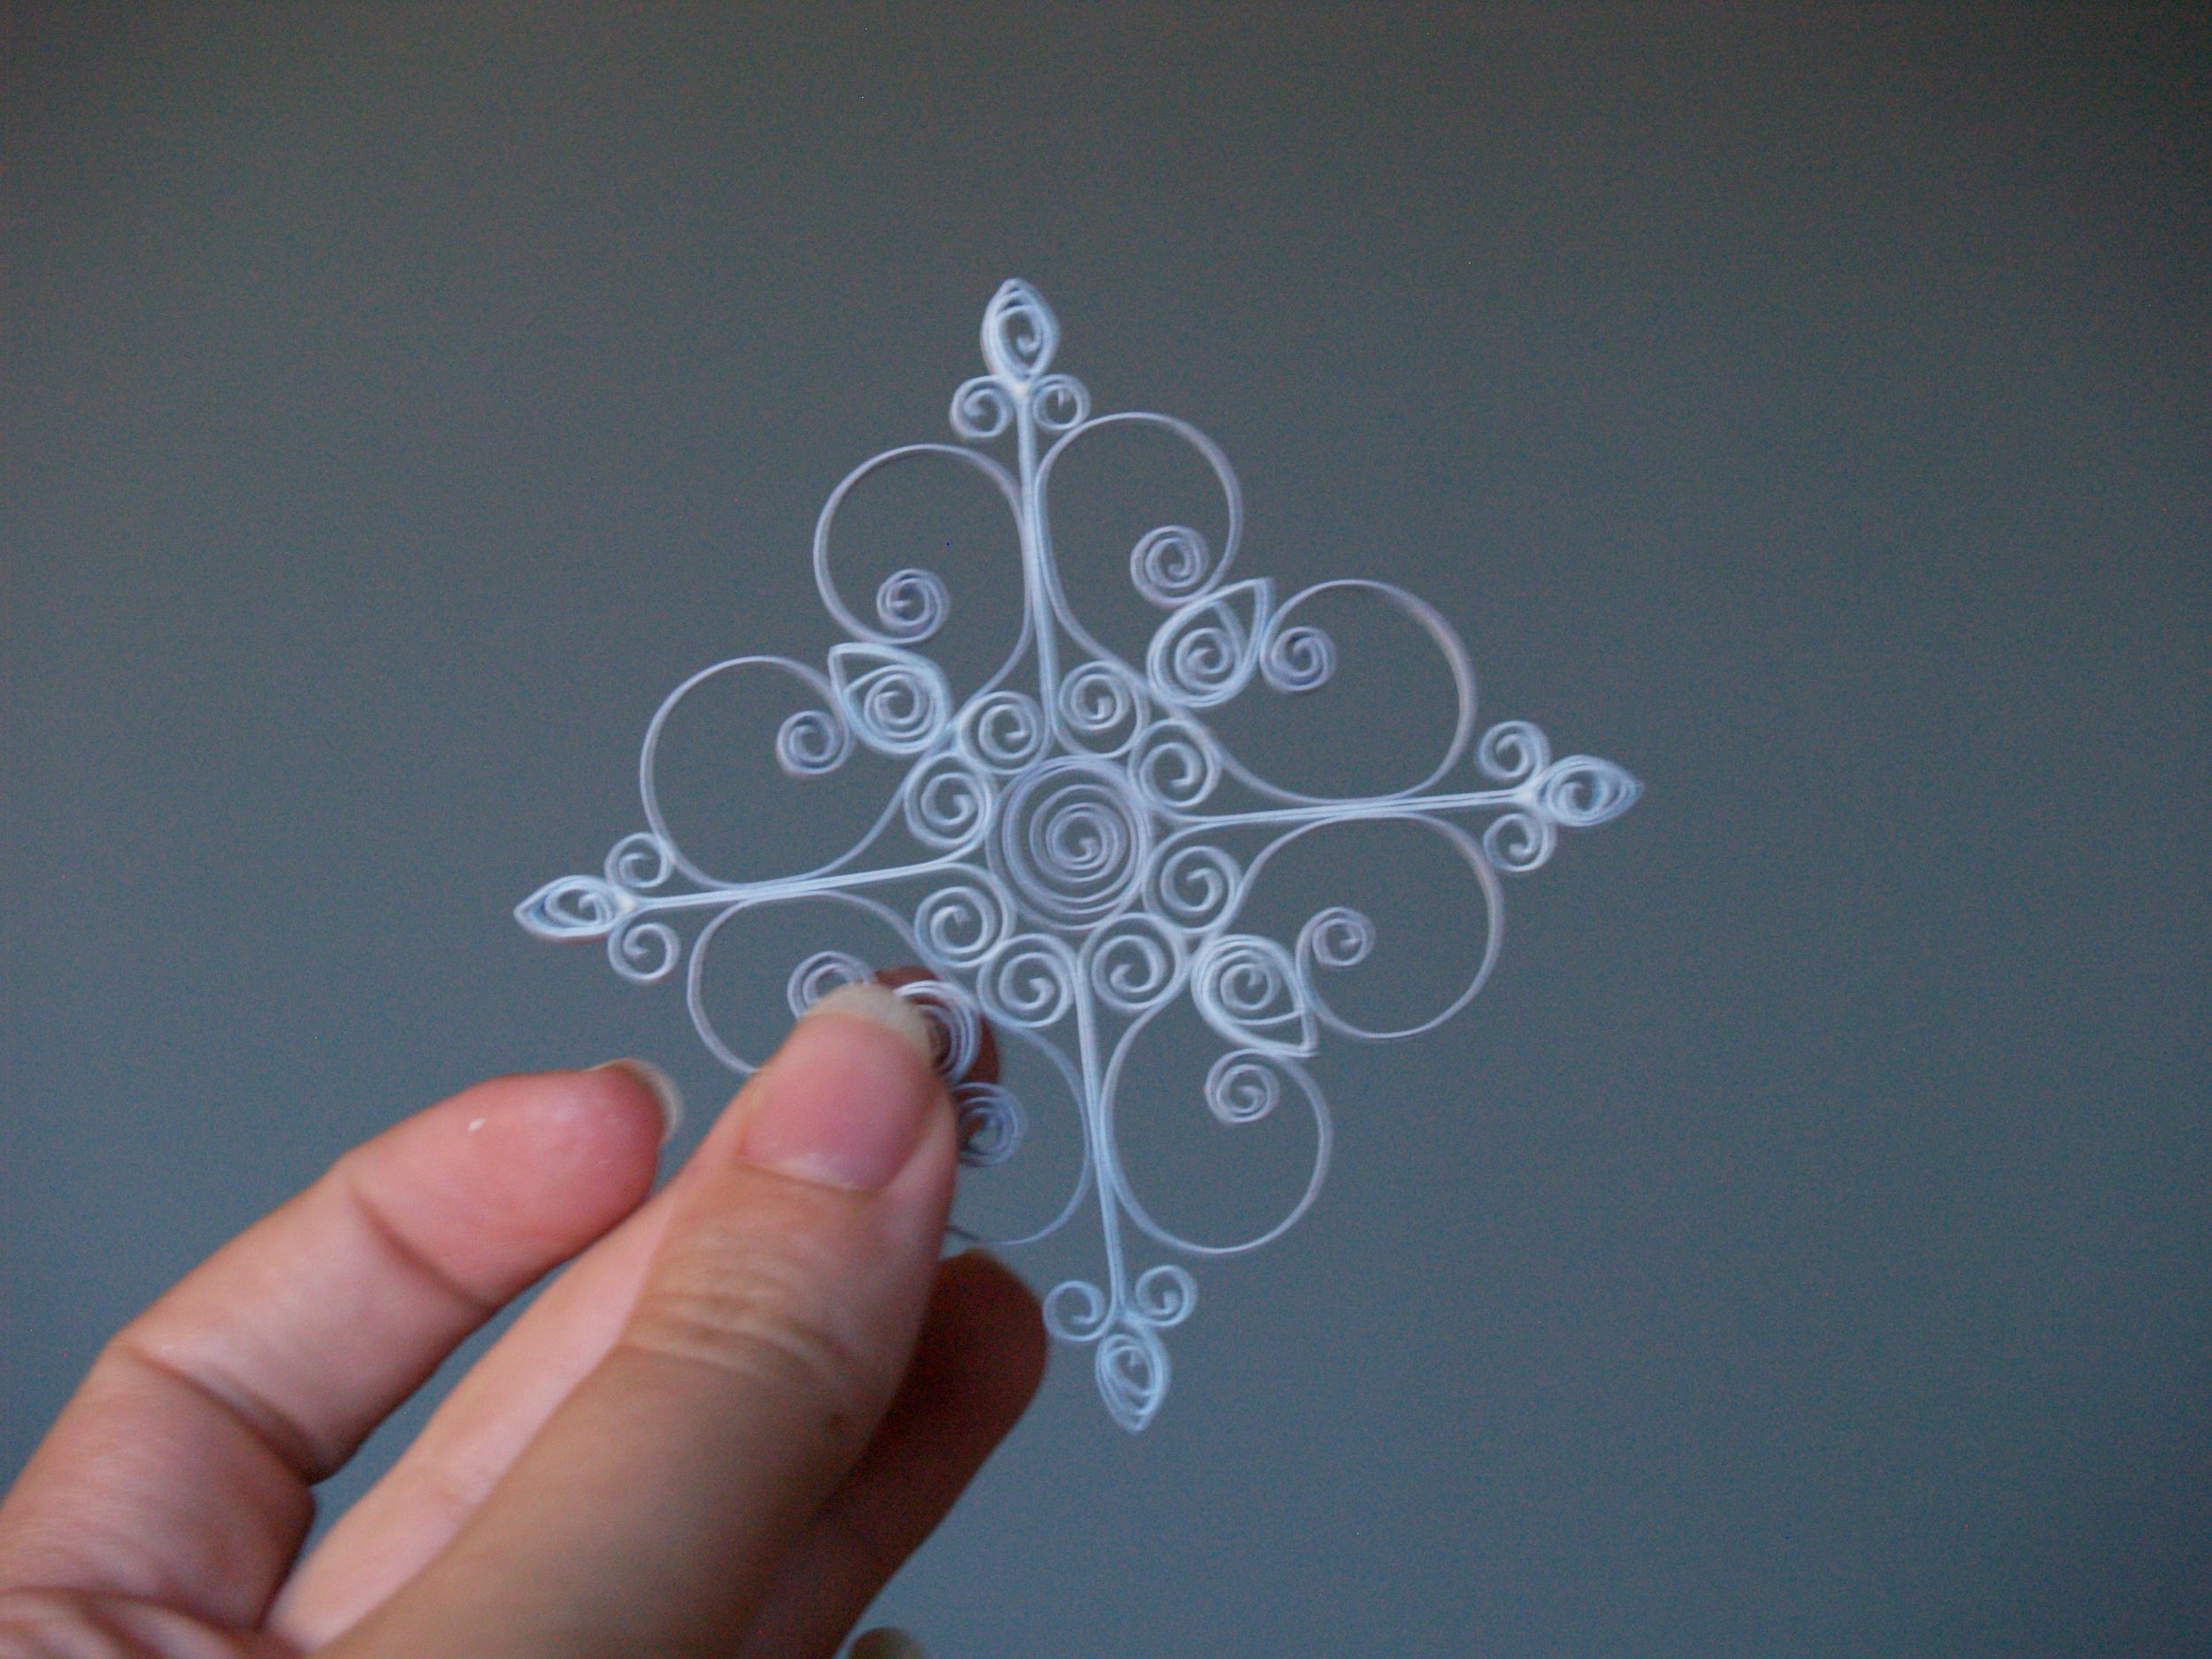
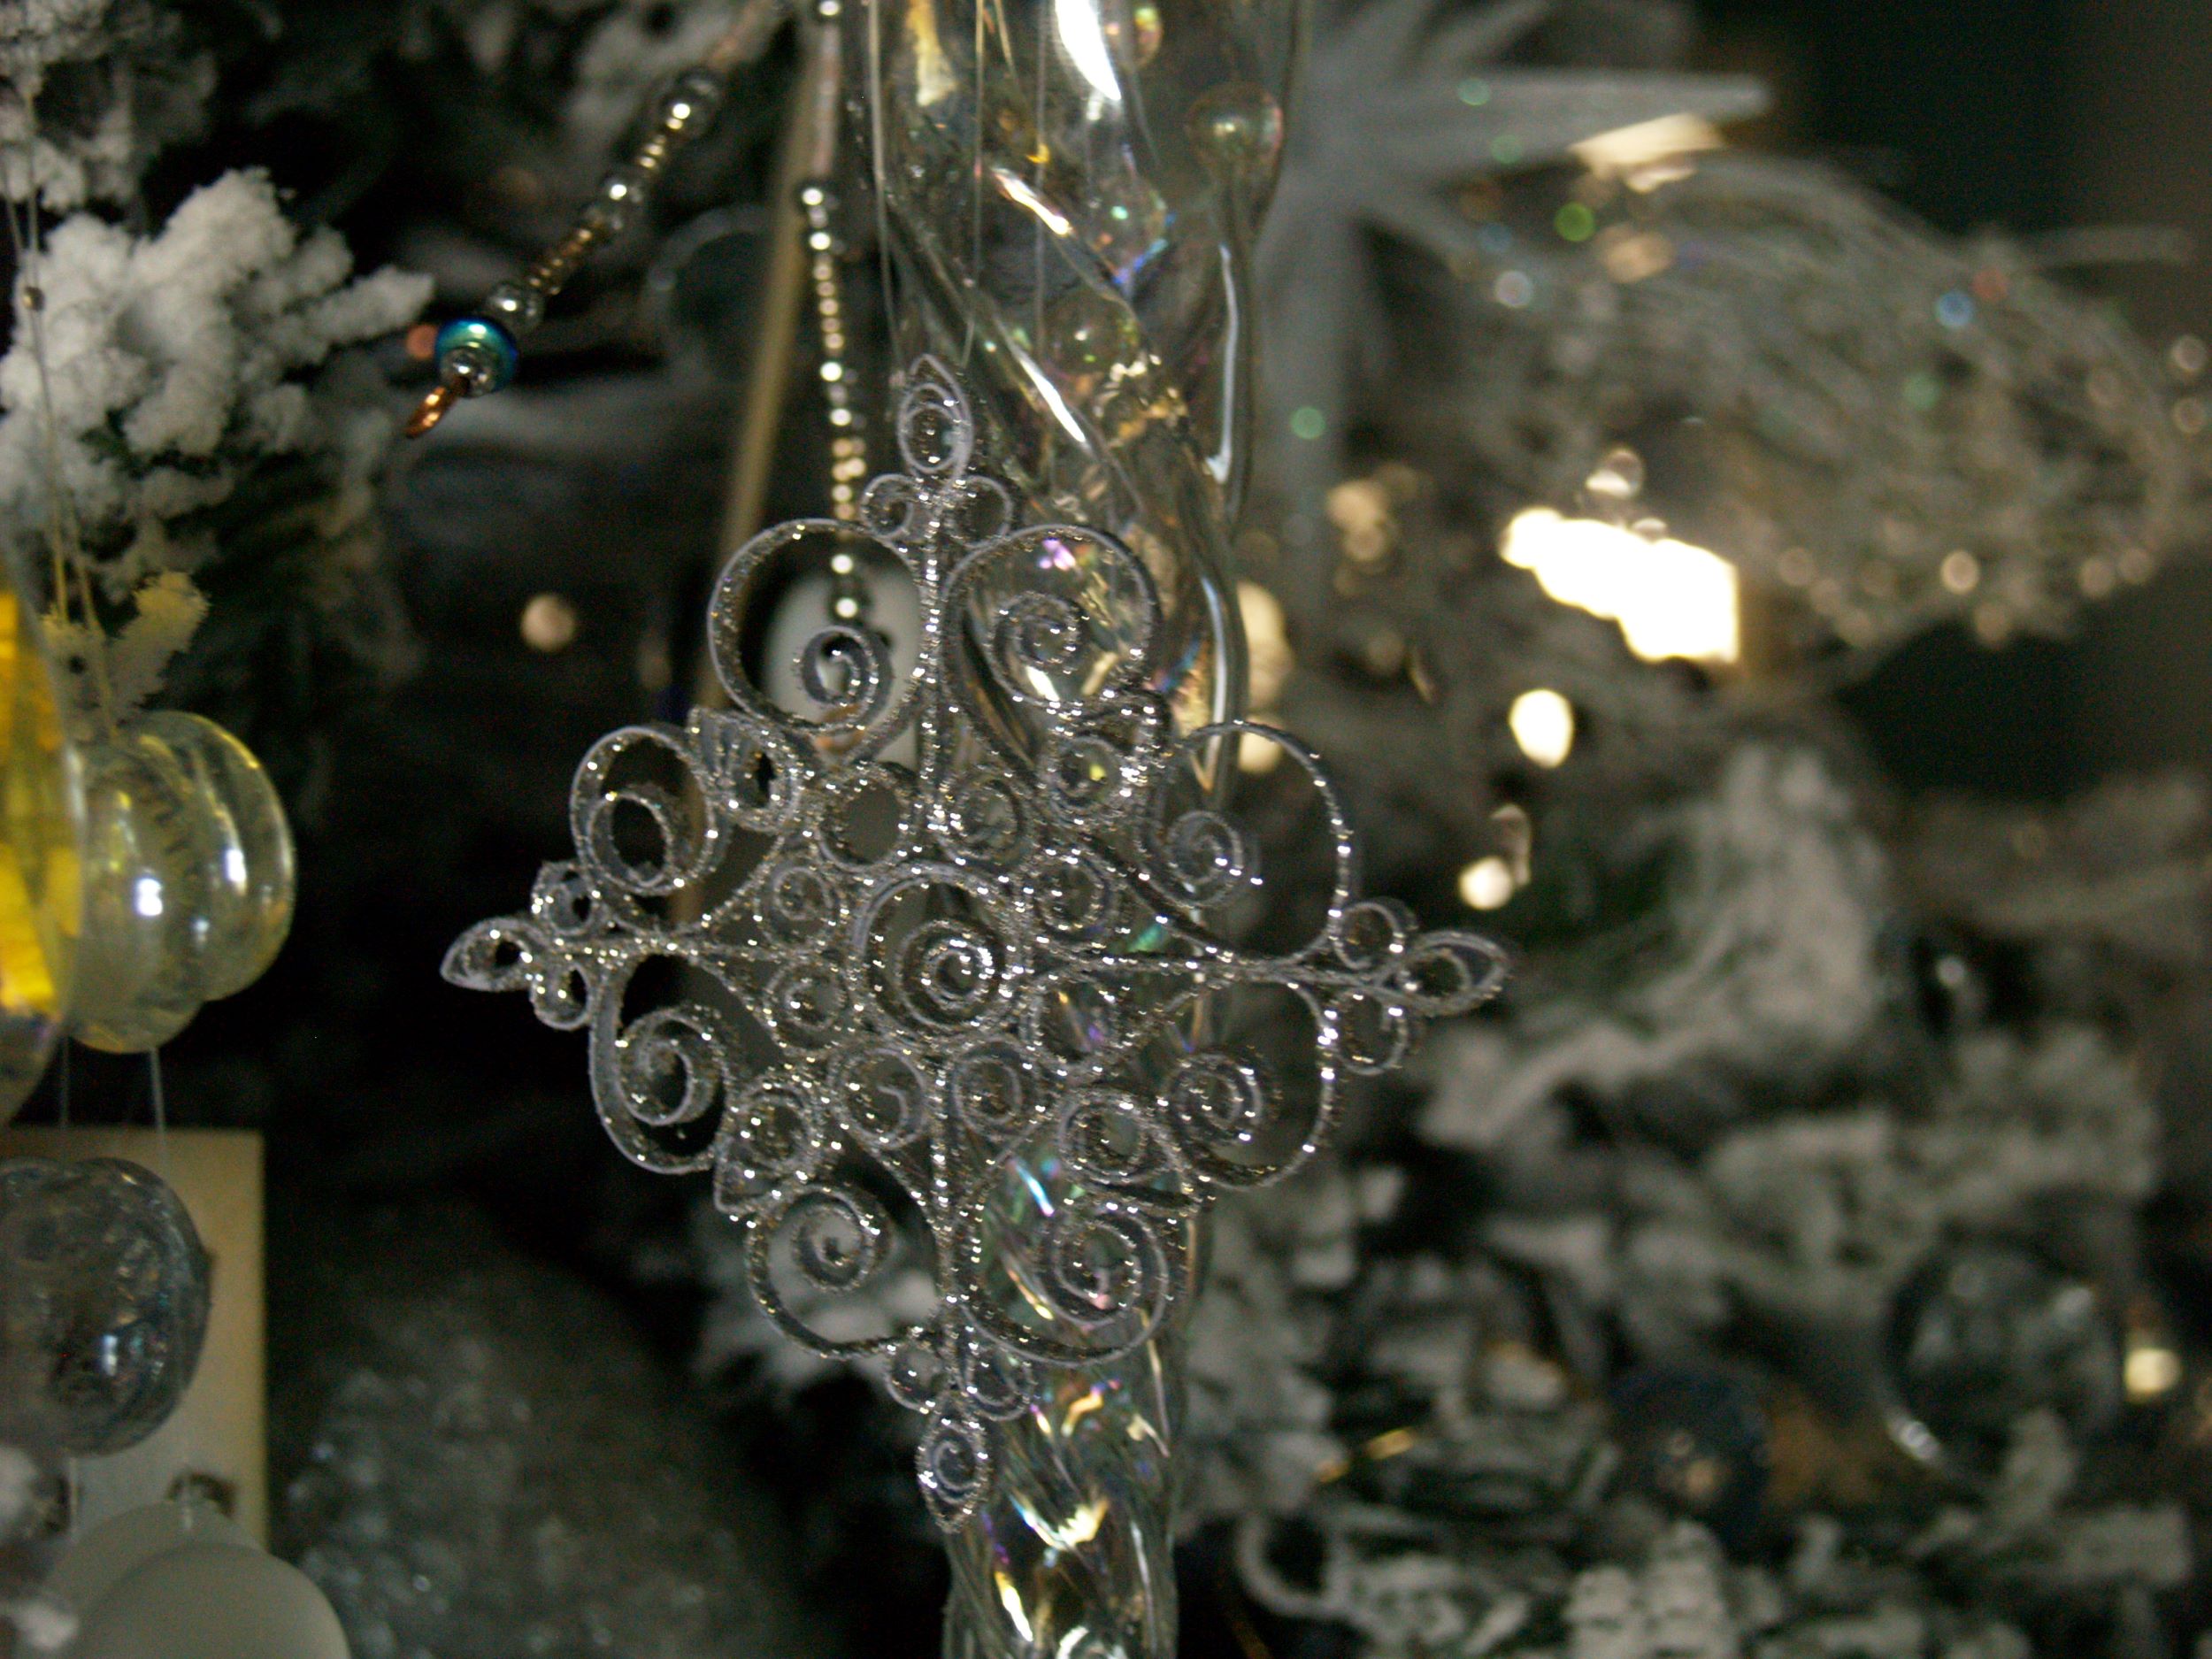
For the snowflakes on my tree, I sprayed the finished snowflake with a spray adhesive and doused it in glitter. I tried a liquid glue first, but it tended to make all the loops unwind. Then I threaded a loop of fishing line through one of the marquis to hang the ornament. I liked the idea of using fishing line so it would look like the snowflakes were falling instead of hanging.
These couldn’t be cheaper. You can nearly get 10 ornaments out of one sheet of paper, and they’re incredibly easy to make up in big batches. Last year I needed to make ornaments for 35 teenagers, and these were the ones I went for. A definite budget saver, and still super fancy.
In making this tutorial, I ended up making another ornament that needs a home. Leave me a comment for a chance to win it! Blogger sucks for communication, so make sure you have an active profile, a link to your website, or an email address listed in the comment so I can contact you if you win. I’ll draw a winner randomly at 10pm Pacific Time on Friday December 12th. That’s actually Bear’s birthday, so we’ll call this a celebration of him. Good luck!

You are so ultimately talented… i look forward to your posts because you are so inspirational!I put a couple of tutorials up on my blog that would be fun to do with your little Atti…
I think I might actually try this!! I have spray adhesive and glitter left over from my Nativity play star extravaganza last year… with no clue what to with it, until now… Thanks for the tutorial!
Wow, that is amazing!! I'm buying a quiller (if that's it's official name), spray adhesive, and glitter the next time I go to Michael's. I love them!!
Very nicely done, bet they look stunning on the tree!Your directions for making this are wonderful and easy to followKeep on Quillin', Denise http://customquilling.blogspot.com
Oh how beautiful!!! I'll be linking.
I love the snowflake! Gorgeous AND I think I can make it! I'm going to try it when I get home tonight.
Ummm…. silly question, but what type of glue is best??
That's a terrific question!My favorite glue is Tombo Mono. It's acid free and smells terrific, with a quick drying time.But when I'm making 35 of these at a time, I'll use either Eileen's Tacky Glue (because I always have it in hand) or even Elmer's in a pinch.
Super cute! I love quilling. I haven't done it in years, but this is making me want to get out my stuff!Would love to win the ornament. Happy birthday to your bear. My dh turns the big 4-0 on Sunday… ;-)Email cardinaux at yahoo dot com.RC
I love your snowflake and would love to own it!! 😉 Thanks for the great tutorial. LindaSonia (baddabinda@yahoo.com)
WOW! I saw you over on OnePrettyThing and I almost didn't click over to your blog because these looked so intricate (translate: difficult). I'm glad I popped on over–I'm going to try my hand at some of these!!
Those are beautiful!Thanks for sharing the tutorial.Karen
This is fantastic ! Thanks for sharing 🙂
simply gorgeous. I absolutely love the glitter
So beautiful!!! I hope i am not too late for the draw!
Very pretty! I have a bunch of leftover quill paper in multiple colors. I think I'll try this in pink and red. Thanks for the tutorial!
Lovely! Thanks for the instructions – makes quilling seem totally doable!
Amazing tutorial! Thank you for posting this. I´m posting about this to my blog. 🙂
Wow! Beautiful! and you make it sound so easy. 🙂 Maybe I'll try one.
Wow!!! This is beautiful!!! I'll have to try this for sure!!!! Thanks so much for the tutorial!!!Valvampme3@yahoo.comhttp://www.valspaperobsession.com
I can see this becoming addictive :-)These are so beautiful – I look forward to trying this at home! amester26@gmail.com
HELLO,I'M A NEWCOMER AT YOUR BLOG AND FIND IT IMPRESSIVE!I'LL TRY MY HAND AT THESE AND WOULD VERY MUCH LIKE YOU TO DRAW MY NAME PICKING YOUR WINNER.WHOEVER IT WILL BE, WILL HAVE A BEAUTIFUL CHARM ADDED TO THEIR HOLIDAYS!THANK YOU FOR SHARING AND FOR THE WHOLE LOT AT YOUR BLOG.-KIRSTI
beautiful! I want to start NOW! oh, wait… there's the Christmas sewing and knitting that needs to finish… sigh…
it turned out gorgeously! you've got quite a skill. i'm a knitter and have tried to work with small/fine crafts and found my fingers just don't cooperate.
Do not get discourage, it took me some hours to make my hands delicate again! The best part, I have a spa day after all my crafts were done!
I have been. Crochet, knitter, embroidery and painter for years , my hands were to heavy at my first 3 quilling projects, now I can not take my hands off it! Be persistent an halve a nice hand massage if you can put your quilling down!
For starters, this is probably the best tutorial I have ever seen. I am going to have to try these as soon as Maine unfreezes enough for me to drive somewhere in my car.I would love to give the ornament a home. I think my profile is accurate, but just incase… rumpazel@gmail.com
Thank you!I never tried though I have admired quilling for quite some time.Hope fully I will try this one.PS I linked to this pattern in our new crafting portal http://domoshar.net, sending you an e-mail re this.
The finished ornament looks like it was made with magic – wow! I want to make these but I don't know if I will have the patience!
These are AMAZING! I just found you through Craft and am so impressed! Will definitely bookmark your blog and check often! :)patty
This is so beautiful! Never in a million years would I have even thought about trying to do this but you made such an excellent tutorial that I think I'm going to try this. Thanks for the tip about cutting the end off a needle – I don't have access to a craft store.Kate in Costa Rica
that ornament is gorgeous! My mom sent me a link to this via email. I love it. Thank you so much for sharing. Oooh and happy birthday, Bear!
Wow!These look so complicated but your tutorial breaks them down into managable steps. Thanks for sharing.reanday at yahoo dot comRean Day
these are so pretty — i might even get brave and try one! because I need another project right before the holidays :)thanks for the easy to follow tutorial!
Hey, it is my dh's birthday also. The kids and I are going to try these we have all the stuff for it, even the little tool.thanks,judi
These are super!! Wow!
That is the most awesome application of quilling I have ever seen! I would love to be added to the drawing.
OMG, I have quilling stuff and was about to throw the lot into a job lot yard sale! Thank you for making me see there is more to quilling.Neasa in Ireland
I don't know if I'm in time for your contest or not, but I still wanted to let you know how beautiful those look. I'm definitely trying to make some tomorrow…er, I guess that would be later today!Thanks so much for sharing!
Ohhh!! What a great tutorial!!! It's so amazing!! Thanks! I want to try it, but I'm sure it's not going to be as perfect as yours!!
Wow this is so beautiful I must try it – thank you so much for an easy to understand tutorial – you are so gifted. I would love to win your piece although I'm from the UK so don't know if thats possible.My email addy is :-hilmof@lineone.net just in case I'm lucky :):)
Thank-you for posting this. I tried it last night with a large needle as my quilling tool. It took a little fiddling but amazing results. I am in love!! Thank-you!!!!
Beautiful ,thankyou for showing us how : ) juliet
Beautiful! Thanks for showing us how to make them. Can't wait to give it a try.
Excellent tutorial. I made two of these, and they look great! If you're using a sawed-off tapestry needle as a quilling tool (as I did), stick the point of it into a wine cork to use as a handle—it makes the rolling much, much easier.
Stunning! I put a pic and a link to your beauty on my Blog….hope that is OK! Holly
I live in Austria and these types of ornaments are quite popular. They're usually made out of some type of thin strips of wood, but I think the paper ones look fantastic. I'm adding this to my to-do list for next Christmas!
these look beautiful! I think I'll be trying this.
Wow, these are so absoultely gorgously beautiful.
these ornaments are beautiful!
I am so glad I stumbled on these! And thank you so much for letting me add them to this year's Advent Calendar. Do stop by and take a look: <a href="http://www.secretcorridor.com.www.secretcorridor.com.<br />I hope you've received lots of new visitors as a result too!
wow…. super cool and super beautiful. I may try it…. but not sure if my three year old would apreciate it….
it is really beautiful!hope you don't my my blogging about it!
I've always wondered how quilling was done – and this appears to be rather uncomplicated to do when broken down! I will definitely have to give this a try. Thanks for posting this tutorial!
I just made my first one and am so excited to make more (and hopefully get better at quilling) thanks for the awesome tutorial!Luluhttp://luluabroad.blogspot.com/
These are so beautiful! I've always wanted to try this technique. Thank you for the inspiration!!
Hi,that is tooooooooooo gooooooood.What is cardstock paper? is it different from the paper which we use for computer printing? Where do i get it ?
This is absolutely amazing! I have never seen anything like that – it is beautiful. OHHHH, I really hope I win!
Oh I totally love these!!Thanks so much for sharing
Thanks for putting up such an excellent tutorial and for giving me permission to show that to my blog readers. Merry Christmas to you and your family 🙂
Wow, that is gorgeous. How long did it take you?
müthiş güzel ya … 🙂
Those are stunning!
I know I've missed the giveaway date, but man I just had to tell you these are gorgeous! I can't wait to start playing around with it. I am wondering about the kind of glue to use. Just regular elmer's? Let me know if you ever have a second. Camillebootstothemoon@gmail.com
OMG its soooo pretty i love im gonna try it soon ill post another message when im done <33333
AMAZING!! Just happened upon your blog and was blown away by this! Gorgeous!
WOW! that is fabulous! i am going to make a bunch of these for next xmas!<3Ehttp://tootsweethandbags.etsy.com
How Beautiful!
Fantastic! Me and my fiance are getting married in two months, this year we wanted a christmas tree and i wanted to make the ornaments but i didn't know how. I'll start making these now so they can be ready by then! PS: for your profile you said you wonder if you will be able to accomplish all you want in this world? you will. Keep doin' what you're doing! It's great!
love it! n the tutorial was super easy to follow.i've linked u in my blog.hope u dont mind.keep quilling =D
absolutely fantastic!Thank you for sharing it
thanks! what a great tutorial, i've been making ornaments too and want some sparkly glitter but don't know how. thanks to you, now i do, and my christmas tree this year will look prettier.
That is so pretty! You make it looks so easy to make. I almost think I can actually make it. =)
You said you love comments so here's mine: I LOVE LOVE LOVE these snowflakes. I change my tree theme each Christmas. I've been collecting snowflakes on eBay since the first of the year, so by Christmas 2009 I'll be all set – especially now because I'll be making some of the gorgeous quilled snowflakes from your tutorial!!!! THANKS. Now I'll take a look around the rest of your blog.p.s.I like what you said, "There's a whole lot I want to do in this world. I wonder if I ever will."
Loved the paper ornament. How clever and beautiful!
This looks like a fun opportunity to learn quilling. I have plenty of paper and glue! Thanks for putting this together.
That snowflake is beautiful! It would also look gorgeous on a window.
These are gorgeous. I'm definitely doing them this winter.
Your snowflake is magical! I quilled as a young girl, and even then, (30 odd years ago) it was somewhat of a lost art. I'm so happy to see it revived, and plan to pull out my old quilling supplies. Thank you for the detailed instructions. I'd like a tree full of your snowflakes this year. Susansoxendine@comcast.net
Hi! I'm about a year later than all your other comments, but I thought I'd leave on anyway… I love crafty stuff, but don't have much money, and usually to make things as beautiful looking as these it costs a fair bit, but these don't! I even had the stuff to make them in my cupboard! Your instructions were awesome! Not gonna lie.. came across this and made one right away!PS: Mine turned out great! 🙂
Thanks so much for your beautifully clear tutorial. You make it look so simple. Keep up the good work! May God bless you.
The ornament looks so beautiful, and the fact that it is also inexpensive really tickles my fancy! I will try to make it this Christmas for my tree. thanks!
Thank you for this. I made one last night, and then another , but double the lengths for a larger one. It must have taken you a week to make 35 of these. They are so nice.
I have been searching for an ornament to make this year and now I have found it! Thanks so much for the easy to follow directions. tthumb at dtccom dot net
this is lovely! too bad i didn't find it 'til nearly a year later… i'd have entered to win! 🙂 i'll just have to try and make one myself.
Beautiful! And so easy. My 12 yr old son just made one – he used a plastic canvas needle and lightly sprayed it with some canned fake snow stuff – it turned out cute. Tomorrow we're going to buy glitter & spray on adhesive – we want to make more – great gifts! Thank you for you 🙂
that looks wonderful! I've never seen quilling done in a 'useful' way before, but now I might have to have a go! Thanks for the tutorial! – Britta J at cutout+keep
These are simply gorgeous. I would love to make a bunch. SO nice of you to have laid it all out so clearly. thank you, thank you. I can tell this will be a family favorite, especially with my 12yo oragami fan!Love, Christi in Utah.
That is beautiful! Thanks so much for sharing. But fix up those nails, mama! Two minutes with some clippers & a nail file. =)
I can't believe that someone would have the nerve to leave a comment about the crafters finger nails! The message says "mama", not sure if this is a relative, but still rude either way. Just had to have my say in this.
Nope. Not a family member, most recent anonymous. Thanks for sticking up for me!Yeah, I don't really know how much nicer my nails could be unless I gave up crafting altogether.Maybe that person just has a weird aversion to people who wear their fingernails long.
yea, I was thinking your nails and hands looked pretty darn good for a crafter! BTW, I made 52 of these ornaments for my gifts this year. I made a few different ones, can I send you a picture? I dont know why I am Anonymous, i posted on here a few weeks ago. anyway, let me know! email tthumb@dtccom.net
I LOVE this tutorial, really well explained and photographed, and it REALLY makes me want to give it a try. Thank you for sharing!
Hi, have just started quilling and came across your tutorial. Thanks so much. Will def try it. You make it sound so easy, hopefully I will be able to manage. cheers.
Oh. My. Goodies! I looked this up because I remember reading it when I first found your blog, but WOW, I forgot how beautiful it was! I'm hoping to do this for the very first time. Thanks for the amazing tutorial!
Okay, I'm trying to make this. First, what kind of glue do you use? I bought one I thought would work but am having some glue issues.Second, I tried to snip the end of a tapestry needle to make a quilling tool (I'm thinking about this for an enrichment project, and buying tools doesn't make sense for that large a group; I also discovered that they no longer carry quilling tools at Michael's). Have you ever tried to cut a big tapestry needle? They are made from VERY hard steel, which easily defeated all my wire-cutting tools and even my hacksaw. So, first I tried wrapping the paper around the eye, and then wiggling it free to pull it out. That worked fairly well, but the spirals were not perfectly round. I've now moved on to using the eye just for the initial turn of the paper, then using the round barrel of the needle to wrap the rest. It works pretty well.Third, what do you use to cut your paper? I'm using a rotary paper trimmer, but even using a fairly high level of care it's hard to keep the width even (and in the pictures, your strips look to be a bit narrower than 1/4").
Reese/Tresa,JaneAnne turned me toward these. How difficult are they? Do you think 9-1- year olds could do it, or does it require greater dexterity?Kay
These are gorgeous, and even for someone fumble fingered like me, they look fairly easy (thanks for the precise detailed instructions). For those of us that don't have a Cricut or whatever, got any tips on how to get the strips an even width?Looking forward to perusing the rest of your site and checking out your other ideas!
Reese told me that a paper shredder works pretty well, as long as it only cuts in one direction (mine is a cross-cut one, so it wouldn't work). The strips don't have to be exactly even, so doing it by hand with a paper cutter works. That's what I did, and my snowflakes turned out okay. I would make the strips thinner next time–closer to 3/16" or even 1/8" than 1/4" (I think mine were on the high side of 1/4").
These are beautiful. I love the glittery version! I'm including these in my Friday Favorites this week!
This is THE project I want to try with my 8th grade art class! I'm not sure they can do it, but I think they will enjoy trying! Thanks so much for posting it!
It's absolutely amazing! It looks so gorgeously! Your tutorial is really helpful, in my free time I'll try to to this 🙂 Thank you 🙂
These snowflakes are gorgeous. I just googled and that is how I found your site. Love your work.
imisstx at comcast dot net
Love these!My daughters and I are making some for gifts for friends!Love the ideas!=)ladyverlina AT yahoo DOT com
Just dropping by to let you know that I linked to this post in a round up today from the Home & Garden channel at Craft Gossip. 🙂 This will appear in the main Craft Gossip RSS feed, on the main home page and can be found directly here http://homeandgarden.craftgossip.com/9-snowflake-craft-projects/If you would like a "featured by" button, you can grab one here!http://homeandgarden.craftgossip.com/grab-a-craft-gossip-button/
I saw this tutorial and was instantly intrigued about quilling. I just made two of them last night just in time for an ornament exchange party I'm going to. Thank you, you made the tutorial so easy and understandable to newbs like me. Merry Christmas.
Hola soy Ester desde EspañaMe ha encantado quilled ornamentThankGracias
i jus love this .. at first look it seems complicated but this is truly easy and specially with your instruction as a paper craft lover i thank and adore ur work from the bottom of my heart …. hope for more tutorials like this
Hello! Thank you for this easy and lovely tutorial! You make it look SO easy. I write a weekly segment for the Sippy Cup Mom blog and used this post as a reference and linked back: http://www.sippycupmom.com/2011/11/make-it-pretty…
I am normally a really crafty person and this did not come very easily! You truly have a beautiful art in these delicate little snowflakes. I will be practicing and putting more snowflakes together in this next week. If I can get enough made I have what I think would be a gorgeous idea for another "Make It Pretty" post. Wish me luck! I will need it!
Tout simplement magnifique …… J' aime
That's just charming !
Thanks A LOT for this tutorial !
This tutorial make something that seemed way too complicated a walk in the park. Thank you for this and making me believe I could create these! I love it!
Dear Sirs;
Going through internet search engine, we find your name as valued
Buyer of our products having good clientage in the area.
We are manufacturer of Precision Quilling Fringers and related tools.
It is most dependable product to fringe paper strips for making flowers
and gifts. You can safely prepare/decorate Basket, Santa, pretty Flowers,
Birthday, Wedding, Valentineday, Motherday and Christmas gifts for loving
and well wishers. This is a hand use manual machine 4cm x 4cm x 11cm
(approximate) in size. Its price is US$.13.50 C&F each (delivery at your
destination by air). For tools, please visit our web. http://www.quillingfringer.com
Your interest in this offer can materialize into riped fruit for us both.
Very truly yours
PRECISION PRODUCT COMPANY
M. Mirza
I've never quilled anything in my life, had never even heard of it, but these instructions were so easy to fallow! I've made about 10 so far. Thanks!
Love this
Chaobella
blog: http://www.chaobella.com
pinterest: http://www.pinterest.com/chaobella
etsy: http://www.etsy.com/shop/angelachaobella
twitter: http://www.twitter.com/angelachaobella
What a beautiful and elegant snowflake! Thank you so much for the tutorial…I just started into quilling and can't wait to try this!
Found this pattern on Home and Garden w/ just the written instructions. Have never quilled before, but ordered tool and strips and made it the first time! Encouraged me to get some card stock and made my 2nd one last night-much sturdier and very professional looking. So glad to come upon your step by step pictures w/ some great tips which will make it so much easier (esp. the scrolls) I've done a lot of tatting and love the delicate look of anything filigree.How do you go about coming up with new and different designs? Would love to do that and think I would have an eye for it. Thanks again.
I found this pattern on Home and Garden w/ just the instructions, had never quilled before,but ordered tool and paper and did it the first time! So got some white card stock yesterday and did another one last night-much more sturdy and professional looking. Loved finding your step by step w/ pictures-great tips.that are going to be so helpful.I've tatted a lot and love anything w/ a filigree look.How do you go about coming up w/ new and different designs? Would like to try my hand at that and think I would have a good eye for it. Again,thank you so much for the inspiration!
!
I found this pattern on Home and Garden w/ just the instructions, had never quilled before,but ordered tool and paper and did it the first time! So got some white card stock yesterday and did another one last night-much more sturdy and professional looking. Loved finding your step by step w/ pictures-great tips.that are going to be so helpful.I've tatted a lot and love anything w/ a filigree look.How do you go about coming up w/ new and different designs? Would like to try my hand at that and think I would have a good eye for it. Again,thank you so much for the inspiration!
Just letting you know I linked to this post in my Snowflake Unit Study. http://www.zujava.com/snowflake-study
Hi, I just wanted to say thank you for giving such an easy-to-follow tutorial. My baby was born 8 wks early last year and we "lived" in the Neonatal Intensive Care Unit through the whole Christmas season. I will be making these to go along with baskets we are putting together for the families who will be there this year. Each snowflake is as unique as the story of a family in the NICU. Now…next time I will start earlier as I only have 2 weeks to make 25 in the midst of a 1st Birthday and Christmas! Anyway, this is just going to work perfect, I am doing 9 pink, 9 blue and 7 white, all with the same color glitter.
I really like your designs and would like to be able to print for later use. Is it possible to put a print on them? Thank you.
Louise
Opening value creation process for the participation of external stakeholders is not easy, but it is
done even in a highly complex auto industry. When focusing on experience, you should leverage social media to increase
the value of the customer’s experience. businesses using twitter have also tried following masses and masses of people via their Twitter business account in an effort to get people to follow their account back and found out that the ratio of follow backs is so low they end up with one of those silly accounts following 1000’s of people but with of a few hundred or even less
followers.
However, what is most important is what we have to say about ourselves.
The mind, body, and soul does not rest when its creative potential is not being used to the fullest extent possible.
Use any of these great, inspiring, and sometimes
funny graduation quotations for greeting cards, speeches or graduation gifts.
Now people became fed off by giving so much money to
the dentists, so they also seemed to be interested in buying practices.
” Have your child practice being the dentist using dolls, stuffed animals and other toys as patients. Patients can now rely on this Marietta dentist’s site for easy access to oral health related resources, including treatments, symptoms, office details and service descriptions.
If you were rational what are these different grades of swiss Rolex Online all about and that if these illustrious watches were available in different grades, be in readiness for a wonder. We are not talking about the certain Rolexes but we are discussing about the language of switzerland replica watches that are available online and are just referred to as language of switzerland rolex watches. swiss watches are illustrious all more than the cosmos for the correct and neat timepieces, hence it is not bewildering to see that the swiss Rolex online watches are not the only brand of replica watches and there are other brands available too like the ever-of the people language of switzerland omega watches. Now let
hi!
i recently started quilling and i loved it.
Can you tell me that how can i put glitter on it because i only have glue stick or uhu liquid.
will the liquid uhu work for glittering?
Hi!
i made this snowflake and it turned out perfect
can u please tell me how to glitter it without spray glue because i don't think its available in our area.
Hello There. I found your blog the usage of msn.
That is a really smartly written article. I’ll make
sure to bookmark it and return to learn more of your useful info.
Thanks for the post. I will certainly comeback.
I can't believe i was able to do this. I did it! I did it!
Awesome…something new & easy to learn..Hope it will be EASY making..:)
Yes! Finally smething about motorcycle accident.
I have been looking for something small and lightweight to use as ornaments on miniature trees and this is it! These snowflakes are stunning! Thanks for the tutorial, I know they are a lot of work.
"A"dorable!!!!
What a beautiful ornament idea! I will definitely try making this. Thanks!
Tnx , It is beautiful !!Have you any other desing of the snowflake ?
I LOVE THIS!!! I am definitely going to make some of these!
Hey!
I made this and it looks awesome
I have made it but didn't put glitter but now i am making a new one and i want to glitter this one.
I only have gluestick, liquid glue or UHU liquid glue. So can i use the UHU glue, it's not really liquid?
Will it ruin the paper. I use thick paper
I'm a beginner in quilled craft and you explain evrything just great. Thank you so much. I'm lookinf froward for more craft from you. 🙂
These are beautiful looking ornaments. I just got done makig a ton of lightbulb snowmen with my crafting class and will be happy to pass this ornament on to them. Thanks for the very detailed turorial.
Love love love these snowflakes definately will be trying these I hope they coem out as good as yours. my email for a chance to win one of theses I hope I'm not too late! Is syrenna@hotmail.com
How do you get these ideas?? Its amazingly beautiful! 🙂 You are brilliant!!
I am gonna try this one for sure.
I made this ornament. It was intimidating, but totally do-able. I will admit that it took me longer than I thought…maybe because I'd never done this before, but it took about an hour and a half!
Hey
will it work if i cut the strips, glitter them and then quill them?
I started quilling and I'm completely addicted. First 10 stars were given in a day! I did the one that you show here, very delicate and feminine, everyone love it. Quilling is my new passion. I do most crafts available. I'm 71 yrs old today and still learning! Name: Foundinnannystrunk.
wow this is so lovely..This is definetly on my todo list..Thanks a lot for the detailed explanation
Great Ornament! – Want to try this with my Grandson!
Gamaral
I don’t know whether it’s just me oor if perhaps everybody
else encountering issues with your site. It looks lile some of
the written tect within your posts are running off the screen.
Can somebody else please provide feedback
and let me know if this is happening to them too? This could bee a issue with my web browser because I’ve
had this halpen previously. Many thanks
Aw, this was an incredibly good post. Spending some time and actual effort to generate a top
notch article… but what can I say… I put things
off a whole lot and don’t seem to get nearly anything
done.
It certainly is almost extremely difficult to find well-aware men and women on this matter, still you come across as like you comprehend what exactly you’re posting on! Thanks A Lot
Eva J. Ouellette http://www.nationalsavingbd.com
Belinda Sinclair empowers men and women to increase their Wow Factor
through personal development and image makeovers.
In this article he has offered essential information about teeth whitening solutions.
Not just that, it may build your teeth more powerful and
healthier.
The principal you are that this involves a massive
cost, and it’s fairly expensive. 00) for whitening and maintenance, and a very lovely,
Color Your Smile Lighted Lip Gloss ($38. First, the peroxide taste is quite strong and the winter
mint flavoring cannot fully mask it.
The principal you are that this involves a massive cost,
and it’s fairly expensive. This article will compare the teeth whitening cost of
every major whitening option. You require just a smile
to warm thhe heart of the people around you and form a great rapport and relation with them.
* Teeth whitening strils – These are not as expensive
as whitening gels. Intrinsic discoloration can be induced by some type of
trauma that will take area when any child is increasing.
If having a mold in your mouth does not suit you, tooth whitening strips have been used with great success.
excellent issues altogether, you just gained a logo new reader.
What might you recommend about your submit that
you just made a few days ago? Any certain?
Cannabis use has been engrained in human culture more than 10 millennia
now; although its use being a drug (both medicinal
and recreational) is only able to be traced returning to around
the year 2700 BC. If a seeds will not surface
you have missing energy that may mismanagement issue your horticulture plan. Reserva Privada Sour Diesel seeds retain the phenotypes most
previlent inside Original East Coast Sour Diesel seeds that enjoyed making legendary.
Love the ornaments..the sparkling one is gorgeous
They look beautiful and I'm somewhat positive that I could accomplish this with hopefully very little frustration. Lol
my address if i were to be lucky enough to win! Fingers crossed.
shortyplz@yahoo.com
Love this economical yet pretty glittery idea.
I'm A new quilled and have become obsessed!! I love this tutorial And I have made my first snowflake ornament this week, it turned out beautiful but took me alot longer and your Tutorial is so much easier to follow! I'm so excited to make these. I want to gift them to my children and grand children as a family heirloom and become a part of family tradition to have on their trees for years to come! Thank you for sharing this awesome tutorial!!!!! Rhonda Maxwell 705 pine lane Cottonwood Shores, Tx. 78657 tuttichick@gmail.com
You are truly talented, & you have a wonderful way of communicating to make me feel like I can do this, & many of your projects! I'm disabled from a back & neck injury on the job, & have 3 sons, 2 young boys, & feel like I may be able to do some of these to stay on a budget but also make me feel like I'm useful! Thank you! ;))
Thanks so much for this cute pattern.
Please enter my name and put in drawing for the snowflake that needs a home.
Wish me luck.
Thanks Jackie Golden
You've just been featured on my blog! Thanks so much for the tutorial, love these ornaments! http://www.colorfulcanary.com/2014/12/14-christma…
super cool and very beautiful <3 wow thank you, 🙂
Loved this & instructions, well done! Ordinarily, I would not attempt anything like this, but definitely will, now!
I'm new to quilling, and am always looking for new techniques to try. This ornament looks so delicate and lovely, so it just called to me, when I saw your post. Thanks so much for sharing this with us. Deb Booth, DifferentLightStudio.com
It is spectacular !!! I was impressed as an insignificant element you can be performed marvels . It's gorgeous and seeing the finish could not imagine anything that any part of such a simple, single element . Thank you very much for sharing and let us learn to do something so nice .
very very good idea…thanksssssss
wowwww is really pretty!!!!
Thnaks by this really good post!
is very very good thanks by your post
is beautiful….really pretty!!!
Intentaremos hacer algo parecido a ver que nos sale….
Amazing how something so beautiful can be created with a slip of paper! Would someone please help me, I have not been able to find any info anywhere on how to determine what price to put on such intricate pieces of work. I want to take some to a craft sale I am going to but am a bit lost as to how to price them. I have looked on etsy, the price ranges there are pretty varied. Thanks.
Is a good and big idea thanks by your post….
Today when trying to find this site, I saw your snowflake posted in a Better Homes & Garden site
IS beautiful i like do for my daughter!!!
this christmas i will try do the same
Wonderful!!! as starting with a small roll of paper you can achieve something so spectacular !!!
it turned out gorgeously! you've got quite a skill.
Beautiful. It is wonderful that starting a module get something so precious. Congrats!!
Thanks for sharing.
Wow! Amazing post. Great idea. Thanks for sharing.
I am a jeweler and the complete process of making a jewelry whatever you have described here is just amazing.
Wow this is really beautiful. I think by using this method we can also create ear rings. If we can use corrugated paper we can create lot more designs. I really like the step by step method that is explained here. Very useful indeed.
The quilled snowflake ornament shared here on the page is so good. I really liked the design of the ornament and I will surely try to make this ornament for my girlfriend. Keep on sharing interesting ideas like this
NICE POST
In the case of artificial lighting, you can always install recessed lighting, or track lighting to achieve more illumination in a room during the
parts of the year when natural light is at a minimum.
Who doesn’t want to get the most they can out of their apartment home for the
money. Pepper Spray is to be mounted next to one is bedroom bed
where one sleeps in the event that someone enters into your personal space.
Loved your tutorial on the snowflake! Haven’t found one yet that will even come close to it – I’m a newbie to this beautiful craft, so am still in the learning stages.
As a fellow quiller, your snowflake is beautiful. I had never thought about using a spay adhesive on my snowflakes and then glitter. I've used the mod podge for paper, but like you stated, sometimes it does cause the rolls to unroll. Once again, Beautiful!
Oh my goodness! What s beautiful ornament! I use to do quilling in the 70’s!!! U inspired me so much!! I recently inherited an amazing woman’s crafts!! Guess what all it was? YES! Quilling supplies!! I am so anxious to get back to quilling! U r so inspirational & giving to share!! I do love money saving projects! It would be lovely to win the ornament!! Thank you for your amazing tutitoral! (& your time) Stay Calm & Quill On!
Blessings
Donna🌸
what is best glue to use
Thanks so much for the inspiration. I've always loved the look of quilling but never felt brave enough to try it. Thanks to this brilliant tutorial I can't wait to get started.
–Lynda R.
It could logically resemble deciding on a match inside a matchbox filled with matches.
In other words, rather than going on the single one-on-one date, why not try going
as a group. This is excellent as it permits you to have
a huge option to select from, and get this choice by stipulating certain criteria set by you.
Nice
wow.This is very trick.I am always search for this type of creativity.Thanks for sharing.
Great art keeps continuing.
hello
I love to quill and have been looking for different designs and step by step info.
Are there more books around, they are not easy to find.
will be OMA in October and would love to have a design for a birth announcement. can you help'
do you have any more designs to share.
thank you,
Creative genius
Colour is life Intrid
Great article, with a lot of good advice. Your blog is very informative.
Awesome Creativity. Thanks for sharing it.
Hello! I would just like to thank you for the excellent information contained in this post. I will be coming back to your site for more cool info soon. bestbatterypoweredleafblower
The snowflake is adorable, but I am most impressed with the clarity and organization of the tutorial. Well done!