The last part of our house left untouched was our backyard. It was seriously rough. Like, we had a jungle threatening to swallow our house.
See?
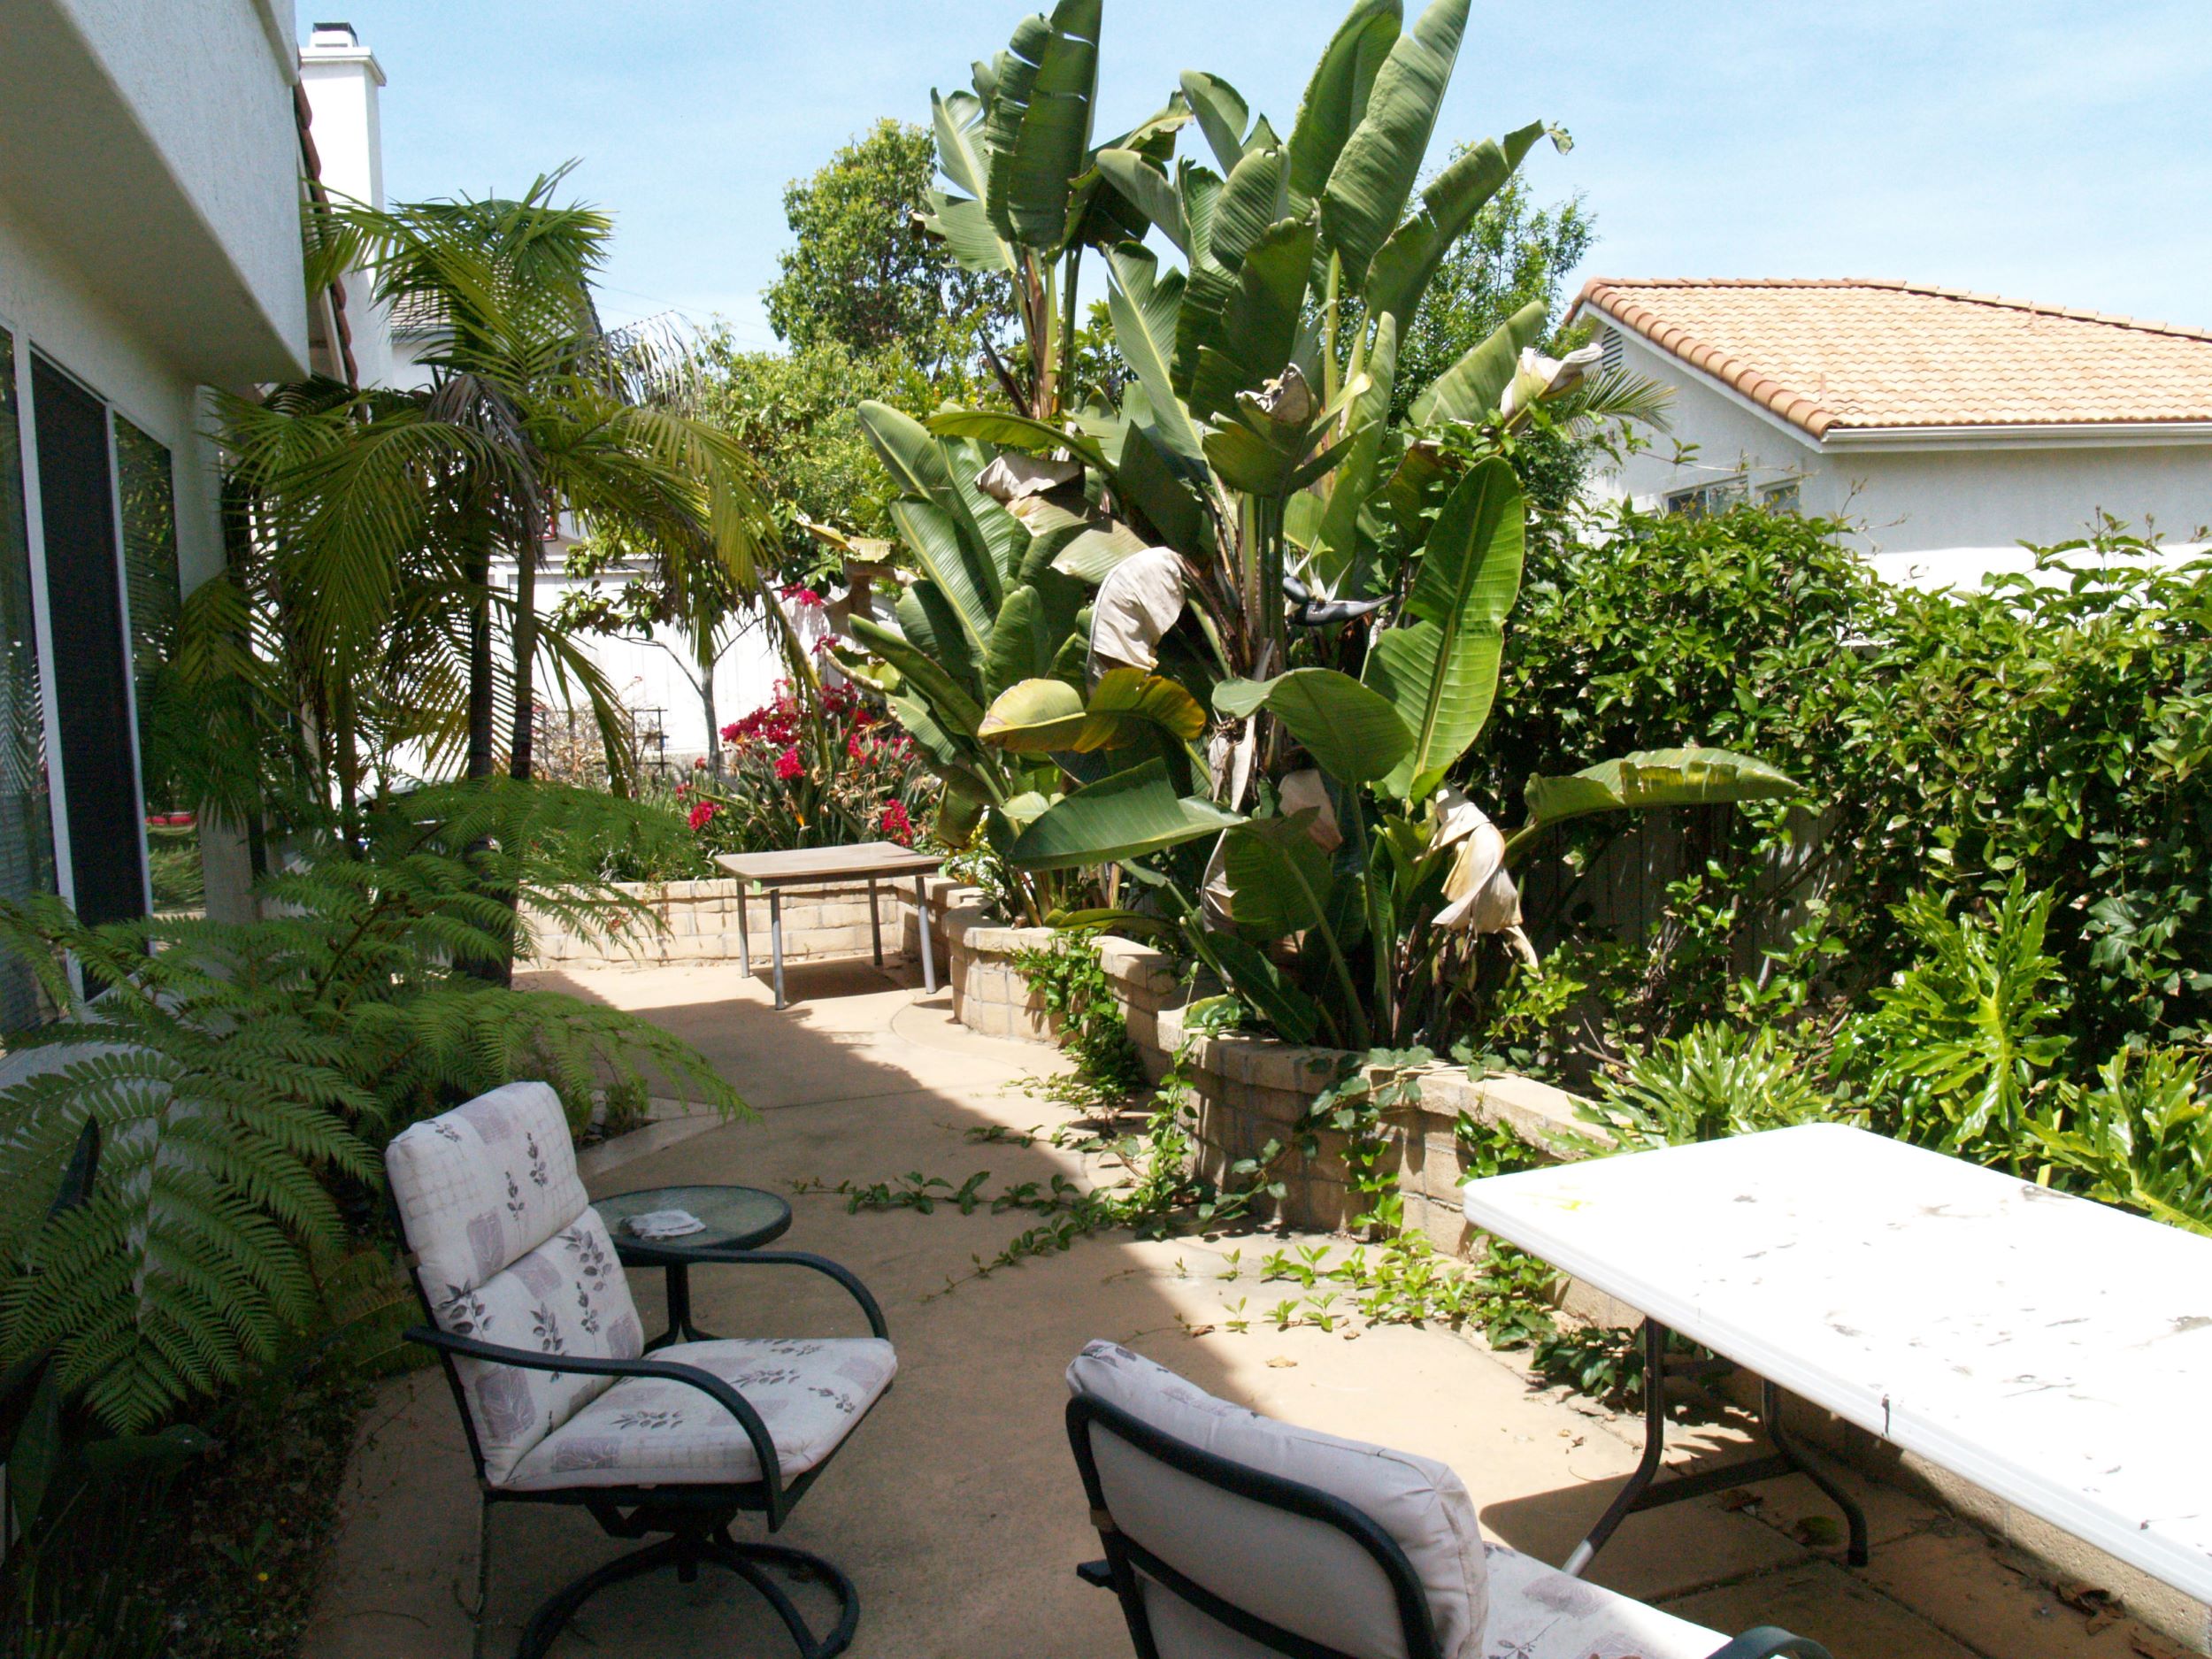
We’ve been slowly slowly slowly ripping out all this stuff. I’m sure the same person who picked out the monkey wallpaper and painted the jungle mural on the wall designed this backyard landscaping. I eventually want to rip out everything and put in fruit trees and a cutting garden.
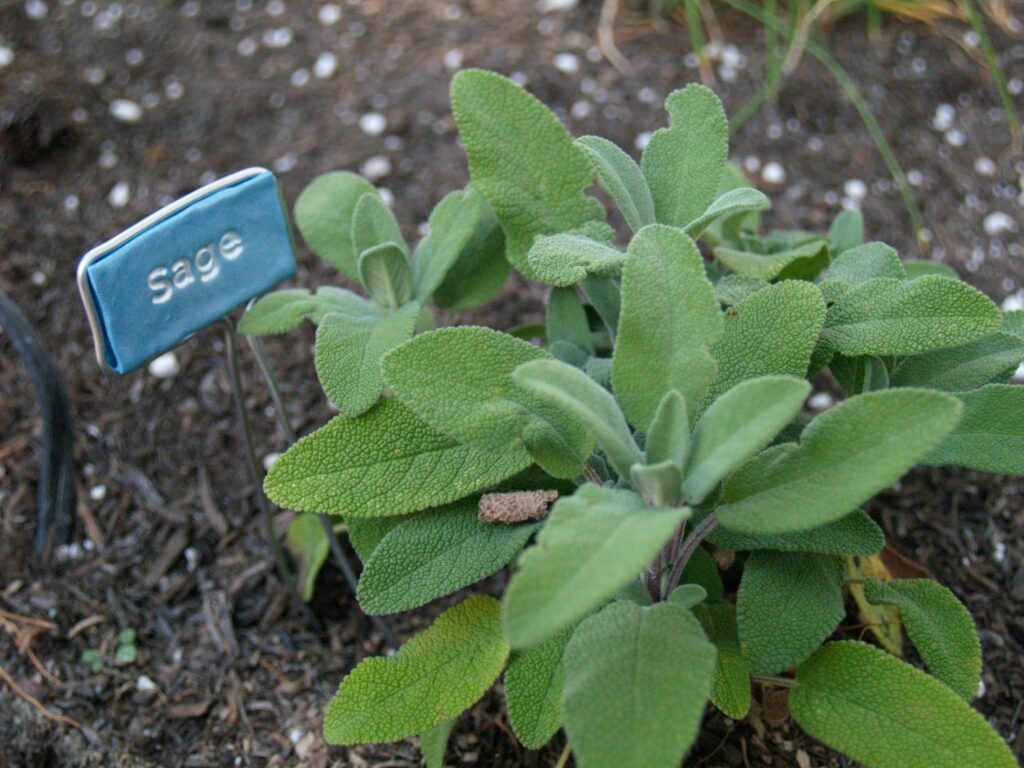
So far I’ve managed to rip out an enormous bush of spiky leaves that are ubiquitous around here. I don’t know exactly what kind of plant it is, but I hated it. The spot it left behind is just outside my kitchen door and the exact right size and spot for a kitchen herb garden. I found almost all of my favorite herbs at a nearby garden center (I still haven’t managed to find Bay) and set the whole thing up a few weeks ago. I’ve been thrilled with the results. I’ve been using the herbs in every meal I make, and everything is taking off like gangbusters. I had an early setback where I nearly killed my dill plant, but he started recovering once I figured out that I had planted him directly over the gas line and apparently plants don’t like that so much.
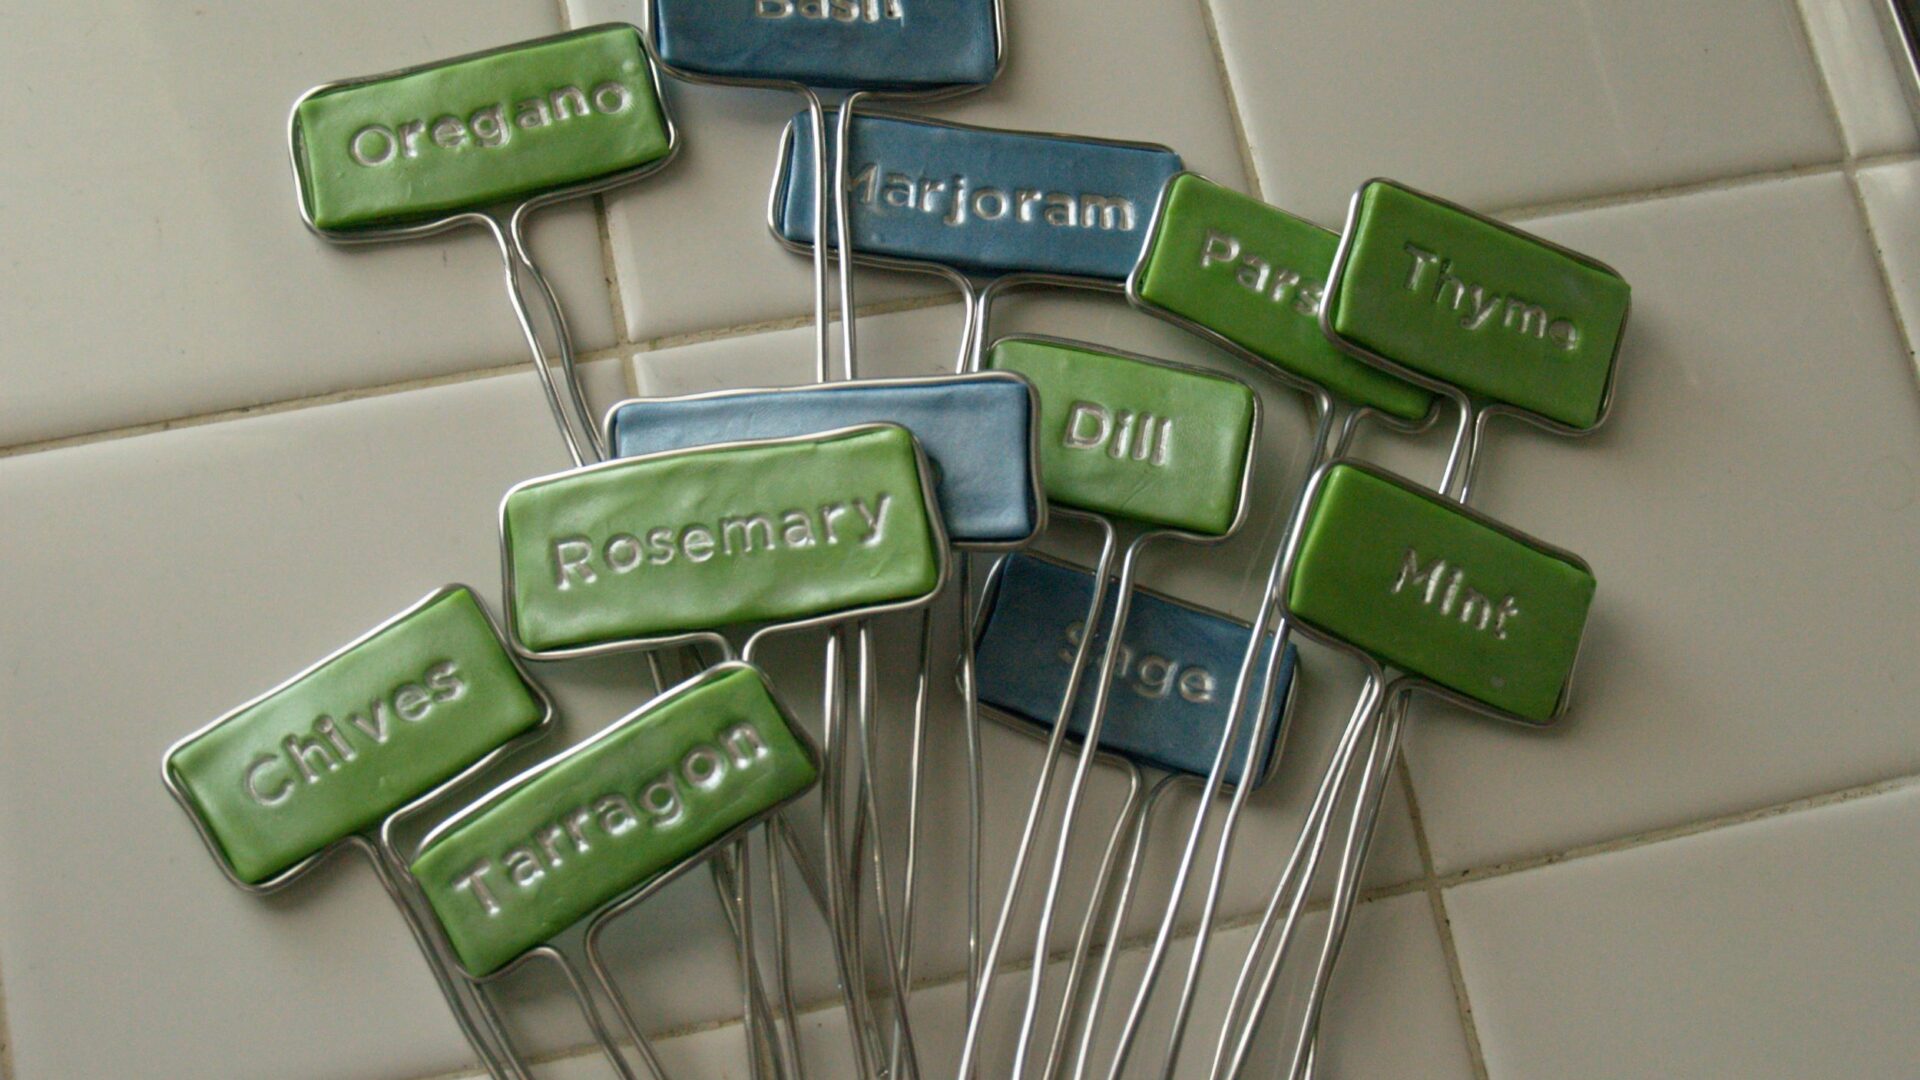
All that was left for my dream come true was some spiffy little herb markers so I could tell the difference between the cilantro and the parsley. Since it had to be weatherproof, I pulled out the polymer clay.
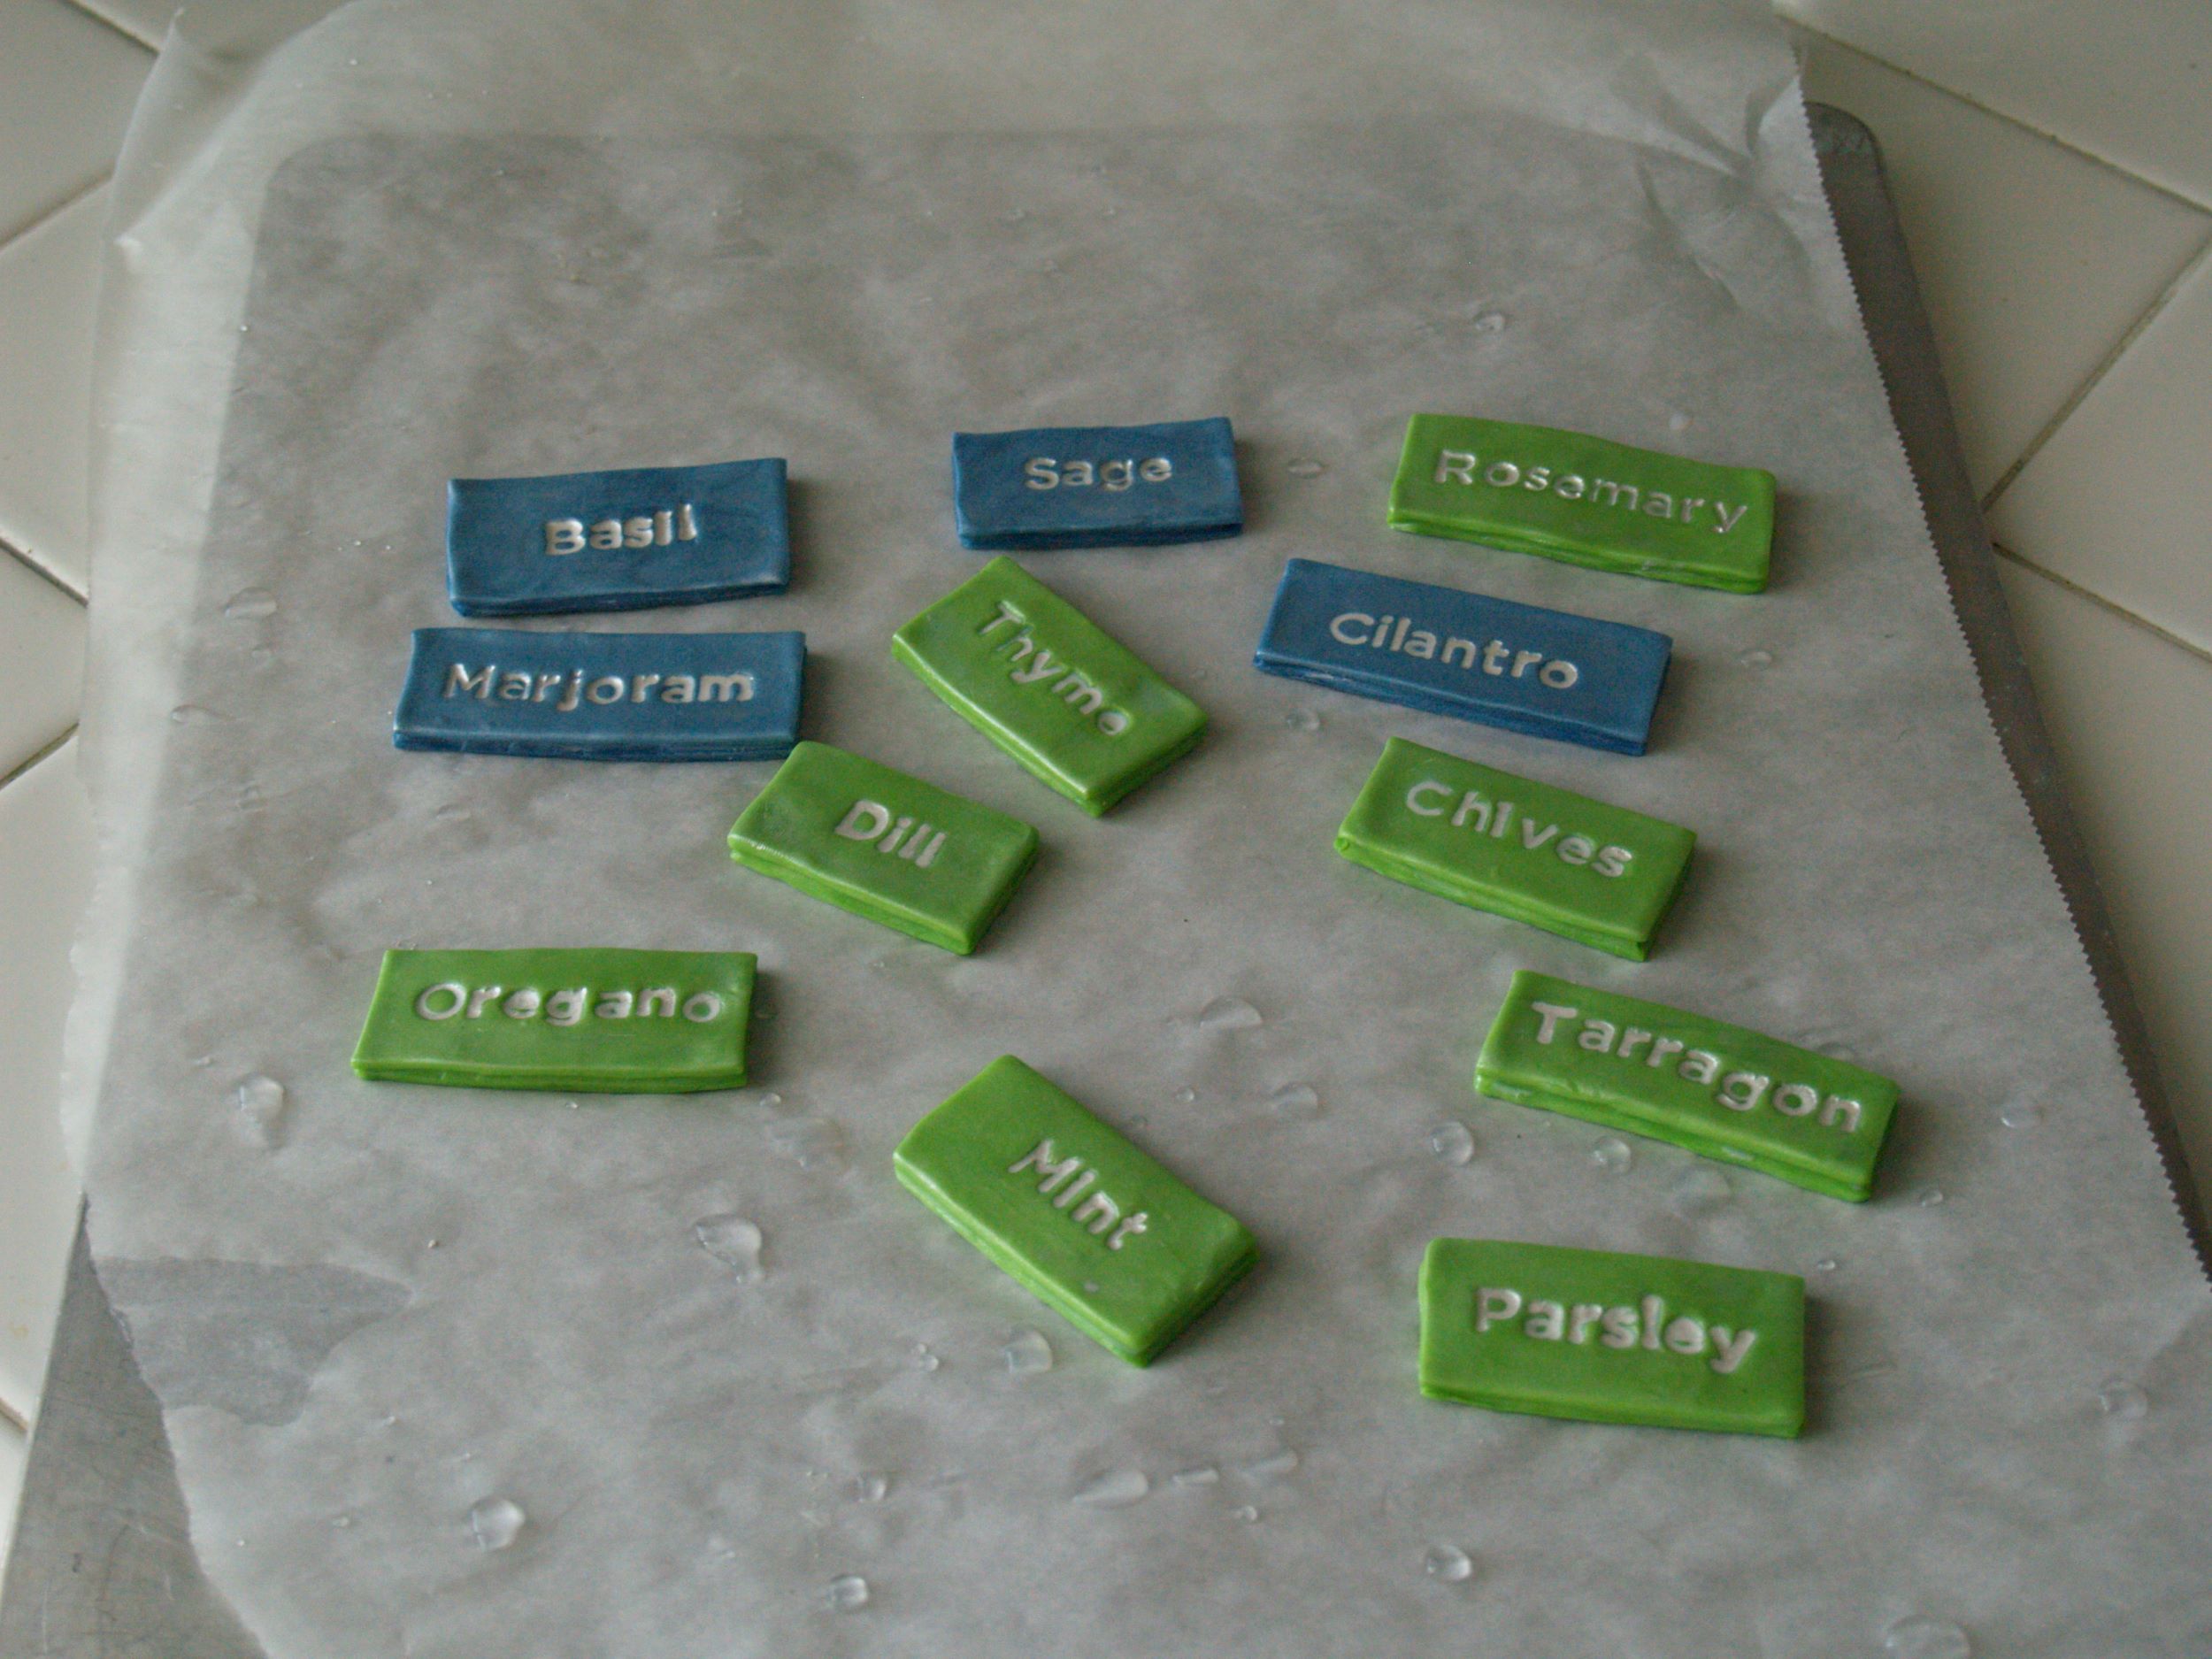
I just rolled out some rectangles big enough for the name of each herb, and used my new Martha Stewart stamps to create the names. I knew I wanted to use armature wire to poke them into the ground, so I pressed the wire up against the edge of the clay to make a little trough. Because I wanted to make them extra fancy, I dusted them with some pearly powders and then tossed them in the oven.
When the clay was baked and cool I took some acrylic paint and rubbed it into the letters, rinsing off any excess.
My initial plan was to glue the wire into the trough I made, but I soon discovered that wasn’t going to work. By the time I finished handling the clay my troughs were no longer perfect enough for the wire to fit snugly down inside it. Instead I used the troughs as a guide to bend the wire around and just let the tension hold it in place. That turned out to be all the adhesion it needed.
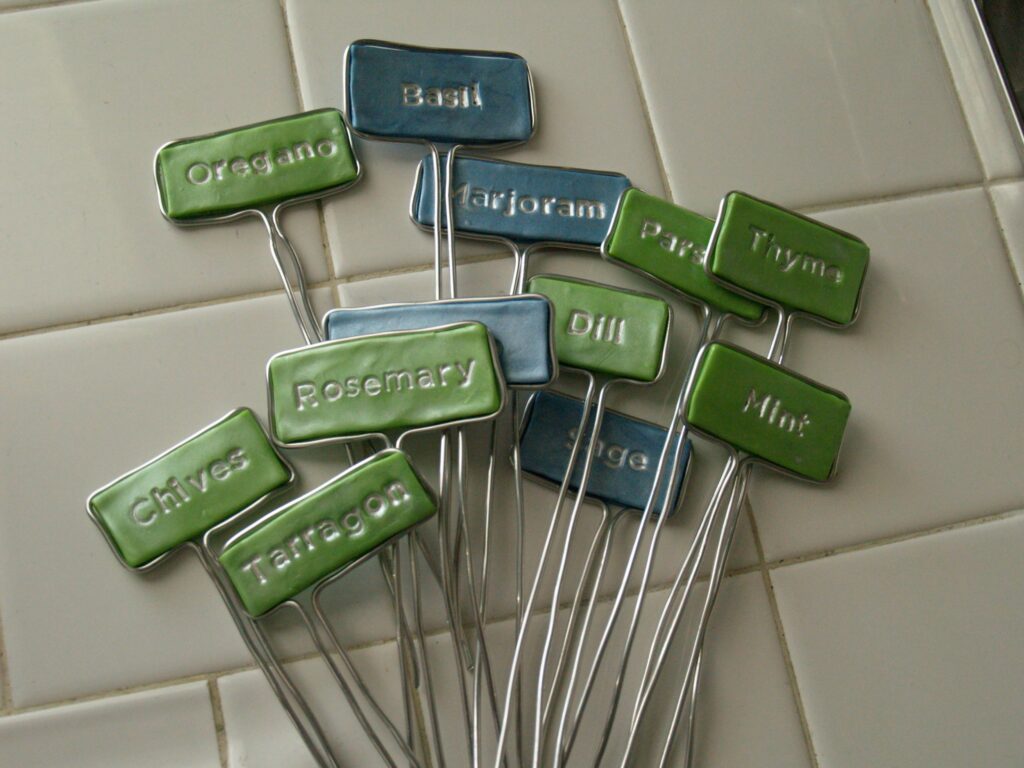
I didn’t worry too much about centering the tiles inside the wire. I wanted them to be a little off center so it would look more graphically interesting, and the clay is so light weight that there was no problem supporting it that way. Then I just poked the wires in the ground next to the right plant, and now I have my perfect herb garden.
Now I just need to work on eeeehhhhverything else.


Very cute!
I just found your blog through the link on sew mama sew for the quilled snowflakes–I am totally making those next year!! Anyway, wanted to say that I'm 99% sure bay is a tree, so you might have to wait a while on that! Love these markers!
Oo! I love it!
I've been wondering how to do a better job of keeping track of my heirloom veggies next summer. Thanks for the project! Now I just have to figure out where to buy armature wire. Do you know what gauge it is?
Those markers are great and would make a great gift for my Mom. The nice thing is that they can be made for a specific garden, and more or less in the language of your choice. (french for my Mom). Great project and wonderful colours you chose.
marvelous! Great project to get us ready for our garden next year – the kids will ADORE making these! ditto Mitzi – where do you get armature wire? Is it rust-proof? Oh -0 you could also poke a hole in them and hang them… heee – the IDEAS! Thank you!
Armature wire should be available anywhere that sells supplies for sculptures. Good fine art stores, Dick Blick, etc.I can't remember what gauge mine is, but Dick Blick's website has a good description of the size in inches, so I picked out one that sounded good, maybe 1/8"? I don't know if it's rustproof exactly, but after a full year in use here in San Diego they haven't rusted yet.
Reese, I was so thrilled when I found this post when I searched "Creative Garden Labels"…you came up first! I'm trying to figure out which stamp you used to get those wonderful letters…i didn't see anything like it on her site…since it was 4 years ago when you posted it, maybe you could describe what I should look for. Thanks much and i am soooo excited to try this.
I publish your tutorial in my blog, I love the markers. Thank you. 🙂
I love this idea! I'm SO going to make these for this year!
Bay often isn't sold as a herb, being so shrubby. So try looking for it as a decorative plant, or as a border shrub. When I lived in the south of france it always seemed odd to me to see bay hedges where i'd be more used to privet!
Awesome project! Very inspiring, thank you!
I love these markers, i might have to do something similar in my new garden! Thanks for the inspiration.
I LOVE these! Did you get the polymer clay with the pearl already in it? I've never used it before am I'm not sure what to order…Too cute!
ZOMG cute.I actually kind of dig the jungle, but I'm crazy that way. Your new (now also jungle-ish!) kitchen garden is vehry nice too.
I found your blog through a search for herb markers! What a great idea! I have a bay, mine is a bush and here in OH I bring it in during the winter months.
Can the clay be put in the ground or a pot as a steak? Would the clay fall apart? I have not worked with that play before but I'm willing to give it a try.
I featured your plant markers on my blog today: http://clayplaycafe.blogspot.com/
LOVE! Can you say a bit more about the stamps – are they ink stamps? How do you get the words to be in white? Do you dip them in white ink? Also, where can you get them? Thanks so much!
Love the post so cute. I'm going to use your sidebar list of ongoing projects to see if it will help me get mine finished. If I see them everyday I might get them finished!
Your herb garden name plates are exactly what I am looking for. Do you sell them….if so, where?
Thanks Didi! I don’t sell them, unfortunately, but they’re super easy. You could totally make them yourself!
What adorable tags! Thanks for the inspiration!
adorable
Chaobella
blog: http://www.chaobella.com
pinterest: http://www.pinterest.com/chaobella
etsy: http://www.etsy.com/shop/angelachaobella
twitter: http://www.twitter.com/angelachaobella
I LOVE these! I will be making some for our garden – what a great project to do with my son!! I am so happy I found your blog!
Just an FYI – a person on eBay is using your photo – however, their stakes are not as cute as yours! (if you search for auction #330885938988 – you will see them there).
Blog: http://www.mizzmo.com
Thank you MizzMo! Thanks for the kind words, and thanks especially for looking out for me! Dang people.
My goal would be to create compelling offers and strong calls to action
to optimize comes from the traffic I generate.
It also offers its unique feature: the Equestrian Center that is known as one from the
finest horse facilities inside the country. But if fancy hotels aren’t in your budget, you can always check out one with the many Las Vegas discount hotels.
You’ve made some good points there. I looked on the
internet to learn more about the issue and found most individuals will
go along with your views on this site.
Fantastic blog you have here but I was curious if
you knew of any discussion boards that cover the same topics discussed
in this article? I’d really love to be a part of community where I can get feedback from other knowledgeable individuals that share the same
interest. If you have any suggestions, please let
me know. Appreciate it!
Great website, really been scouting forever and a day for ideas on the perfect rattan furnishings for
our home and in our patio. This site really helpedgreat blog some
great info here
I'm going way back a few years when you posted on making the herb markers. I'm wondering at what temperature you baked the clay and how many minutes you baked them? I've never worked with clay, so this would be great information for making them. Thanks!
It depends on the brand of clay you use, they each have their own preferred methods. Just check the wrapper and that’s the best place to start!
nice