
One of the biggest adjustments for me in moving into this house was going from nasty crappy apartment carpeting to hardwood floors. There are so many things about having no carpeting that is just fantastic – especially to someone with OCD and three long-haired cats. I geek out on a regular basis about just how pretty the floors look, especially up against such vibrant paint colors.
They have proven a bear to keep clean though. I always thought it was a simple sweep and mop on a regular basis, but that never seemed to cut it. Even after we finished the majority of the construction and I was finally able to scrub the floors, it never lasted. We walked around with black gritty feet for the first six months we lived here. I used to go stand in the shower at least three times a day just to wash off my feet. I bought three different brooms and four different mopping solutions, and the problem was always the same. The floors looked gorgeous for a couple of hours, and then the first time anything touched it – a foot, a sweaty can of Coke, a kitty paw – a mark was left and all my work was ruined.
I finally found the solution after asking around, and this was recommended by some wood floor installer guys. It’s fantastic.
Before I found my long-term solution, I kept trying to find ways to make the life of my clean floors last a little longer, and since I never successfully managed to keep the cats from walking across whatever I just mopped, the best short-term solution was to use coasters to keep anything I could from touching the ground.
Here’s my little simple tutorial for you. If you’ve ever sewn at all these will probably be intuitive, but if you haven’t, this is a great place to start.
1. Cut your fabric pieces to size. You’ll need one square cut to 3″x3″ for the center, one square cut to 4″x4″ for the back, two short sides cut to 1″x3″, and two long sides cut to 1″x4″, along with some kind of batting cut to 3″x3″.

2. Sew the sides to the center piece. Start by sewing the short side pieces to the center piece across from each other and press open. Then sew the long pieces to the other two sides and press open.
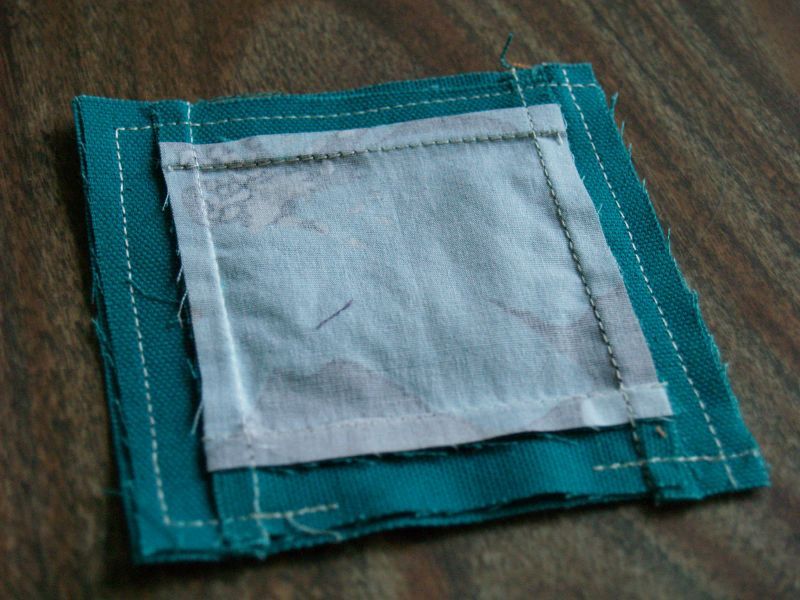
3. After you’ve pressed the front, lay the front of the coaster onto the back of the coaster, right sides together, and sew all the way around, leaving an inch or so open at the bottom.
4. Turn the coaster right side out through the hole you’ve left behind, and press. Stuff with your batting.

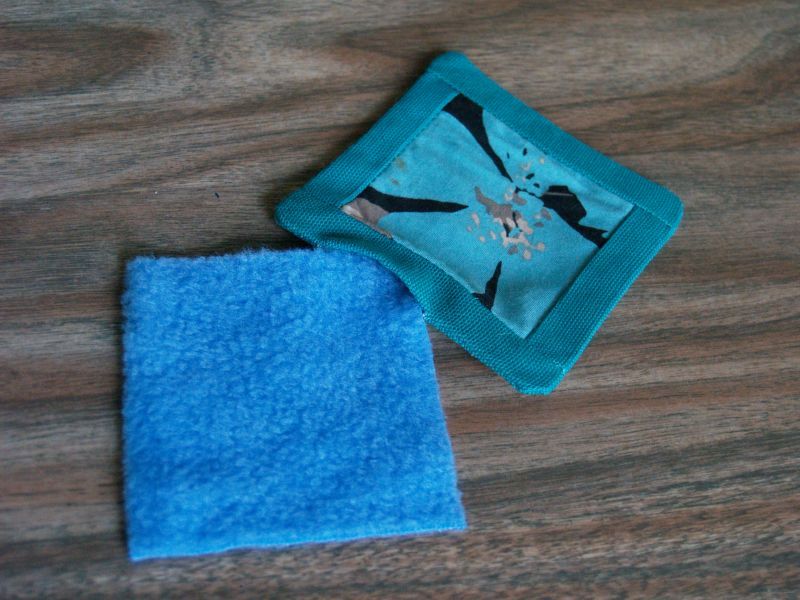
5. Sew around the outside of the coaster with a cute topstitch to close up your hole and to keep your batting in place. I also used a tiny stitch width to do an easy machine quilt around the flower pattern.
If you have a great memory, you might recognize these fabrics as left overs from an apron I made. The teal cotton was so heavy that it was impossible to get a crisp edge. If I had used a quilters weight cotton I probably could’ve made it look much less homesewn, but I was going for using up stash. For the stuffing I just used some fleece I had left over – again, using up stash. These coasters are not only ridiculously simple, but you can toss them right in the washing machine when they get nasty.

2 thoughts on “Worlds Most Basic Quilted Coasters”
Comments are closed.